
Let’s make Lemonade
This tutorial was
written by me Fairygem on the 21st August 2017 and is all my own
idea and creation. Any resemblance to another tutorial is purely coincidental
and not intended.
This tutorial comes in
2 parts and 2 tags one sexy and one cute.
For this tutorial you
will need:-
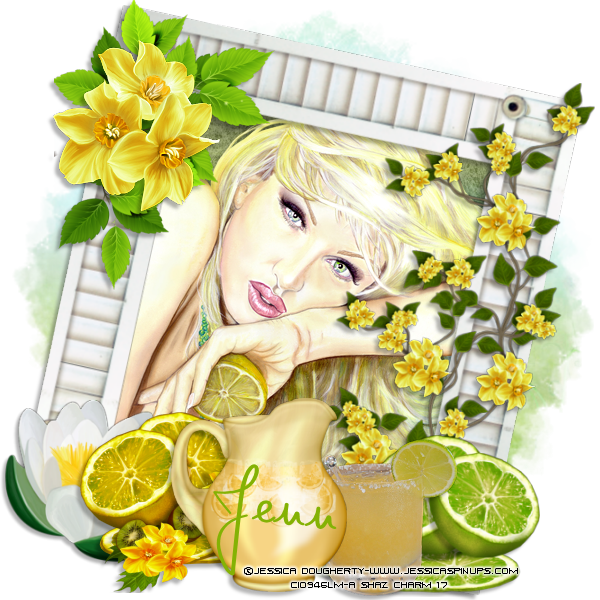
1st tag Tube
of Choice – I am using the gorgeous artwork of Jessica Dougherty called
Lemonice. I bought this tube when CILM was open but you can buy Jessica’s
artwork from CDO HERE.
2nd tag Tube
of Choice – I am using the cute artwork of Caron Vinson called Summers End. You
can buy Caron’s artwork at CDO HERE.
Scrapkit – I am using a
gorgeous fresh kit by Jenn at Ginnibug Designz called Lemon & Lime. You can
buy this kit at Hania’s Design HERE.
Mask of Choice – I am
using a lovely mask by Moonbeams and Spiderwebs. The mask is called MB and SW
Mask 93. You can download the mask HERE.
Font of Choice – I am
using 2 fonts, for the 1st tag I am using Monsieur Pomme. For the 2nd
tag I am using Janda Celebration Script. You can google to get these fonts.
Lets begin with Tag 1.
1.
Open
new image 600x600.
2.
Open
Paper 2, resize by 75%. Copy and paste as a new layer. Layers Load Mask and
find MB and SW Mask 93. Delete mask layer and merge group.
3.
Open
Frame 1, resize by 80%. Copy and paste as a new layer. Image rotate and rotate
by 12 right. Make sure all layers are unchecked.
4.
Take
your magic wand and click inside the frame, modify expand by 7. Open Paper 3,
resize by 60%. Copy and paste as a new layer moving paper to which part you
want showing through the frame. Invert and Delete. Do Not Select
5.
Open
your tube, Copy and paste as a new layer moving tube to what part you want
showing. Once happy hit delete. Selections None.
6.
Move
paper and tube under frame layer and give frame and tube drop shadow of V4 H-4,
30, 4.63 Black. This drop shadow will be used throughout the tutorials.
7.
Open
Element 7, resize by 25%. Copy and Paste as a new layer moving over to the
left. Sharpen and D/s.
8.
Open
Element 17, resize by 70%. Copy and paste as a new layer moving over to the
right side of the frame. Sharpen and D/s.
9.
Open
Element 28, resize by 35%. Copy and paste as a new layer, mirror and move
slightly left. D/s
10.
Open
Element 30, resize by 40%. Copy and paste as a new layer moving right. D/s
11.
Open
Element 40, resize by 45%. Copy and paste as a new layer moving in between
Lemon and Lime elements. Sharpen and D/s
12.
Open
Element 12, resize by 35%. Mirror then copy and paste as a new layer moving
next to glass. Sharpen and D/s
13.
Open
Element 5, resize by 55%. Copy and paste as a new layer moving to top left hand
side of frame. With eraser tool erase the stalk from the branch.
14.
Open
Element 37, resize by 30%. Copy and paste as a new layer moving up to the
leaves. Sharpen and D/s
15.
Add
copyright and license details then add name using font with colour #84b204.
Save as Png.
Ok now for Tag 2
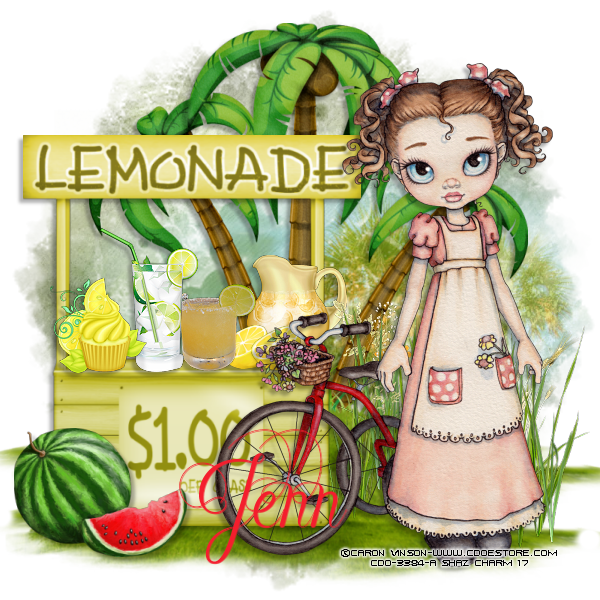
1.
Open
new image 600x600.
2. Open Paper 3, resize by
75%. Copy and Paste as a new layer. Load your mask previously used. Delete mask
and merge group.
3. Open Element 31, resize
by 75%. Copy and paste as a new layer moving slightly up. Sharpen then D/s.
4. Open Element 26, resize
by 90%. Copy and Paste as a new layer moving slightly down. Duplicate and
resize by 95% and move down below other grass.
5. Open Element 20, resize
by 65%. Copy and paste as a new layer moving over to the left.
6. Open Element 12, resize
45% then 55%. Copy and paste as a new layer placing on the lemonade stand.
Sharpen and D/s
7. Open Element 9, resize
by 45% x2. Copy and paste as a new layer moving in front of the jug. Duplicate
and move slightly right. Merge down and D/s.
8.
Open
Element 40, resize by 25%. Copy and paste as a new layer moving over to left
side of stand. Sharpen and D/s
9.
Open
Element 29, resize by 25%. Copy and paste as a new layer moving over to far
left side of stand. Sharpen and D/s
10.
Open
Element 36, resize by 25% then 65%. Copy and paste as a new layer moving over
to left side of stand. Sharpen and D/s
11.
Open
Element 21, resize by 65%. Copy and paste as a new layer moving over to right
side. Sharpen.
12.
Open
Element 14, Resize by 45% then 75%. Mirror then copy and paste as a new layer moving
down and left. D/s
13.
Open
your tube and if using the same as me resize by 90%. Copy and paste as a new
layer moving to right side. D/s
14.
Add
copyright and license details then add name using colour #f41e2d.
Save as a Png
That’s it we are done.
I hope you enjoyed both
Tutorials and found them easy to follow. Remember though these are just a
guideline put your own special touches to your creations.
Any questions or queries
don’t hesitate to ask.
Hugs
No comments:
Post a Comment