
Vintage Elizabeth

This tutorial was written by me Fairygem on the 17th August 2017 and is all my own idea and creation. Any resemblance to other tutorials is purely coincidental and not intended.
You will need to have a working knowledge of Paint Shop Pro and working in layers.
For this tutorial you will need:-
Paint Shop Pro – I am using X5 but any version will work.
Tube of Choice – I am using the awesome artwork of Verymany. The tube is called Mary Elizabeth and you can buy her HERE. Remember you need to have a proper license to use Verymany’s artwork.
Scrapkit – I am using a wonderfully beautiful kit by Jenn at Ginnibug Designz called Vintage Elizabeth. You can buy this kit at Hania’s Design HERE or Picsfordesign HERE.
Jenn sells her beautiful kits under the name LapisGin.
Mask of Choice – I am using a beautiful mask by Savage at Rednecktuts. Savage_Mask16_2011. You can get this HERE.
Font of Choice – I am using a font called Youth and Beauty. This is a free font and you can get it HERE.
Plugins:-
Xero – Soft Mood
Lets Begin
1. Open New Image 600x600
2. Open Paper 5, Resize by 85% x2. Copy and Paste as a new layer. Load Mask, delete and merge group.
3. Open Element 5, Copy and Paste as a new layer moving over to the left. Sharpen and give dropshadow V2, H3, Opa 35 Blur 8.35 Black.
4. Open Element 14, Resize by 80% and mirror. Copy and Paste as a new layer moving over to the right. Sharpen and D/s as above.
5. Open Element 50, Resize by 45%. Copy and Paste as a new layer moving to the left. Sharpen and D/s as above.
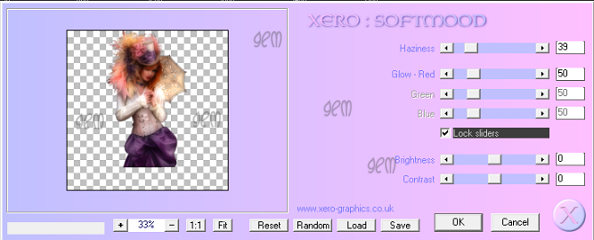
6. Open your tube and if using the same as me resize by 50% then 70%. Copy and Paste as a new layer. Duplicate and on original Plugins Xero Soft Mood with settings below. On Copy change blend mode to Screen and Opacity to 75. D/s as above.
7. With your freehand selection tool draw point to point a square on the bottom half of the skirt on the tube. Delete then delete on the original too. Selections None.
8. Open Element 53, Resize by 65% x2. Copy and Paste as a new layer moving down and right. Sharpen then D/s as above.
9. Open Element 13, Resize by 40% then 65%. Copy and Paste as a new layer moving down and right. Sharpen then D/s as above.
10. Open Element 30, Resize by 40%. Copy and Paste as a new layer moving to the left. Sharpen then D/s as above.
11. Open Element 39, Resize by 65% then 80%. Copy and Paste as a new layer moving to the left. Sharpen and D/s as above.
12. Open Element 25, Resize by 40% then 65%. Copy and paste as a new layer moving down to the left. Sharpen and D/s as above.
13. Open Element 21, Resize by 35%. Copy and Paste as a new layer. Image rotate free rotate and rotate by 17 left. Sharpen and D/s as above.
14. Open Element 43, Resize by 20%. Copy and paste as a new layer moving to left. Sharpen and D/s as above.
15. Open Element 71, Resize by 35%. Copy and Paste as a new layer moving down and right. Sharpen and D/s as above.
16. Open Element 31, Resize by 50%. Copy and paste as a new layer moving down and right. Sharpen and D/s as above.
17. Open Element 34, Resize by 35% then 65%. Copy and paste as a new layer moving over to the right so that its sitting on the top of the fan. Sharpen and D/s as above.
18. Add your copyright and license details and resize if you wish to.
19. Add your name using font and colour #25132b and size 72.
Save as a png
That’s it we are done, hope you found this easy to follow. If you have any questions or queries don’t hesitate to ask. Remember though this is only a guideline make the tag yours with your own special touches.
Hugs
No comments:
Post a Comment