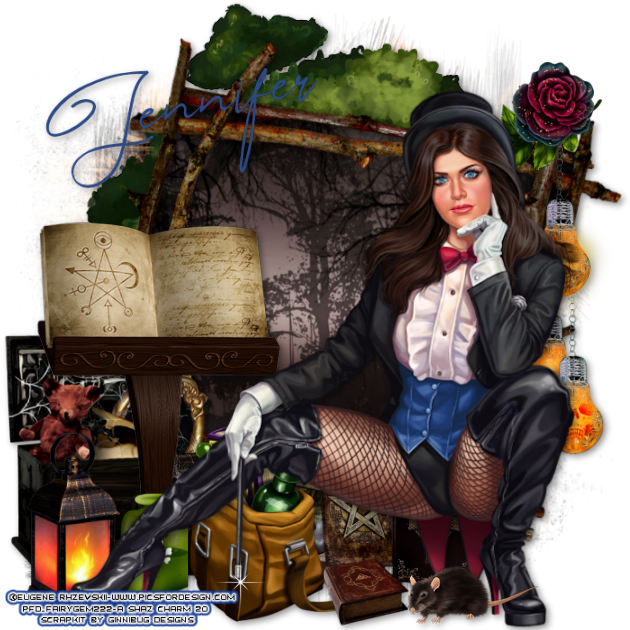
Pages

Monday 5 April 2021

Beautiful Kit by Ginnibug Designz - The Traveler

 The Traveler


This beautiful kit is by Jennifer at Ginnibug Designz.

You can buy this kit at All That Glitterz Store - HERE

The kit itself is full of so much scope as you can see by my two very different tags.

There are 94 Elements

6 Frames

10 Papers and

1 Wordart.

My two tags are using the wonderful artwork of Lorri Kajenna which you can buy at Picsfordesign - HERE


Stay safe everyone
Hugs
ForeverShaz/Gem


Friday 15 May 2020

PTU Stay Safe - Keep Well PTU

PTU  Stay Safe Keep Well  PTU

jenniferstaysafe

As we go into another 3 weeks of Lockdown during this Covid 19 Virus, I wanted to share this tutorial with the most important message to all My family and friends and those that visit my blog.
I hope and pray that we all stay safe and keep well and our governments finally find a cure for this virus.
Please please stay safe everyone.

So this tutorial was written by me Shaz/fairygem on the 15th May 2020 and is all my own idea and creation. Any resemblance to other tutorials is purely coincidental and not intended.

For this tutorial you will need:-

Scrapkit - I am using a new kit by Jennifer at Ginnibug Designs called Hello Spring. This wonderful kit comes full of the beauty of spring. You can buy this kit at Picsfordesign under the name LapisGin - HERE
Tube of Choice - I am using a beautifully cute tube by Laguna called My Furry Doctor - You can buy this tube at Picsfordesign - HERE
Mask of Choice - I am using Mask 157 by Insatible Dreams. Sadly Cats site is no longer available so if you don't have the mask use one that is similar to it.
Font of Choice - I used Dayland for the Wordart HERE and Alista Script for the Name HERE
Wordart by Me - Right click and save as
Pink:-
Wordart-staysafe-Gem20a
Gold:-
Wordart-staysafe-Gem20
Lets Begin:-

1. New Image 700x700
2. Open Paper 3, Resize by 90%. Copy and paste as a New Layer.
3. Layers Load Mask and find the mask you wish to use. Delete mask Layer and merge group.
4. Open Element 43. Copy and Paste moving slightly up. Dropshadow V3 H3 Opa 45 Blur 11.22 Black. This dropshadow will be used throughout the tutorial.
5. Open Element 13, Resize by 75%. Copy and paste moving slightly up. D/S
6. Open Element 3, Resize by 75%. Copy and paste moving far right. D/S
7. Open Element 12, Resize by 85%. Copy and paste moving far left. D/S
8. Open tube and if using the same as me open all layers you wish to use. Resize by 40%. Copy and paste moving slightly right. D/S
9. Open Element 52, Resize by 85%. Copy and paste moving down and left. D/S
10. Open Element 69, Resize by 65% then 85%. Copy and paste moving down and right. D/S
11. Open my wordart. Choose which colour you wish to use, I used the Pink one. Copy and paste moving down to the bottom of tube. D/S
12. Using Alista script and colour #c6044c and add your name. I gave mine a slight gradient glow aswell. Add D/S
Save as a PNG

Thats it short and sweet. Hope you found the tutorial easy to follow. Remember though this is just a guideline, make the tag your own and add any other elements you wish to use.
Any questions or queries just ask.
Hugs
fairysignature

Saturday 4 April 2020

PTU Magic Gretel PTU

Magic Gretel


This tutorial was written by me Shaz/fairygem on the 4th April 2020 and is all my own idea and creation. Any resemblance to other tutorials is purely coincidental and not intended. You will need to have a working knowledge of Paint Shop Pro for this tutorial.

You will need:-
Paint Shop Pro - I am using X5 but any version will work.
Scrapkit - I am using a new beautiful kit by Jennifer at Ginnibug Design called Gretel Punk. This kit has 78 Elements, 6 Frames, 2 Masks, 8 Papers, 3 Clusters and 1 tube. You can buy this kit at Picsfordesign under the name LapisGin Here
Tube of choice - I am using a beautiful tube by Eugene Rzhevskii called Magician Girl at Picsfordesign. This tube is in the Exclusive club so you need to have the proper license to use it. You can get the tube Here
Mask of choice - I used Mask 1 from Jenns Kit.
Font of choice - I am using Angers Script which you can download Here
No outside plugins were used.

Lets begin:-

1. Open New image 700 x 700 transparent checked.
2. Open Mask 1 from the kit. Copy and Paste as a new layer. Resize by 105% make sure all layers are unchecked.
3. Open Element 9. Copy and paste moving slightly up. Dropshadow V3 H3 Opa 45 Blur 11.22 black. This is the dropshadow for the whole tutorial unless otherwise stated.
4. Open Frame 5. Copy and paste as a new layer. Image free rotate 12 right. 
5. Make your freehand tool active, Point to point and draw around the outer branches of the frame. Right click to get your marching ants.
6. Open Paper 4, resize by 80%. Copy and paste moving the paper to what you wish to show. Invert and delete the overhanging. Selections None. On the layer palette move paper under the frame then give frame Dropshadow as above.
7. Open Element 16, resize by 65%. Copy and paste moving down and far left. d/s as above
8. Open Element 21, resize by 65%. Copy and paste placing in front of Element 16. d/s as above.
9. Open Element 17, resize by 60%. Copy and paste moving to top right of frame. d/s as above.
10. Open Element 60, resize by 25% and mirror. Copy and paste moving to top right side of frame. d/s as above
11. Open Element 62, resize by 30%. Copy and paste moving down and left. d/s as above.
12. Open Element 71, resize by 60%. Copy and paste moving down and left. d/s
13. Open Element 15, resize by 35%. Copy and paste moving down and slightly left. d/s
14. Open Element 25, resize by 35%. Copy and paste moving down and slightly right. d/s
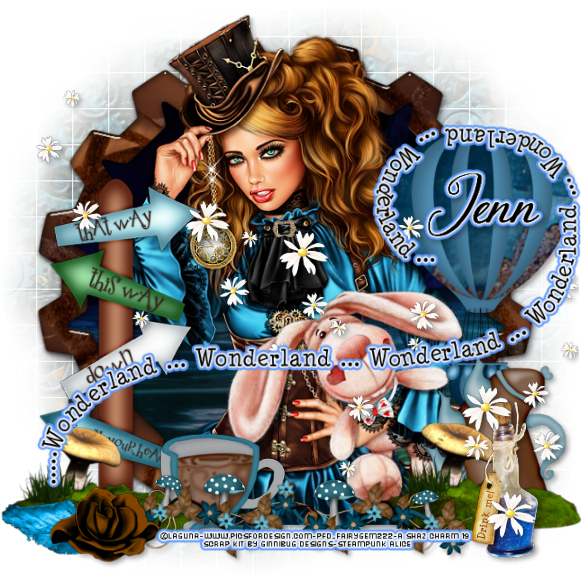
15. Open your tube and Copy and paste. Resize by 55% and move to the bottom of your image (see mine for placement). d/s
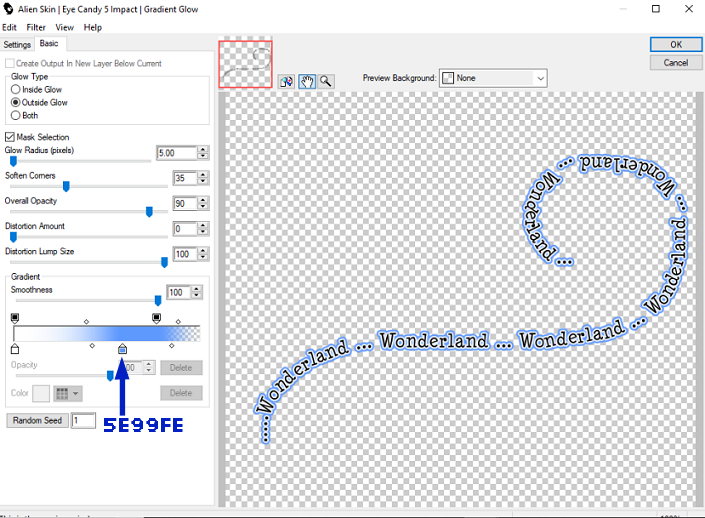
16. Add a new Raster layer. Click on brushes and find a single sparkle brush (deviantart has some lovely brushes). Change your colour palette foreground to white #ffffff. With your brush place at the end of the wand and left click about 3 times to make the sparkle stand out.
17. Open Element 36, resize by 20%. Copy and paste moving to under the tubes legs. d/s
18. Add name using #2b4a87. d.s
19. Add the relevant copyright and license details to the tag.
Save as a png.

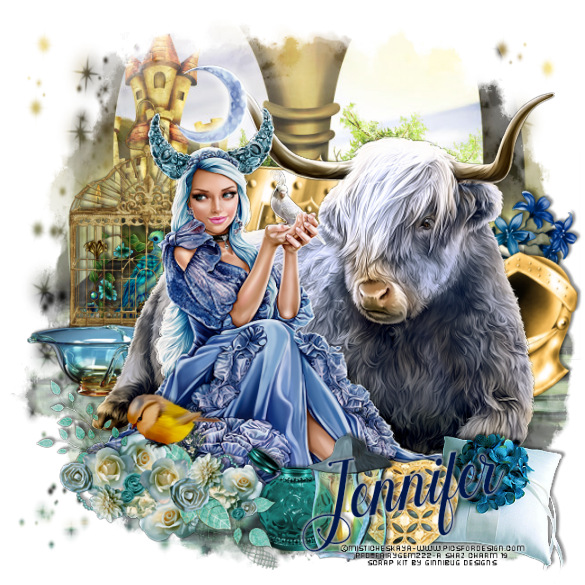
I also did a tag using Cluster 1, the tube from the kit and some of the Elements.

Remember this tag is yours to make your own. Add any other elements you see fit. I hope you enjoyed my tutorial and found it easy to follow. Any questions please don't hesitate to ask.

Hugs
fairysignature

Wednesday 19 June 2019

PTU Your Moojesty PTU

Your Moojesty
jennifermoojesty/
This tutorial was written by me Shaz/fairygem on the 19th June 2019 and is all my own idea and creation. Any resemblance to other tutorials is purely coincidental and not intended. For this tutorial you will need to have a working knowledge of Paint Shop Pro.

You will need:-
Paint Shop Pro program - I am using X5 but any version will work.
Scrap kit of choice - I am using a wonderful kit by Jennifer at Ginnibug Designs called Your Majesty. This kit has 120 Elements 12 Frames and 24 Papers. You can buy this kit at Picsfordesign.com under the name LapisGin. Here
Tube of Choice - I am using a wonderful tube by Misticheskaya called Nelly. This tube is from the Exclusive club at Picsfordesign so you need to have the license to use this tube.
You can buy it Here
Mask of choice - I am using Mask 89 by Sophistocat Simone. You can find this mask on her blog Scrappy bit of Fun Here
Font of choice - I am using a font called Chalisa Octavia. You can download this font from Here.

 Lets begin

1. Open new Image 650x650 transparent.
2. Open Paper 11 from the kit. Copy and Paste as new layer. Layers load mask 89. Delete Mask layer and merge group.
3. Open Element 2. Resize by 55%. Copy and Paste moving left. Drop shadow V-2 H3 Opa 45 and Blur 3.43.
4. Open Element 82. Resize by 50% then 80%. Copy and Paste moving to the front of the cage. Erase any over hanging. On layer palette move below cage layer. Sharpen and Drop shadow.
5. Open Element 19. Resize by 55% then 80%. Mirror then Copy and Paste moving right. Sharpen and Drop shadow.
6. Open Element 30. Resize by 65% x 2. Copy and paste moving slightly up. Image free rotate by 12% right.
7. Open Element 23. Resize by 45% then 80%. Copy and paste moving far left. Sharpen and drop shadow.
8. Open Element 50. Resize by 45% then 75%. Copy and paste moving far right.
9. Open tube and find what colours you would like to use. Copy merged and paste as a new layer. Resize by 35% then 90%. Mirror, position where you want. Sharpen and drop shadow.
10. Open Element 31. Resize by 30% then 70%. Copy and paste moving down and slightly left. Sharpen and Drop shadow.
11. Open Element 34. Resize by 60%. Copy and paste moving down and far left. Sharpen and drop shadow.
12. Open Element 43. Resize by 40% then 75%. Copy and paste moving down and far right. Sharpen and drop shadow.
13. Open Element 47. Resize by 45% then 65%. Copy and paste moving down and slightly right. Sharpen and drop shadow.
14. Open Element 54. Resize by 35% then 70%. Copy and paste moving down. Sharpen and drop shadow.
15. Open Element 53. Resize by 30% then 80%. Copy and paste placing on top of the flowers. Sharpen and drop shadow.
16. Add your copyright and license details using a pixel font.
17. Add your name using Chalisa Octavia and colour #00174a. Give a slight gradient glow and drop shadow.
Save as a png.

That's it we are done. I hope you found this tutorial easy to follow. Any questions don't hesitate to ask.
Hugs
Shaz/Gem

Sunday 19 May 2019

Cupcake Queen Set

Cupcake Queen Forum Set

I made this set using my template, the wonderful designer Jenn from Ginnibug Designs and the art of Alehandra Vanhek.
This wonderful kit Cupcake Cutie is full of 85 wonderfully cute elements and 24 colourful papers. 
You can buy this kit at Pics for Design Here under the name LapisGin.
cupcakequeenav
cupcakequeenfs
cupcakequeentag
Hugs
Shaz/Gem

Wednesday 15 May 2019

Cupcake Queen Template

Cupcake Queen Template Set
I have a beautiful kit and tube with a cupcake theme and hunted everywhere online for a template and couldn't find any so decided to make a set myself. I will be using it in a tutorial using Jenn's wonderful kit and Alehandra Vanhek's wonderful tube but thought i would share the template set just incase anyone else goes a hunting.

Here is a preview of the Set
cupcake template3
cupcake template 2
cupcake template 1


You can download here at Box

The templates are saved in Psp and Psd so can be used in both programs.
Have fun and please respect my TOU
Hugs
Shaz/Gem

Tuesday 14 May 2019

PTU Steampunk Alice PTU

Steampunk Alice
jennsteampunkalice
This tutorial was written by me Shaz/Gem on the 13th May 2019 and is all my own idea and creation. Any resemblance to other tutorials is purely coincidental and not intended. For this tutorial you will need to have a working knowledge of Paint Shop Pro. 

You will need:-
Paint Shop Pro - I am using X5 but any version will work.
Scrap kit - I am using an awesome kit by Jennifer at Ginnibug Designs called Steampunk Alice. You can buy this kit at Picsfordesign under the name LapisGin. HERE
Tube of choice - I am using a beautiful tube by Laguna called Steampunk Alice with Rabbit. You can buy the tube HERE
Mask of choice - I am using a wonderful mask by Designs by Vaybs Mask 72. Download HERE
Font of choice - I am using Allana-Regular which you can download HERE
Plugins:-
Eye Candy Impact - Glass
Eye Candy Impact - Gradient Glow

Lets Begin:-

1. Open new image 650 x 650 Transparent
2. Open Paper 9. Copy and Paste as a new layer. Layers load mask and load DBV_Mask 72, delete and Merge group.
3. Open Paper 14. Go to Colour palette foreground and click on pattern. Find the image of paper 35% Angle Size 100. Go to Preset Shapes and find Gear 5, width 30. Close fill and draw a circle (see mine for reference). Once happy with the size and placement convert to layer.
4. With your magic wand click inside frame, selections modify Expand by 7.
5. Open Paper 3 and Resize by 75% then 90%. Copy and paste as a new layer and move the paper where you would like. Invert Delete. Selections none. Move below frame layer.
6. Make frame layer active. Plugins Eye candy impact Glass with the settings below. Drop shadow V3, H3, Opacity 35 Blur 7.63 Black.
steampunkaliceglasssettings1
steampunkaliceglasssettings2

7. Open Tube, Copy and paste as a new layer. Resize by 35% then 80%. Move to where you would like it placed. Drop shadow as above.
8.Open Element 55. Resize by 40%. Copy and paste moving to the left. Sharpen and drop shadow.
9. Open Element 49. Resize by 40%. Copy and paste moving down and left. Drop shadow.
10. Open Element 77. Resize by 55%. Copy and paste moving up and right. Drop shadow.
11. Open Element 66. Resize by 35% then 70%. Copy and paste moving slightly up and right. Drop shadow.
12. Make layer 6 active on your palette. Right click and duplicate, move to the right side of canvas. On layer palette bring to top.
13. Open Element 68. Resize by 25% then 80%. Copy and paste move slightly left. Sharpen and Drop shadow.
14. Open Element 78. Resize 30%. Copy and paste moving right and down. Sharpen and Drop shadow.
15. Open Element 69. Resize by 65%. Copy and paste moving down. Sharpen and Drop shadow.
16. Open Element 12. Resize by 30% then 75%. Copy and paste moving left and down. Drop shadow.
17. Open Element 25. Resize by 30%. Copy and paste moving left and down. Drop shadow.
18. Open Element 43. Copy and paste moving slightly left. Sharpen and Drop shadow.
19. Open Element 9. Copy and paste moving slightly down. Eye candy Gradient glow settings below. Drop Shadow.
steampunkalicegradientglowsettings

20. Add your name using Allana Regular font and colour Black then add the same gradient glow.
21. Add your copyright and License details and save as a PNG

That's it we are done. 
I hope that you managed to follow the tutorial without any problems and enjoyed it at the same time.
Any questions or queries please don't hesitate to ask.
Hugs 
Shaz