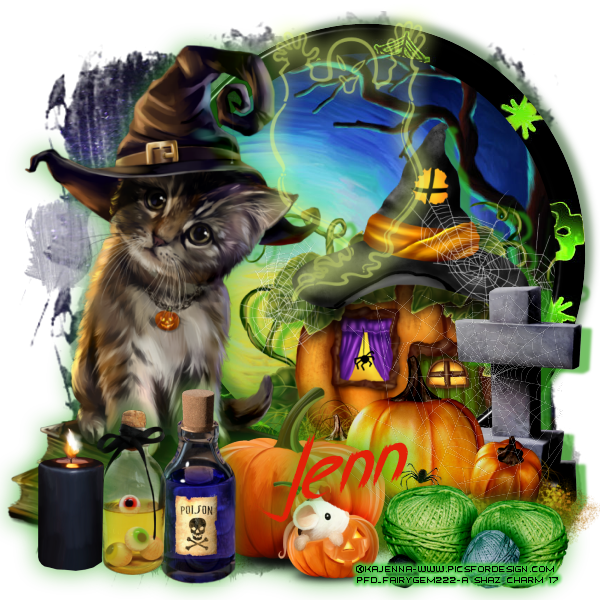
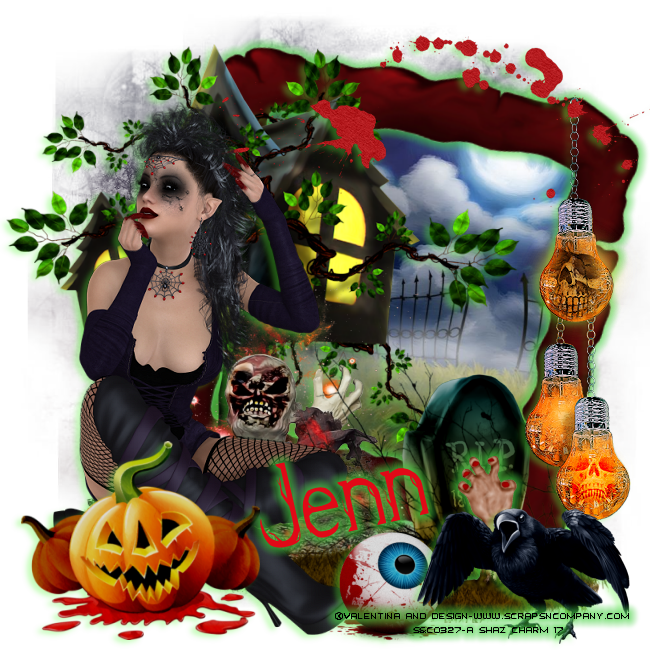
I Put a Spell on You
This tutorial was written by me Fairygem/Sharon on the 30th
October 2017 and is all my own idea and creation. Any resemblance to other
tutorials is purely coincidental and not intended. You will need to have a
working knowledge of Paint Shop Pro for this tutorial.
You will need:-
Paint Shop Pro – I am using X5 but any version will work.
Scrapkit – I am using a stunning kit by Jenn at Ginnibug
Designz called Spellcaster. You can buy this kit at Hania’s Design HERE
Tube of Choice – I am using a very old tube by Dominic
Marco that I received during a Xmas gift when CILM was open. I have looked
around the net to see if Dominic is selling elsewhere and have come up blank.
If anyone knows where he’s selling please email me so I can add the link.
Mask of Choice – I am using another awesome Halloween mask
by Vix called Vix-MaskHalloween2012-1. You can download HERE
Font of Choice – I am using My Dark Halloween which you can
get HERE
Plugins – Dsb Flux – Blast
Ok ready to begin:-
1.
Open new image 650x650
transparent
2.
Open Paper 11, resize
85%. Copy and paste as a new layer. Load Mask and find the mask you are using.
Delete Mask layer and Merge Group.
3.
Open Element 49, resize
by 70%. Copy and paste as a new layer moving over to the left. Drop Shadow V3,
H3, 45, 6.92 Black
4.
Open Element 48. Copy
and paste as a new layer moving to the right and down. Plugins Dsb Flux – Blast
with settings 40% Left.
5.
Open Element 68, resize
by 70%. Copy and paste as a new layer moving down and left. Drop Shadow as
above.
6.
Open Element 56, resize
by 80%. Copy and paste as a new layer moving to the right. Drop Shadow as
above.
7.
Open Element 60. Copy
and paste as a new layer. Adjust – Hue & Saturation – Colourize – Hue 130 –
Saturation 192. Duplicate and move over to the left. With Eraser tool erase
overhanging grass. Merge down.
8.
Make Mask layer active.
Go to Presets and find Eclipse. Put background colour at #fdf079. Draw out a
circle 300 by 300. Once happy convert to raster. Drop Shadow as above.
9.
Open Element 21, resize
by 90%. Copy and Paste as a new layer moving up. Drop Shadow as above.
10.
Open Tube. Copy and
paste as a new layer moving over to the right. Drop Shadow as above.
11.
Open Element 52, resize
by 30%. Copy and paste as a new layer moving down and left. Drop Shadow as
above.
12.
Open Element 13, resize
by 35% then 85%. Copy and paste as a new layer moving so its sitting on barrel.
Sharpen and Drop shadow as above.
13.
Open Element 2, resize
by 45%. Copy and paste as a new layer moving down.
14.
Open Element 18, resize
by 45% then 65%. Copy and paste as a new layer moving down and left. Drop
Shadow as above.
15.
Open Element 116,
resize by 45%. Copy and paste as a new layer moving down and right slightly.
Drop Shadow as above.
16.
Open Element 88, resize
by 30%. Copy and paste as a new layer moving down and far right. Drop Shadow.
17.
Add name, Copyright and
license details.
Save as a png.
That’s it we are done. I hope you found my tutorial easy to
follow. Any questions or queries please don’t hesitate to ask.
Hugs
Gem/Sharon
 v
v