
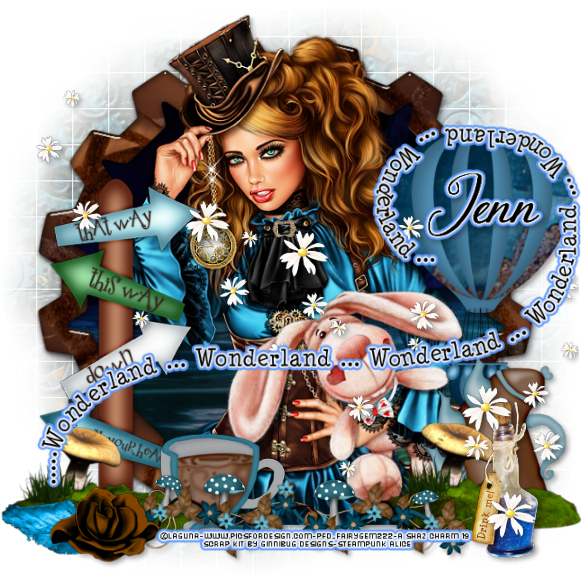
Steampunk Alice
This tutorial was written by me Shaz/Gem on the 13th May 2019 and is all my own idea and creation. Any resemblance to other tutorials is purely coincidental and not intended. For this tutorial you will need to have a working knowledge of Paint Shop Pro.
You will need:-
Paint Shop Pro - I am using X5 but any version will work.
Scrap kit - I am using an awesome kit by Jennifer at Ginnibug Designs called Steampunk Alice. You can buy this kit at Picsfordesign under the name LapisGin. HERE
Tube of choice - I am using a beautiful tube by Laguna called Steampunk Alice with Rabbit. You can buy the tube HERE
Mask of choice - I am using a wonderful mask by Designs by Vaybs Mask 72. Download HERE
Font of choice - I am using Allana-Regular which you can download HERE
Plugins:-
Eye Candy Impact - Glass
Eye Candy Impact - Gradient Glow
Lets Begin:-
1. Open new image 650 x 650 Transparent
2. Open Paper 9. Copy and Paste as a new layer. Layers load mask and load DBV_Mask 72, delete and Merge group.
3. Open Paper 14. Go to Colour palette foreground and click on pattern. Find the image of paper 35% Angle Size 100. Go to Preset Shapes and find Gear 5, width 30. Close fill and draw a circle (see mine for reference). Once happy with the size and placement convert to layer.
4. With your magic wand click inside frame, selections modify Expand by 7.
5. Open Paper 3 and Resize by 75% then 90%. Copy and paste as a new layer and move the paper where you would like. Invert Delete. Selections none. Move below frame layer.
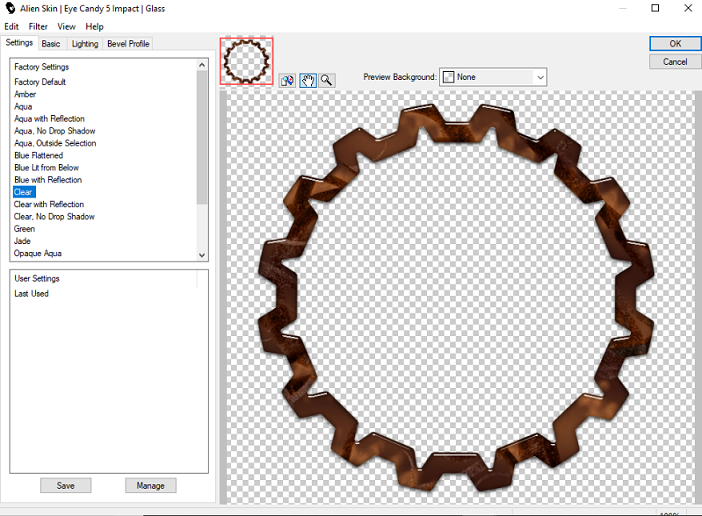
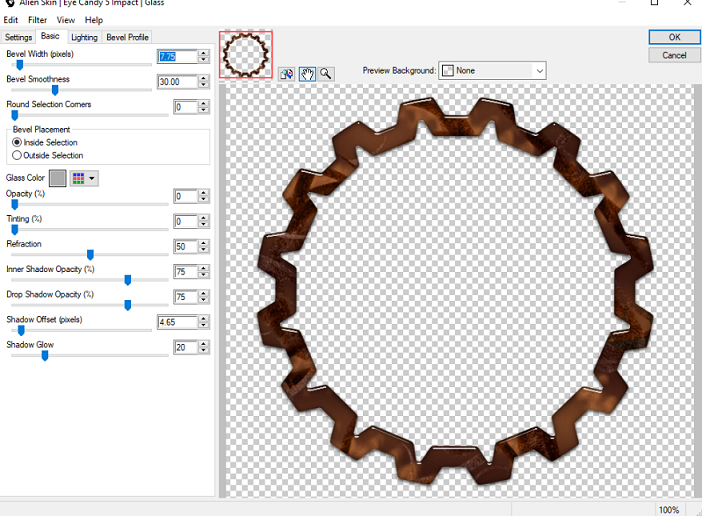
6. Make frame layer active. Plugins Eye candy impact Glass with the settings below. Drop shadow V3, H3, Opacity 35 Blur 7.63 Black.
7. Open Tube, Copy and paste as a new layer. Resize by 35% then 80%. Move to where you would like it placed. Drop shadow as above.
8.Open Element 55. Resize by 40%. Copy and paste moving to the left. Sharpen and drop shadow.
9. Open Element 49. Resize by 40%. Copy and paste moving down and left. Drop shadow.
10. Open Element 77. Resize by 55%. Copy and paste moving up and right. Drop shadow.
11. Open Element 66. Resize by 35% then 70%. Copy and paste moving slightly up and right. Drop shadow.
12. Make layer 6 active on your palette. Right click and duplicate, move to the right side of canvas. On layer palette bring to top.
13. Open Element 68. Resize by 25% then 80%. Copy and paste move slightly left. Sharpen and Drop shadow.
14. Open Element 78. Resize 30%. Copy and paste moving right and down. Sharpen and Drop shadow.
15. Open Element 69. Resize by 65%. Copy and paste moving down. Sharpen and Drop shadow.
16. Open Element 12. Resize by 30% then 75%. Copy and paste moving left and down. Drop shadow.
17. Open Element 25. Resize by 30%. Copy and paste moving left and down. Drop shadow.
18. Open Element 43. Copy and paste moving slightly left. Sharpen and Drop shadow.
19. Open Element 9. Copy and paste moving slightly down. Eye candy Gradient glow settings below. Drop Shadow.
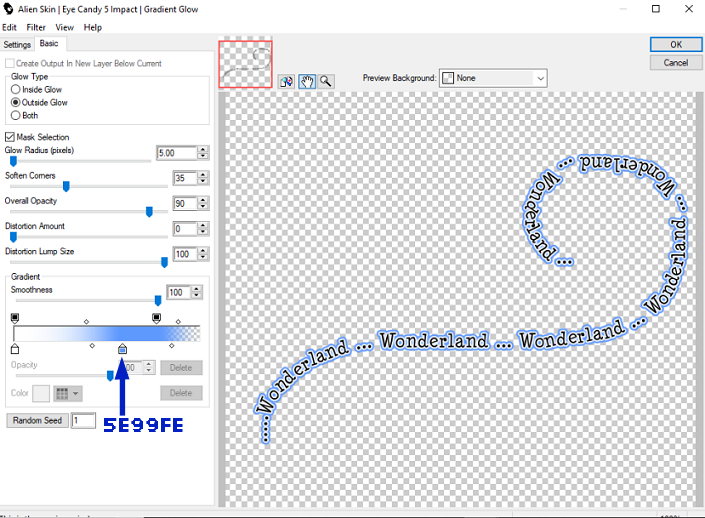
20. Add your name using Allana Regular font and colour Black then add the same gradient glow.
21. Add your copyright and License details and save as a PNG
That's it we are done.
I hope that you managed to follow the tutorial without any problems and enjoyed it at the same time.
Any questions or queries please don't hesitate to ask.
Hugs
Shaz
No comments:
Post a Comment