Pages

Thursday 31 January 2013

Finding Emo Cluster Frame

Finding Emo Cluster Frame

Another Cluster frame, this one using the PTU kit Finding Emo by Bello Scarto, you can find her site HERE
Preview below

You can download this Cluster HERE
Remember to leave some love when downloading it only takes a second but lasts a lifetime
Have fun 
Hugs
Gem xxx

Abby Love Cluster Frame

Abby Love Cluster Frame
Another frame using one of Bibi's Collections kits. This one is called Abby Love again you can find it at SATC
Preview below

You can Download HERE
Remember and leave some love it only takes a second but lasts a lifetime
Hugs
Gem xxx

Bad Valentine Cluster Frame

Bad Valentine Cluster Frame
Thought i would make a couple of cluster frames from kits i have bought recently. The first one is from Bibi's Collection Bad Valentine kit which you can download at SATC.
Preview below

You can Download HERE
Remember to leave some love it only takes a second but lasts a lifetime
Hugs
Gem xxx

Tuesday 29 January 2013

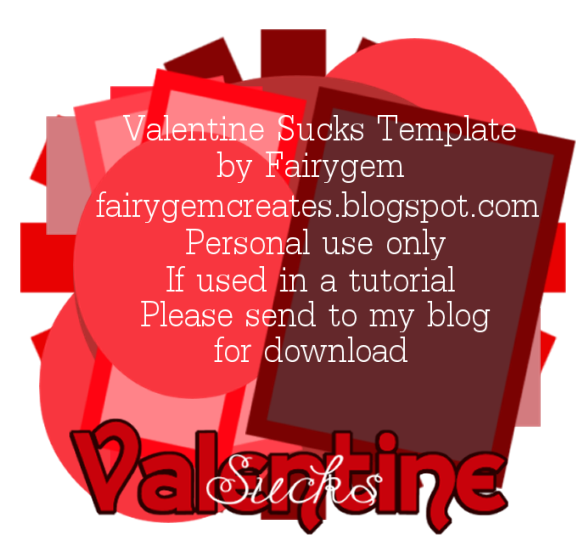
Valentine Sucks Template

Valentine Sucks Template
And another template with the Valentine is slushy theme. 
Preview below
Valentine Sucks
You can get it HERE
Have fun, don't forget to say a thank you as it only takes a second but lasts a lifetime
Hugs
Gem xxx

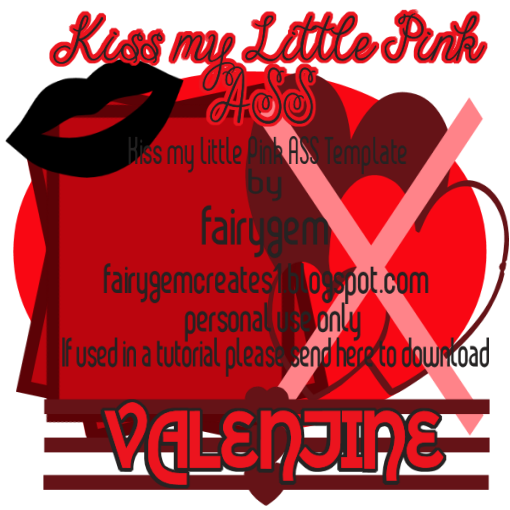
Kiss my Little Pink A$$ Valentine Template

I am not Anti Valentine but everyone is making slushy tags so thought i would do a template for those that don't want to do slushy. 
Usual TOU if you use in a tutorial please direct here for download
Preview below
Kiss my ass template
You can download HERE
Please leave a thank you it only takes a second but lasts a lifetime.
Hugs
Gem xxx

Friday 18 January 2013

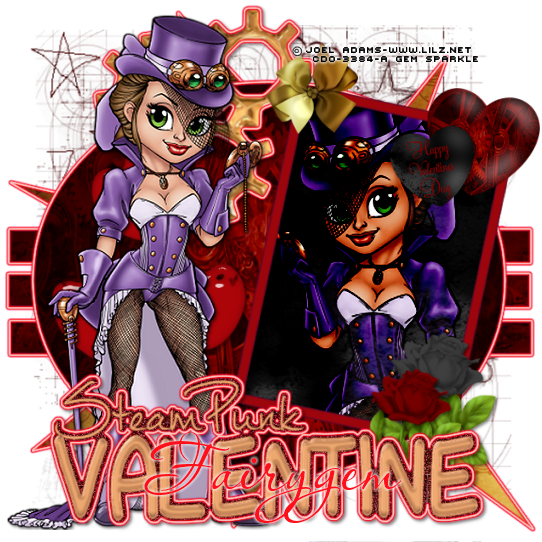
Steampunk Valentine - FTU

SteamPunk Valentine
fairygemtag
This tutorial was written by me Fairygem on the 18th January 2013, any resemblance to another tutorial is purely coincidental and not intended. You will need to have a working knowledge of using Paint Shop Pro and working with layers. 


For this tutorial you will need:-

Paint Shop Pro - I am using Psp9 but this will work with any program.
Tube of Choice or the one i am using by Joel Adams which you can get HERE. Please make sure you have the proper license to use his artwork.
Scrapkit of choice or the one i am using by Doris over at Scrap Dimensions called Steampunk Valentine. You can get the kit HERE.
My Template which you can download HERE
Mask of choice or the one i am using by Cat over at Insatiable Dreams Mask 567 which you can get HERE
Plugins:-
Xero Porcelain
Eyecandy 5 Impact Gradient Glow and Glass


Ok lets Begin.


1. Open my template and Shift D. Delete the original.


2. Open Paper 6 and Resize by 75%. Copy and Paste as a new layer. Move it to the bottom of template.


3. Layers, Load Mask from Disk. Find Mask 567, load and delete the mask layer. Merge group.


4. Highlight the Splat layer, Selections float, defloat. Open Paper 10 and resize by 85%. Copy and paste as a new layer, Inverts Delete. Delete the original layer.


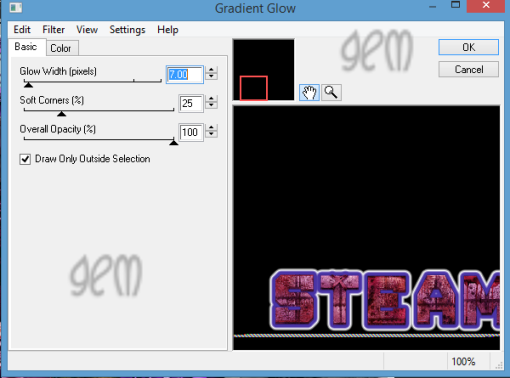
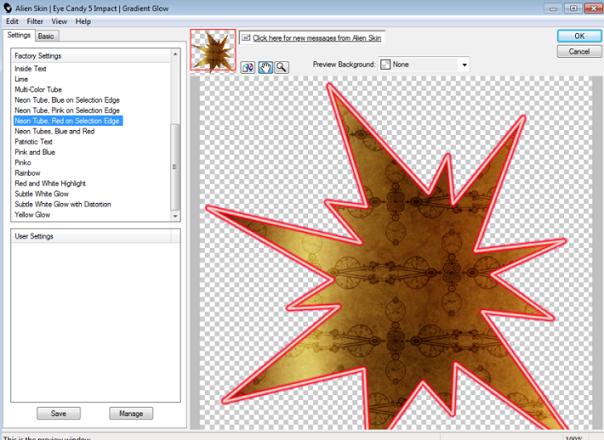
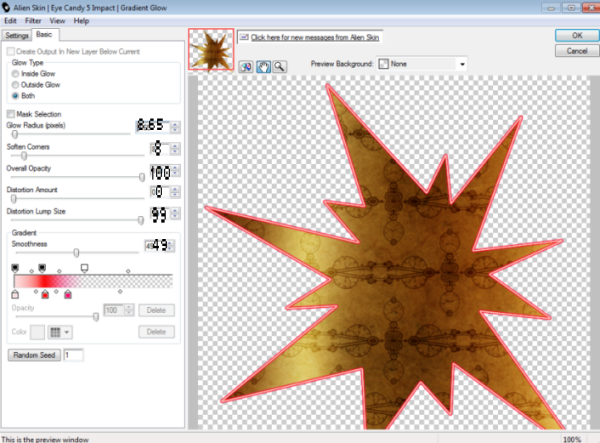
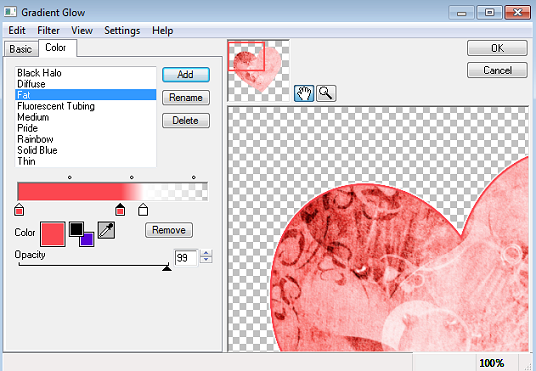
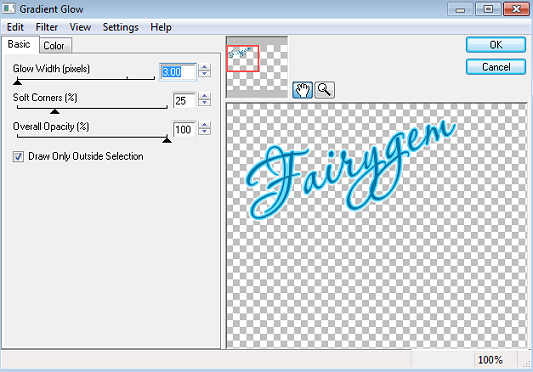
5. Effects, Plugins Eyecandy 5 Impact Gradient glow with the settings below.

Gradient glow 1
gradient glow 2

6. Highlight the rectangle layer, selections float, defloat. Open Paper 3 and resize by 85%. Copy and paste as a new layer, Invert delete. Delete the original layer. Give it a gradient glow previously used. 


7. Highlight the Oval layer, selections float, defloat. Open Paper 8 and resize by 85% twice. Copy and paste as a new layer, Invert delete. Delete the original layer. Add the Gradient glow.


8. Highlight the Frame background layer, Selections float, defloat. Open Paper 2 and resize by 85% twice. Copy and paste as a new layer, Invert Delete. Delete the original layer. Don't Deselect.


9. Open your tube, Copy and Paste as a new layer and place what part of the tube you want into the frame. Change the blendmode to Hard Light. 


10. Highlight the frame layer, selections float, defloat add a new layer and floodfill with #9d505c. Delete the original layer. 


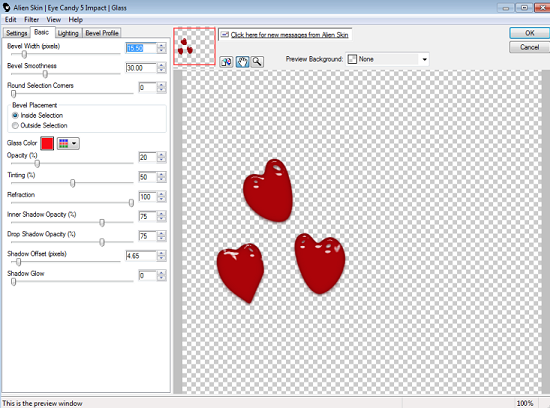
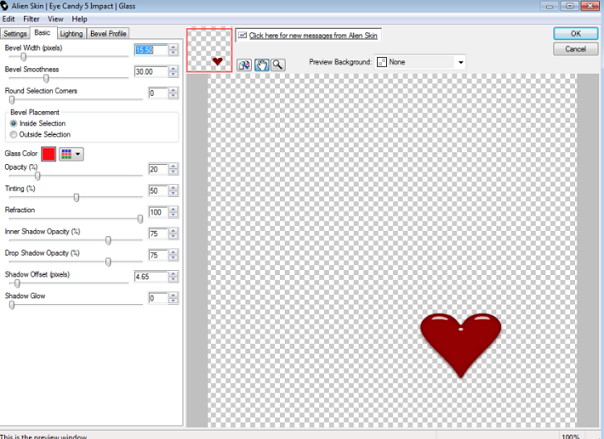
11. Highlight the Hearts layer, selections float, defloat. Add a new layer and floodfill with #9d505c. Delete the original layer. Eye candy Impact Glass settings with the settings below. Add a dropshadow of 2,2,50 and 5.

glass settings


12. Highlight the Gears layer and give it the gradient glow previously used. Give the same dropshadow. 


13. Highlight the Wordart background, selections float, defloat. Add a new layer and floodfill with #600207. Adjust Add/Remove noise Randon, Monochrome ticked 65%. Add the Gradient glow and Dropshadow.


14. Leave the Wordart with the Chrome effect or if you wish to change it to whatever you think would love good. 


15. Add your tube behind the wordart to the left side of the tag. Give it the same dropshadow previously used. 


16. Open the Bow 2 element. Resize by 30%, copy and paste and place on the left side of the Frame. Add dropshadow.


17. Open the Heart 2 element, resize by 25%, copy and paste as a new layer placing on the frame at the right side. Add dropshadow.


18. Open the Rose 2 element, resize by 35%, copy and paste placing on the right side of the frame at the bottom. Make sure you place it under the wordart. Add dropshadow.


19. Open the Rose 1 element, resize by 30%, copy and paste placing it next to the other rose. Add Dropshadow.


20. Add your name and copyright and Save as a png.


Thats it we're done 

Hope you enjoyed my tutorial if you have any questions don't hesitate to ask.
Hugs
Gem xx

Monday 14 January 2013

Tangerine Valentine - PTU

Tangerine Valentine PTU 
fairygemtangerinevalentine
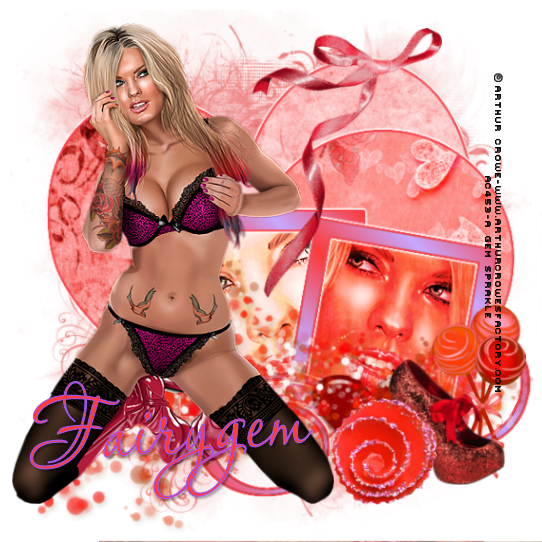
This tutorial was written by me, Fairygem on the 14th January 2012 and is all my own idea, any resemblance to another tutorial is purely coincidental and not intended. For this tutorial you will need to have a working knowledge of Paint Shop Pro and working with Layers. 


For this tutorial you will need:-

Tube of Choice or the one i am using by Arthur Crowe which you can get HERE, Please make sure you have proper licence to use his artwork. 
Template of Choice or the one i am using by Scrap It Studio's which you can find HERE
Scrapkit of Choice or the one i am using called Tangerine Valentine by Tiny Turtle Designs which you can get HERE
Mask of Choice or the one i am using by Moonbeams and Spiderwebs Mask 23 which you can get HERE, its the middle mask. 
Font of choice I am using Aquarelle
Plugins:- Eyecandy Gradient Glow, 
Eye candy 5 Impact - Glass.


Lets Begin


1. Open your template, Shift D and delete the original. Delete the TOU layer and the background layer.


2. Open Paper 21 from the Scrapkit resize by 85%. Copy and paste as a new layer moving it to the bottom of the tag. 


3. Layers, Load mask from disk and find your mask. Delete the mask and merge group down.


4. Highlight the LG Heart layer, selections float, defloat. Open Paper 11 and resize by 70%, Copy and paste as a new layer, Inverts Delete. Delete the original layer.


5. Add a gradient glow settings below
Gradient glow 1
Gradient Glow 2

6. Highlight the Circle layer, Selections float, defloat. Open Paper 14 and resize by 70%, Copy and Paste as a new layer, Invert Delete. Delete the original layer. Add the previous Gradient glow.


7. Highlight the Left Mat, Selections float, Defloat. Open Paper 17 and resize by 85% twice, Copy and Paste as a new layer, Inverts Delete. Delete the original layer. Do not Deselect


8. Copy and paste your close up tube as a new layer, Delete and deselect. I placed only the eyes and mouth into the frame but its your tag your choice or what part you use. Change the blendmode to Hard Light. 


9. Highlight your Left Frame layer, Selections float, defloat. Make a gradient using #fe3a3a in your foreground colour and #c8a8fe in your background colour. Linear 45 degrees and repeats set at 3. Floodfill your frame layer. Add the previous gradient glow.


10. Highlight your Right Mat layer, Selections float, defloat. Open Paper 19 and resize by 85% twice. Copy and paste as a new layer, Invert Delete. Delete your original layer. Do not Deselect.


11. Mirror your close up tube Copy and paste as a new layer. Delete and deselect. Change the blend mode to Hard light. 


12. Highlight the Right frame layer, Selections float, defloat and flood fill with the previous gradient. Give the frame a gradient glow previously used.


13. Highlight the Doodle layer, Mirror and move it down towards the bottom on the right side. Selections float, defloat and flood fill with the gradient. Give it a gradient glow previously used.


14. Highlight the Sm Heart layer, Effects Eyecandy 5 Impact Glass using the settings as below.
Eyecandy5 Impact Glass settings


15. Add your tube and place to the left side of the tag.

16. Open Element 50, resize by 55%, copy and paste placing to the right side of the tag.


17. Open Element 67, resize by 65%, copy and paste as a new layer placing it under your tube.


18. Open Element 73, resize by 35%. Copy and paste as a new layer placing it under the shoe layer.


19. Open Element 88, resize by 85%. Copy and paste as a new layer and place it to the top right hand heart.


20. Open Element 63, Resize by 20%. Copy and paste as a new layer placing in front of the shoe element. 


21. Add your copyright and Name


22. Save as a png.


Thats it we're done I hope you enjoyed doing my tutorial. If you have any questions please don't hesitate to ask. 


Sunday 13 January 2013

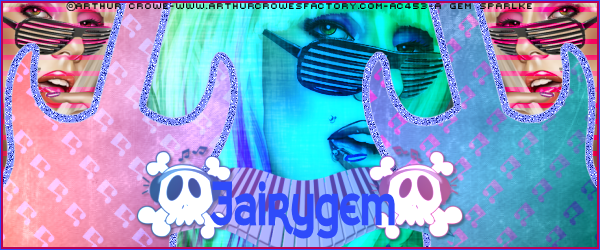
Rockstar Forum Set - FTU

Rockstar Forum Set - FTU

fairygemrockstaravi
rockstar tag

This tutorial was written by Me, Fairygem on the 13th January 2013 and is all my own idea. Any resemblance to another tutorial is purely coincidental and not intended. 
For this tutorial you will need to have a working knowledge of paint shop pro and working with layers. 
For this tutorial you will need:-
Paint Shop Pro - I am using Psp9 but any version will work.
Tube of Choice or the same as i am using by Arthur Crowe HERE please make sure you have the proper license for using his artwork.
Forum Template - I am using one by Spawns Template 007 Which you can get HERE
Scrapkit of Choice or the one i am using by Alikas Scraps called Rockstar which you can get HERE
Font of Choice or the one i am using called Kingthing San which you can find HERE
Plugin:-  
Xero -  Porcelain
ColourRave - Atmosphere 1.1

Ok lets begin. 

1. Open your template shift D and close the original. Delete the Copyright layer. Delete the Middle musical notes layer aswell. 

2. Highlight your Middle Background,  Selections float, defloat, Open Paper 9 copy and paste as a new layer, Invert Delete then delete the original layer. 

3. Highlight the middle layer again Selections float, defloat and Open your tube. Copy and paste as a new layer and position where you think it looks best. Invert Delete, and deselect. Xero Porcelain default settings. 

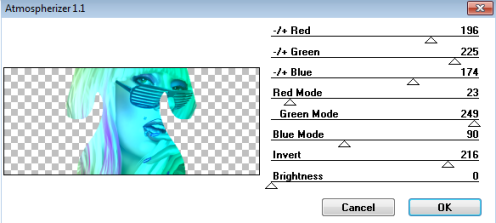
4. Change the Blend mode to Hard Light then go to ColourRave Atmosphere 1.1 and use the settings below. 
ColourRave 1

5. Merge the Left Guitar background with the Right Guitar background. Select, float, defloat and open Paper 5, Copy and Paste as a new layer, Invert Delete and Deselect. Delete the original layer. 

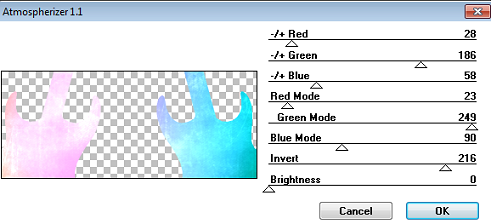
6. ColourRave Atmosphere 1.1 with the settings below.
ColourRave 2

7. Merge the Left corner background with the Right corner background. Selections float, defloat and choose a colour from your tube. Add a new layer and floodfill, I am using #e13c9a. Delete the original layer. Do not deselect.

8. Copy your tube again and place on the left side where you would like it positioned i used the eyes as a point. See my tag for placement. Invert and delete. Duplicate and Mirror the tube. 

9. Merge the Left lines with the Right lines, Selections float, Defloat and flood fill with a colour from your tube, i used #ed0588. Change the blendmode to Overlay

10. Highlight the Right Musical Notes, Adjust Colour balance Manual Colour correction and change the target to #fb4d93. Change the blendmode to Overlay.

11. Highlight the Left Musical Notes, Adjust Colour balance Manual Colour correction and change the target to #8eb3fe. Change the blendmode to Overlay.


12. Merge the two Outlines together, Selections float, defloat and flood fill with #818ffb. Adjust Add/Remove noise with settings Random Monochrome checked 45%.


13. Highlight the Black Border, Adjust Colour balance Manual Colour Correction and change the target to #ba0254.


14. Highlight the White Border, Adjust Colour Balance, Manual Colour Correction and change the target to #2e4bfa.


15. Open Element 48, resize by 65% twice. Copy and paste as a new layer positioning at the middle of the outline on the left. Duplicate and mirror. Merge down the two layers.


16. Effects ColourRave Atmosphere 1.1 with previous settings used. Mirror and give a dropshadow of 2, 2, 33, 3.00. 


17. Open Element 57, resize by 65%. Copy and paste below the Skulls. Effects ColourRave Atmosphere 1.1 settings previously used.


18. Add your Copyright then using the font provided Add your name.


Save as a PNG.


Avatar

I find this an easy way to produce an avatar rather than going through making it from scratch and this way it matches your main tag perfectly. 

1. Shift D your main tag. 


2. Grab your crop tool and choose which side of the tag you want to use. I went for the right side. 


3. Get your length to 180 and your width to 150 then click crop and your left with your avatar. 


4. Delete any layers that are not in the Avatar. 


5. Add a new layer, Selections Modify and Contrast by 3. Invert and Floodfill with #2e4bfa. Selections None.


6. Selectoins Modify and Contrast by 1, Invert and Floodfill with #ba0254. Selections none.


7. Add your Copyright and Your name then Save as a PNG.


Thats it we're done hope you found this easy to follow, if you have any questions don't hesitate to ask. 

Hugs
Gem xxx


Thursday 10 January 2013

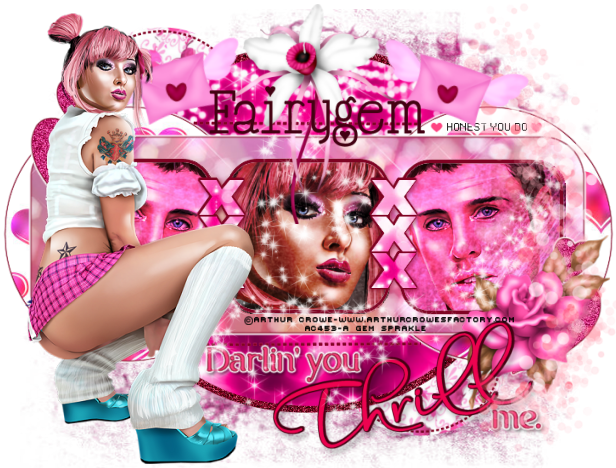
Darlin You Thrill Me - PTU

Darlin You Thrill Me
fairygemthrillme
This tutorial was written by me on the 10th January 2013 and is all my own idea, any resemblance to other tutorials is purely coincidental and not intended. I have actually falling in love with Bibi's Collection Scrapkits so you will no doubt see a few more tuts using her kits coming out of this head of mine. 
For this tutorial you will need a working knowledge of Paint Shop Pro and using layers. 
You will need:-
Paint Shop Pro - I am using Psp9 but any version will work
Scrapkit of Choice or the one i am using by Bibi's collection HERE
2 Tubes of Choice - I am using two by Arthur Crowe  HERE
Template - I am using a gorgeous collab between Kandi Kissez and Dee for valentines - You can get this template HERE
Mask of Choice or the one i am using by Gem's Taggin Scraps - Mask 101 which you can get HERE
Font of Choice - I used Cupid De Locke which you can get HERE
Plug ins :- Eye Candy 4 Gradient Glow
Remember when downloading say a thank you its only takes a second but lasts a lifetime. 

Ready to begin 
Ok 

1. Open Template 4 shift D and duplicate. Delete the background layer.

2. Open Paper 15, Copy and paste at the bottom of your canvas. Resize by 75%, then grab your deform tool and stretch out the paper so that it covers most of the template. 

3. Layers load mask from disk and find your mask. Delete and merge group. 

4. Move your Right Dark Pink circle down by one and merge it with the left Dark pink Circle. Do this to the dotted circle aswell merging the two dotted circles together. 

5. Highlight the Dark Pink Circles, selections float, defloat. Open Paper 9 and resize by 75%. Copy and paste as a new layer, Invert and delete. Delete the original layer. 

6. Add a new layer above the dotted circle layer. Floodfill with #800323.

7. Highlight the Dotted Circle layer, Selections float, defloat then go to your floodfilled layer and invert delete. Delete the original layer. 

8. Add a new layer above the White Glittered Circle layer. Floodfill with #800323.

8. Highlight the White Glittered Circle layer, Selections float, defloat. Go to your flooded layer, invert delete. Delete the original. Go to Adjust and Add noise, Random 65% monochrome ticked. 

9. Open Paper 17 and resize by 75%. Highlight the Pink Circle layer, Selections float, defloat. Copy your paper and paste as a new layer, Invert, Delete. Delete the original layer. 

10. Merge the Right Creme Circle with the Left Creme Circle. Open Paper 8 and resize by 75%. Back to your working canvas. Highlight the Creme Circle layer, Selections float, defloat. Copy the paper and paste as a new layer, Invert and Delete. Delete the original layer.

11. Add a Gradient Glow with the settings below
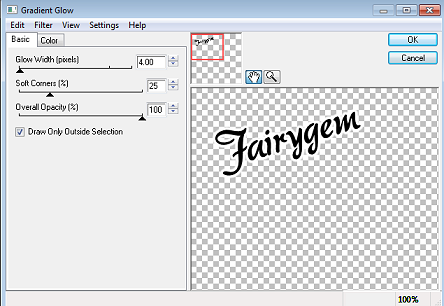
Gradient Glow settings 1
Gradient Glow settings 2

12. Highlight the Creme Rectangle layer, Selections float, defloat. Open Paper 14 and resize by 85%. Copy and Paste onto your canvas, Invert and Delete. Delete the original layer. Add Gradient Glow settings as before.

13. Take your Magic Wand and click inside the left square. Open Paper 7 and resize by 75%. Copy and paste as a new layer, Invert delete. Do not Deselect. 


14. Highlight your Male tube close up, Copy and paste as a new layer resize by 65%, Delete any tube hanging over. Deselect.


15. Duplicate your paper layer and Tube layer and mirror fitting it on the right side square. 


16. Merge down the tube layers and the paper layers. Change the blend mode on your tube to hard light. 


17. Take your Magic wand and click inside the Middle pink Square. Open Paper 6 and resize by 75%. Copy and paste as a new layer, Invert Delete. Do not Deselect.


18. Highlight your Female tube close up, Copy and Paste as a new layer and resize by 65% twice, Delete any tube hanging over. Deselect. Change the blend mode to hard light. 


19. Highlight the white frames layer, Add a new raster layer and flood fill with #800323. Delete the original layer. 


20. Merge down the glittered heart layer and add the gradient glow previously used. 


21. Add a new layer and flood fill with #800323, Highlight the dotted line layer, selections float, defloat. Go back to your flood fill layer and Invert delete. Delete the original layer. 


22. Highlight the X's white layer, selections float, defloat add a new layer and flood fill with #800323. 


23. Highlight the X's pink layer, open Paper 13 and copy and paste as a new layer, Move the paper to what part you want showing, Invert and Delete. Delete the original layer. 


24. Highlight the Me layer, Go to Adjust colour balance and Manuel colour change, change your colour to #f93f7c. Give it the gradient glow. Give it a dropshadow of 2, 2, 50 and 5.


25. Go to the Thrill white layer, selections float, defloat and add a new layer. Flood fill with #430112. Delete the original layer. 


26. Go to the Thrill black layer, Adjust Colour Balance and Manual colour change, change your colour to #ed0350.


27. Merge down the Darlin and You layer. Adjust, Colour balance, Manual colour change, change your colour to #f93f7c. Add the gradient glow. Give it a dropshadow of 2, 2, 50 and 5.


28. Leave the white strips and Pixel words black. Go to the wee hearts, Adjust, Colour balance, Manual colour change and change your colour to the last used. 


29. Copy and Paste your tube placing it to the left, if using the same tube as me resize by 65%.


30. Open Element one, resize by 35%, copy and paste below the Thrill layer placing on the Glitter hearts to the right. 


31. Open Element 49, Mirror and resize by 70%. Copy and Paste placing it on the right side.


32. Open Element 57, Copy and Paste placing the sparkles on the middle of the tag. See my tag for placement. 


33. Open element 69, Resize by 50%, Copy and Paste as a new layer placing at the top of the tag. See my tag for placement. 


34. Open Element 85, Resize by 55%, Copy and Paste as a new layer placing at the top right side. Rotate Free rotate by 15%. Duplicate and mirror, moving under the tube layer. 


35. Add your Copyright and License.


36. Add your name, using colour #430112.


37. Save as a PNG and we're done.


Hope you enjoyed my tutorial any questions don't hesitate to ask 

Hugs
Gem xx