
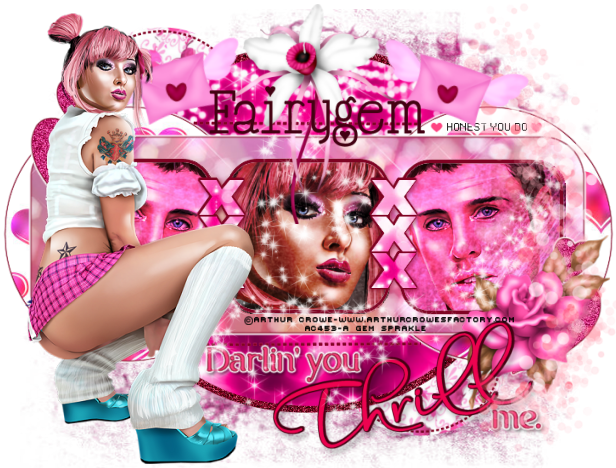
Darlin You Thrill Me
This tutorial was written by me on the 10th January 2013 and is all my own idea, any resemblance to other tutorials is purely coincidental and not intended. I have actually falling in love with Bibi's Collection Scrapkits so you will no doubt see a few more tuts using her kits coming out of this head of mine.
For this tutorial you will need a working knowledge of Paint Shop Pro and using layers.
You will need:-
Paint Shop Pro - I am using Psp9 but any version will work
Scrapkit of Choice or the one i am using by Bibi's collection HERE
2 Tubes of Choice - I am using two by Arthur Crowe HERE
Template - I am using a gorgeous collab between Kandi Kissez and Dee for valentines - You can get this template HERE
Mask of Choice or the one i am using by Gem's Taggin Scraps - Mask 101 which you can get HERE
Font of Choice - I used Cupid De Locke which you can get HERE
Font of Choice - I used Cupid De Locke which you can get HERE
Plug ins :- Eye Candy 4 Gradient Glow
Remember when downloading say a thank you its only takes a second but lasts a lifetime.
Ready to begin
Ok
1. Open Template 4 shift D and duplicate. Delete the background layer.
2. Open Paper 15, Copy and paste at the bottom of your canvas. Resize by 75%, then grab your deform tool and stretch out the paper so that it covers most of the template.
3. Layers load mask from disk and find your mask. Delete and merge group.
4. Move your Right Dark Pink circle down by one and merge it with the left Dark pink Circle. Do this to the dotted circle aswell merging the two dotted circles together.
5. Highlight the Dark Pink Circles, selections float, defloat. Open Paper 9 and resize by 75%. Copy and paste as a new layer, Invert and delete. Delete the original layer.
6. Add a new layer above the dotted circle layer. Floodfill with #800323.
7. Highlight the Dotted Circle layer, Selections float, defloat then go to your floodfilled layer and invert delete. Delete the original layer.
8. Add a new layer above the White Glittered Circle layer. Floodfill with #800323.
8. Highlight the White Glittered Circle layer, Selections float, defloat. Go to your flooded layer, invert delete. Delete the original. Go to Adjust and Add noise, Random 65% monochrome ticked.
9. Open Paper 17 and resize by 75%. Highlight the Pink Circle layer, Selections float, defloat. Copy your paper and paste as a new layer, Invert, Delete. Delete the original layer.
10. Merge the Right Creme Circle with the Left Creme Circle. Open Paper 8 and resize by 75%. Back to your working canvas. Highlight the Creme Circle layer, Selections float, defloat. Copy the paper and paste as a new layer, Invert and Delete. Delete the original layer.
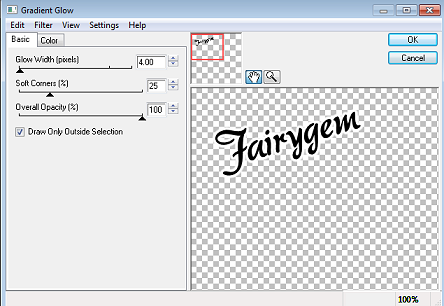
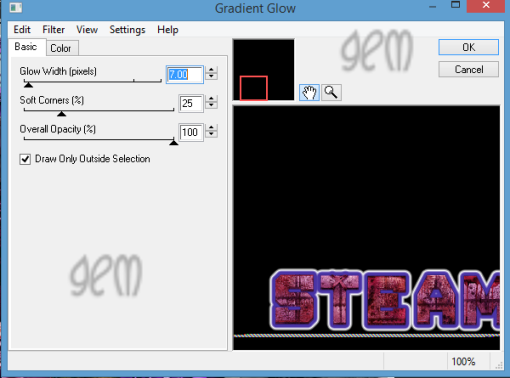
11. Add a Gradient Glow with the settings below
12. Highlight the Creme Rectangle layer, Selections float, defloat. Open Paper 14 and resize by 85%. Copy and Paste onto your canvas, Invert and Delete. Delete the original layer. Add Gradient Glow settings as before.
13. Take your Magic Wand and click inside the left square. Open Paper 7 and resize by 75%. Copy and paste as a new layer, Invert delete. Do not Deselect.
14. Highlight your Male tube close up, Copy and paste as a new layer resize by 65%, Delete any tube hanging over. Deselect.
15. Duplicate your paper layer and Tube layer and mirror fitting it on the right side square.
16. Merge down the tube layers and the paper layers. Change the blend mode on your tube to hard light.
17. Take your Magic wand and click inside the Middle pink Square. Open Paper 6 and resize by 75%. Copy and paste as a new layer, Invert Delete. Do not Deselect.
18. Highlight your Female tube close up, Copy and Paste as a new layer and resize by 65% twice, Delete any tube hanging over. Deselect. Change the blend mode to hard light.
19. Highlight the white frames layer, Add a new raster layer and flood fill with #800323. Delete the original layer.
20. Merge down the glittered heart layer and add the gradient glow previously used.
21. Add a new layer and flood fill with #800323, Highlight the dotted line layer, selections float, defloat. Go back to your flood fill layer and Invert delete. Delete the original layer.
22. Highlight the X's white layer, selections float, defloat add a new layer and flood fill with #800323.
23. Highlight the X's pink layer, open Paper 13 and copy and paste as a new layer, Move the paper to what part you want showing, Invert and Delete. Delete the original layer.
24. Highlight the Me layer, Go to Adjust colour balance and Manuel colour change, change your colour to #f93f7c. Give it the gradient glow. Give it a dropshadow of 2, 2, 50 and 5.
25. Go to the Thrill white layer, selections float, defloat and add a new layer. Flood fill with #430112. Delete the original layer.
26. Go to the Thrill black layer, Adjust Colour Balance and Manual colour change, change your colour to #ed0350.
27. Merge down the Darlin and You layer. Adjust, Colour balance, Manual colour change, change your colour to #f93f7c. Add the gradient glow. Give it a dropshadow of 2, 2, 50 and 5.
28. Leave the white strips and Pixel words black. Go to the wee hearts, Adjust, Colour balance, Manual colour change and change your colour to the last used.
29. Copy and Paste your tube placing it to the left, if using the same tube as me resize by 65%.
30. Open Element one, resize by 35%, copy and paste below the Thrill layer placing on the Glitter hearts to the right.
31. Open Element 49, Mirror and resize by 70%. Copy and Paste placing it on the right side.
32. Open Element 57, Copy and Paste placing the sparkles on the middle of the tag. See my tag for placement.
33. Open element 69, Resize by 50%, Copy and Paste as a new layer placing at the top of the tag. See my tag for placement.
34. Open Element 85, Resize by 55%, Copy and Paste as a new layer placing at the top right side. Rotate Free rotate by 15%. Duplicate and mirror, moving under the tube layer.
35. Add your Copyright and License.
36. Add your name, using colour #430112.
37. Save as a PNG and we're done.
Hope you enjoyed my tutorial any questions don't hesitate to ask
Hugs
Gem xx
No comments:
Post a Comment