
Tangerine Valentine PTU

This tutorial was written by me, Fairygem on the 14th January 2012 and is all my own idea, any resemblance to another tutorial is purely coincidental and not intended. For this tutorial you will need to have a working knowledge of Paint Shop Pro and working with Layers.
For this tutorial you will need:-
Tube of Choice or the one i am using by Arthur Crowe which you can get HERE, Please make sure you have proper licence to use his artwork.
Template of Choice or the one i am using by Scrap It Studio's which you can find HERE
Scrapkit of Choice or the one i am using called Tangerine Valentine by Tiny Turtle Designs which you can get HERE
Mask of Choice or the one i am using by Moonbeams and Spiderwebs Mask 23 which you can get HERE, its the middle mask.
Font of choice I am using Aquarelle
Plugins:- Eyecandy Gradient Glow,
Eye candy 5 Impact - Glass.
Lets Begin
1. Open your template, Shift D and delete the original. Delete the TOU layer and the background layer.
2. Open Paper 21 from the Scrapkit resize by 85%. Copy and paste as a new layer moving it to the bottom of the tag.
3. Layers, Load mask from disk and find your mask. Delete the mask and merge group down.
4. Highlight the LG Heart layer, selections float, defloat. Open Paper 11 and resize by 70%, Copy and paste as a new layer, Inverts Delete. Delete the original layer.
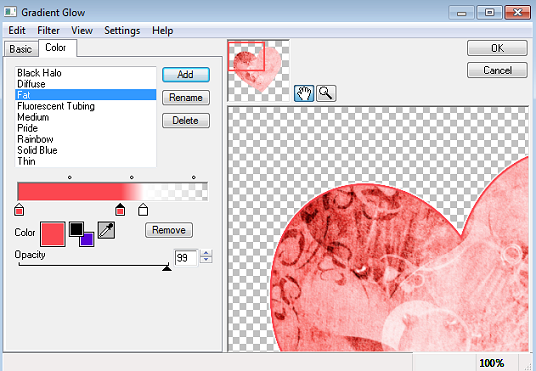
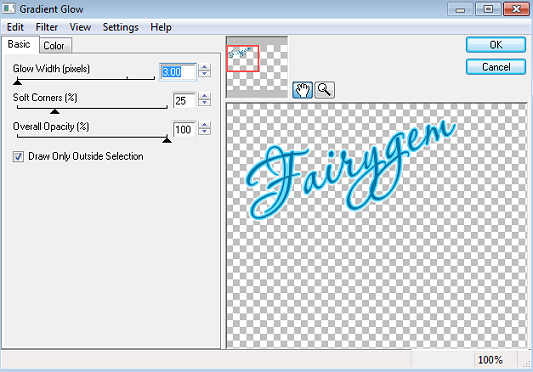
5. Add a gradient glow settings below
6. Highlight the Circle layer, Selections float, defloat. Open Paper 14 and resize by 70%, Copy and Paste as a new layer, Invert Delete. Delete the original layer. Add the previous Gradient glow.
7. Highlight the Left Mat, Selections float, Defloat. Open Paper 17 and resize by 85% twice, Copy and Paste as a new layer, Inverts Delete. Delete the original layer. Do not Deselect
8. Copy and paste your close up tube as a new layer, Delete and deselect. I placed only the eyes and mouth into the frame but its your tag your choice or what part you use. Change the blendmode to Hard Light.
9. Highlight your Left Frame layer, Selections float, defloat. Make a gradient using #fe3a3a in your foreground colour and #c8a8fe in your background colour. Linear 45 degrees and repeats set at 3. Floodfill your frame layer. Add the previous gradient glow.
10. Highlight your Right Mat layer, Selections float, defloat. Open Paper 19 and resize by 85% twice. Copy and paste as a new layer, Invert Delete. Delete your original layer. Do not Deselect.
11. Mirror your close up tube Copy and paste as a new layer. Delete and deselect. Change the blend mode to Hard light.
12. Highlight the Right frame layer, Selections float, defloat and flood fill with the previous gradient. Give the frame a gradient glow previously used.
13. Highlight the Doodle layer, Mirror and move it down towards the bottom on the right side. Selections float, defloat and flood fill with the gradient. Give it a gradient glow previously used.
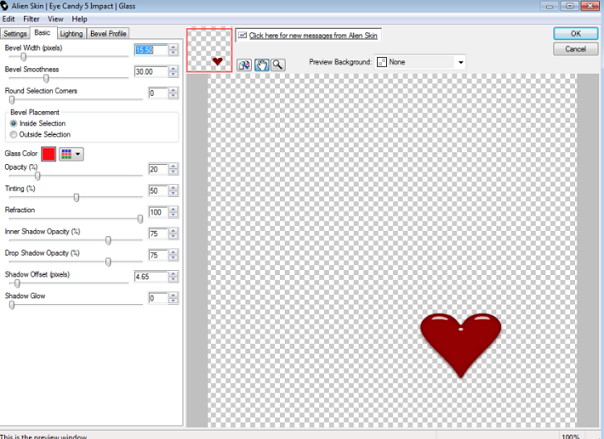
14. Highlight the Sm Heart layer, Effects Eyecandy 5 Impact Glass using the settings as below.
15. Add your tube and place to the left side of the tag.
16. Open Element 50, resize by 55%, copy and paste placing to the right side of the tag.
17. Open Element 67, resize by 65%, copy and paste as a new layer placing it under your tube.
18. Open Element 73, resize by 35%. Copy and paste as a new layer placing it under the shoe layer.
19. Open Element 88, resize by 85%. Copy and paste as a new layer and place it to the top right hand heart.
20. Open Element 63, Resize by 20%. Copy and paste as a new layer placing in front of the shoe element.
21. Add your copyright and Name
22. Save as a png.
Thats it we're done I hope you enjoyed doing my tutorial. If you have any questions please don't hesitate to ask.
No comments:
Post a Comment