
Wickedness
This tutorial was written by me Fairygem on the 20th
August 2017 and is all my own idea and creation. Any resemblance to another
tutorial is purely coincidental and not intended.
For this tutorial you will need to have a working knowledge
of Paint Shop Pro and using layers.
For this tutorial you will need:-
Paint Shop Pro – I am
using X5 but any version will work.
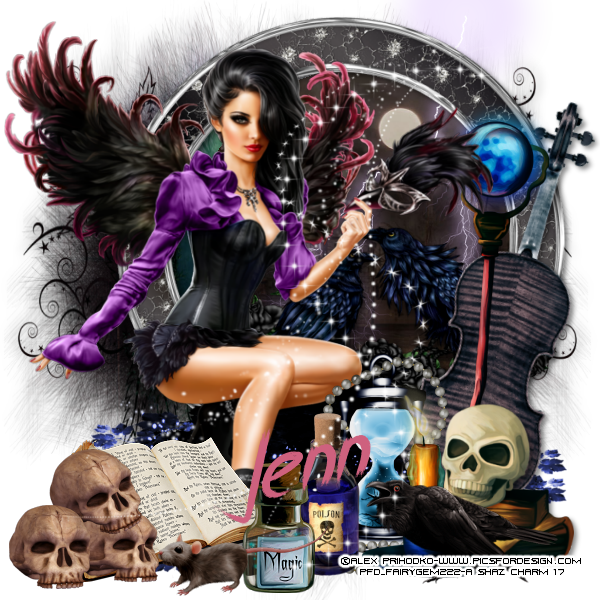
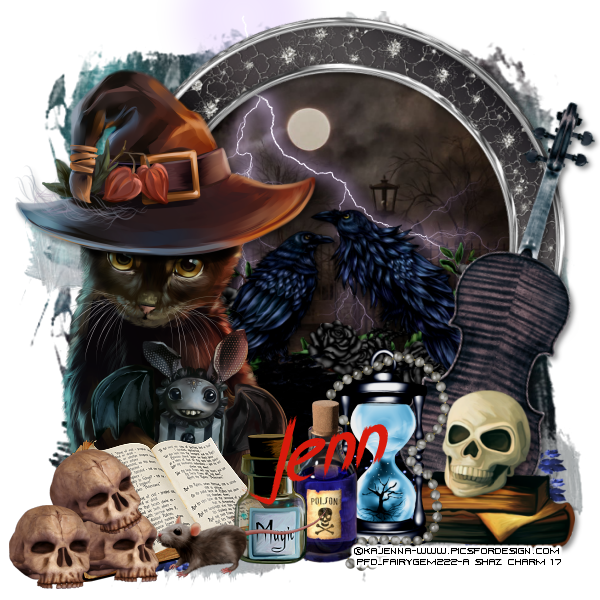
Tube of choice – For the
first example I am using the cute artwork of Kajenna with a tube called Black
Cat. My second example I am using the beautiful artwork of Alex Prihodko with a
tube called CrowGirl 2. You can buy both these tubes at Picsfordesign HERE
Scrapkit – I am using a beautiful kit by Jenn at Ginnibug
Designz called Wickedness. This kit is amazingly dark and can be used for both
Dark or Halloween tags. You can buy this wonderful kit at Hania’s Design HERE
or Picsfordesign HERE.
Mask of Choice – I am using a mask by Sophisticat Simone –
Mask 25. You can get Simones masks HERE.
Font of Choice – I am using a font called Breathe Karma
Italic. You can get this font HERE.
Plugins:-
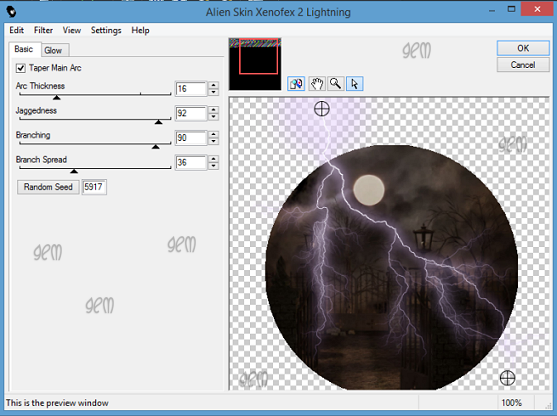
Xenofex 2 – Lightning
Dropshadow throughout Tutorial is
V3, H3, 45, 6.92 Black.
Ok lets begin:-
1.Open new image 600x600, You can resize later if you want.
2.
Open Paper 8, resize by
85% x2. Copy and Paste as a new layer. Load mask and find your mask. Delete
mask layer and merge group.
3.
Open Frame 8, resize by
85%. Copy and Paste as a new layer moving up and over to the right.
4.
With your magic wand
click inside frame and expand by 7. Open Paper 7, resize by 60%. Copy and paste
as a new layer and place the part of the paper you would like inside the frame.
Invert and delete. Selections none.
5.
Move paper under frame
then give frame Drop Shadow as stated.
6.
Open Element 47, resize
by 55%. Copy and paste as a new layer. Move under the frame placing at the
bottom. Drop Shadow.
7.
Open Element 58, Copy
and paste as a new layer moving to bottom of tag.
8.
Open Element 24, resize
by 65%. Copy and paste as a new layer moving over to the right. Free rotate and
rotate by 17 right, making sure all layers is unchecked. Drop Shadow.
9.
Open your tube, if
using the cat resize by 25%, if using the girl resize by 35%. I will be writing
the rest of the tut using the cat. Copy and paste as a new layer, mirror then
move over to the left. Drop shadow.
10.
Open Element 10, resize
by 30%. Copy and paste as a new layer moving over to the right (in front of the
violin). D/S
11.
Open Element 34, resize
by 45%. Copy and paste as a new layer moving down and slightly right. D/S
12.
Open Element 6, resize
by 35%. Copy and paste as a new layer moving down. D/S
13.
Open Element 50, resize
by 35%. Copy and paste as a new layer move down and over to the left. D/S
14.
Open Element 25, resize
by 25%. Copy and paste as a new layer move down and slightly left. D/S
15.
Open Element 88, resize
by 25%. Copy and paste as a new layer move down and left.
16.
Open Element 53, resize
by 45%. Copy and paste as a new layer move down in front of the open book. D/S
17.
Make the paper in the
frame active. Effects Plugins Xenofex 2 – Lightning using settings below.

18.
Add your copyright and
license details
19.
Add your name using
font and colour #d81a0c
With the second tag I changed the mask for Mask 2 from the
kit and added Elements:-
4 (resize by 35%)
29 (Resize by 85% - Mirror and move over to the violin-On
layers palette move above the violin)
61 (Resize by 40%)
84 Move so it looks like the sparkle is coming out of the
frame
Add your name using the same font but change the colour to
#ce617e
Resize tag if you wish then save as png.
That’s it we are done. I hope that you found my tutorial
easy to follow. If you have any queries message me and I will help out. Remember
though my tut is only a guideline make it your own.
Hugs
No comments:
Post a Comment