
Forest Fae Garden

This tutorial was written by me Sharon/fairygem on 2nd
July 2017 and is all my own idea. Any resemblance to other tutorials is purely
coincidental and not intended. You will need to have a working knowledge with
Paint Shop Pro and using layers and tools for this tutorial.
You will also need :-
Paint Shop Pro – I am using X5 but any version will work
Tube of Choice – I am using the wonderful artwork of Andy
Cooper. You can buy his work at Scraps and Company Here. You must have a
license to use his work.
Scrapkit – I am using the wonderful designer LapisGin at
Ginnibug Designz. Jenn sells her kits at Picsfordesign Here and Hania’s Designs
Here. The scrapkit is called Forest Fae.
Mask of Choice – I am using number 18 big masks by Vix HERE
Font of Choice – I am using Amethyst font – if you google
this should come up for you.
Plugins – Eyecandy 4000 - Glass
Ok lets begin.
1.
Open new image 600x600
2.
Open Paper 14 and
resize by 85% twice. Copy and paste as a new layer. Load mask and find Vix Big
masks 18. Delete mask layer and merge as group.
3.
Open Paper 8. Go to
your colour palette and click on pattern. Find your paper and make this active
in your foreground.
4.
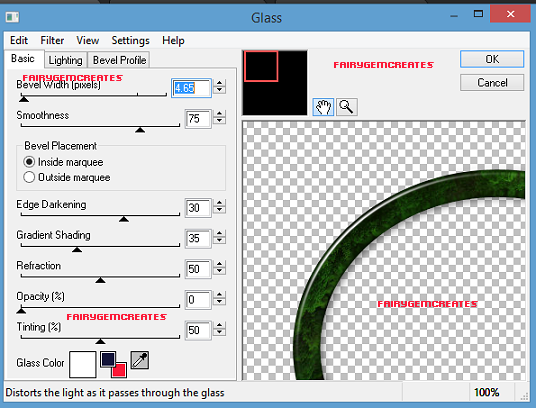
Go to presets and find Eclipse.
Set the width to 30 and close the background colour. Draw out an oval shape
size V400 H450 (See my tag for size and placement) Go to Eyecandy 4000 Glass
settings and use settings below. Give a drop shadow of V2 H3 45 and 11.93.
5.
Take your Magic Wand
and click inside the frame. Modify and expand by 9. Open Paper 9 and resize by
75%. Copy and Paste as a new layer, invert and delete overhanging paper. Move
under frame.
6.
Open Element 1, resize
by 85%. Copy and Paste as a new layer moving over to the left. Drop shadow as
Above
7.
Open Element 42, resize
by 45%. Copy and Paste as a new layer moving to the right. D/S as above
8.
Open Element 38 and
resize by 45%. Copy and Paste as a new layer moving to the right. D/S as above
9.
Open Element 49, Resize
by 85%. Copy and Paste as a new layer placing under the fairy house. Duplicate
and mover towards the tree and slightly down.
10.
Open Element 62, resize
by 65% twice. Copy and Paste as a new layer moving to the right and down a bit.
11.
Open your tube and if
using same as me resize by 65% then 90%. Copy and paste as a new layer Mirror
and Drop shadow as above.
12.
Open Element 65, resize
by 40%. Copy and paste as a new layer move to left. Duplicate and move down
slightly over to the right. Merge down and D/s as above.
13.
Open Element 8 and
resize by 40%. Copy and Paste as a new layer moving over to the right. D/s as
above.
14.
Open Element 21, resize
by 40% then 60%. Copy and Paste as a new layer moving over to the right.
15.
Open Element 37, resize
by 65%. Copy and Paste as a new layer.
16.
Add copyright and
license information
17.
Add name using Amethyst
font and colour #a76efa
That’s it we are done. I hope you found this tutorial easy
to follow. If you have any questions please leave me a message and I will endeavour
to answer as soon as possible.
I would also love to see your results so if you would like
me to add them email me and I will get them added. Remember this is only a
guideline make the tag yours with your own special touches.
Hugs

No comments:
Post a Comment