
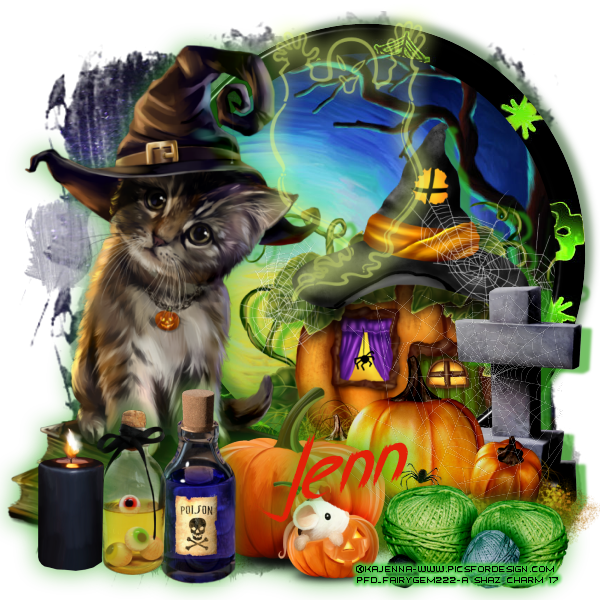
PTU Spooks N
Kittens PTU
This tutorial was written by me Fairygem on the 18th
October 2017 and is all my own idea and creation. Any resemblance to other
tutorials is purely coincidental and not intended. You will need to have a
working knowledge of Paint Shop Pro and using layers and filters.
For this tutorial you will need:-
Paint Shop Pro – I am using PSP X5 but any version will
work.
Scrapkit – I am using an awesome kit by Jenn at Ginnibug
Designz called Spooky Kitties N Co. You can buy this kit at Hania’s Design
HERE.
Tube of Choice – I am using a beautiful tube by Kajenna
that I bought last year. The tube is called Magic Cat and you can buy it at
Picsfordesign HERE. Remember that you must have a license to use Kajenna’s
artwork.
Mask of Choice – I am using a gorgeous mask by
SophistocatSimone at Scrappy Bit of Fun. Mask 25. You can download this mask HERE.
Font of Choice – I am using Breathe Karma Italic which you
can download HERE.
Plugins :-
Eye Candy 4000 – Glass
Ok Ready Lets begin :-
1.
Open new image 600x600
transparent.
2.
Open Paper 16, resize by 85% x2. Copy and
Paste as new layer. Layers Load Mask and find the mask you are using. Delete
mask layer and merge group.
3.
Open Paper 6, Go to your colour palette and find
your paper in Patterns. Make sure it shows in Foreground/Stroke Palette. Close
Background.
4. Go to Presets and find your Eclipse shape. Width 30,
Anti-Alas and create as vector. Draw out a circle 400x400. Once happy with the
size Convert to Raster and move over to the right of canvas.
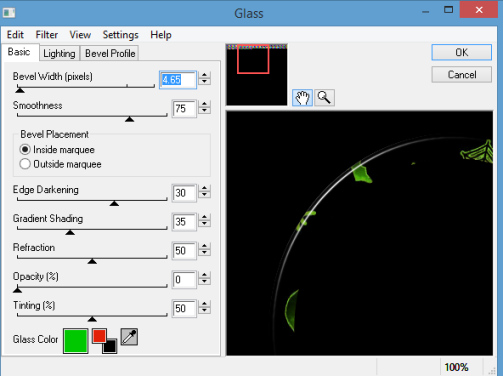
5.
Effects – Plugins – Eyecandy 4000 Glass with
settings below.
6.
With your magic wand click inside the frame,
Modify, Expand by 7. Open Paper 5, resize by 70%. Copy and paste as new layer moving
paper into frame. When happy Invert, Delete. Selections None. Move Paper below
frame.
7. Make frame layer active and give a drop shadow V-6, H-7,
Opacity 65, Blur 11.24, Colour #3e6537.
8.
Open Element 3, resize by 70% and Copy. Make
the paper layer active, and Paste as a new layer. Move over to the right side
of frame. Erase any overhanging house. Give a drop shadow of V4, H10, Opacity
65, Blur 3.55, Colour #2ca115.
9.
Open Element 20, resize by 45%. Copy and Paste
as a new layer moving over to the right side. Drop Shadow as above.
10.
Open Element 9. Copy
and Paste as a new layer. Mirror then move over to the right.
11.
Open your tube and if
using same as me resize by 25%. Copy and paste as a new layer and move over to
the left. Drop shadow V1, H-1, Opacity 65, Blur 32.55 Same colour as above.
12.
Open Element 15, resize
by 60%. Copy and Paste as a new layer. Move over to the left and down slightly.
Drop Shadow as above.
13.
Open Element 14, resize
by 45%. Copy and paste as a new layer moving over to the right side. Sharpen.
14.
Open Element 48, resize
by 40%. Copy and Paste as a new layer moving over to the left. Drop shadow as
above.
15.
Open Element 64, resize
by 40% then 65%. Copy and paste as a new layer moving over to the left. Drop
shadow as above.
16.
Open Element 73, resize
by 30%. Copy and paste as a new layer moving over to far left. Drop shadow as
above.
17.
Open Element 104,
resize by 45%. Copy and paste as a new layer moving over to the right. Drop
shadow as above.
18.
Open Element 43, resize
by 75%. Copy and paste as a new layer moving slightly up and to the right (see
mine for placement). Lower the Opacity to 65%.
19.
Add copyright and
relevant license details.
20.
Add name using colour
#e22108. Add drop shadow as above then repeat.
Save as a PNG.
That’s it we are done. I hope you enjoyed my tutorial and
found it easy to follow. If you have any questions don’t hesitate to ask. I
would love to see your results so please feel free to email me them and I will
get them added to the post.
Hugs
Sharon/Fairygem
No comments:
Post a Comment