
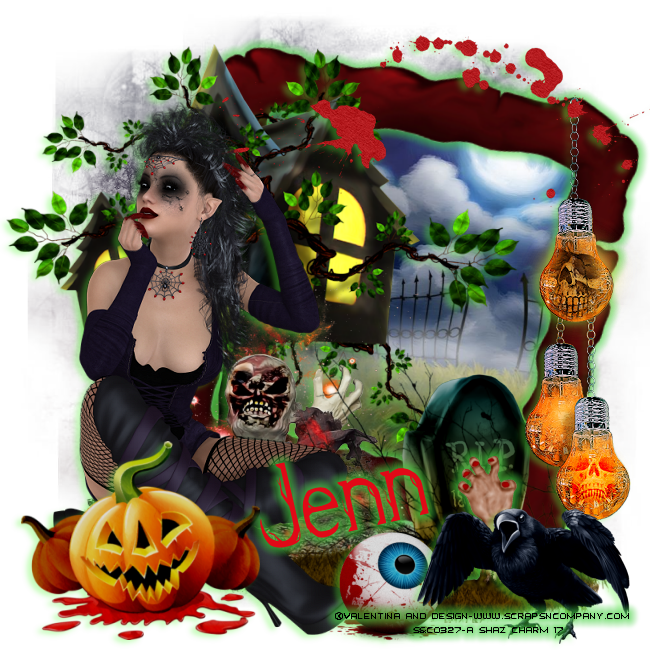
Zombies Smile
This tutorial was written by me Fairygem on the 19th
October 2017 and is all my own idea and creation. Any resemblance to other
tutorials is purely coincidental and not intended. You will need to have a
working knowledge of Paint Shop Pro for this tutorial.
You will need:-
Paint Shop Pro – I am using X5 but any version will work.
Scrapkit – I am using an awesome kit by Jenn at Ginnibug
Designz called Zombie Snow. You can buy this kit at Hania’s Design Here.
Tube of Choice – I am using the wonderful artwork of
Valentina and Design. This tube is called Evalle. You can buy this tube at
Scraps N Company Here.
Mask of Choice – I am using an awesome Halloween mask by
Tonya called Tbt_HalloweenMask 2. You can download this mask on the Creative
Misfits blog under Bca_Halloween mask 2016 Here.
Font of Choice – I am using a Halloween font called Kampung
Zombie. You can get this font Here.
Plugins – Eyecandy 4000-Gradient Glow
Lets Begin :-
1.
Open new image 650x650
transparent
2.
Open Paper 1, resize by
85%. Copy and paste as a new layer. Layers Load mask and find the mask you are
using. Delete Mask layer and Merge group.
3.
Open Frame 2, resize by
70%. Copy and paste as a new layer moving up and over to the right. Free rotate
by 12 right.
4.
With your magic wand
click inside the frame, modify and expand by 10. Open Paper 2 and resize by 70%
then Mirror. Copy and paste placing into the frame. Once happy with position
Invert and Delete. Selections None.
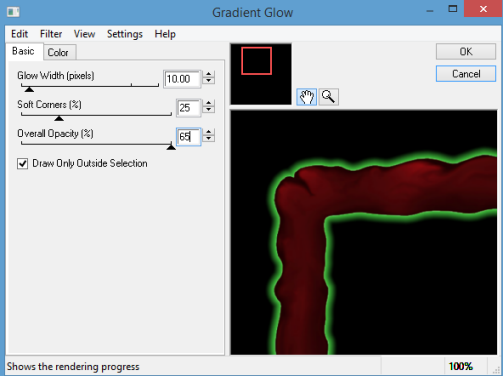
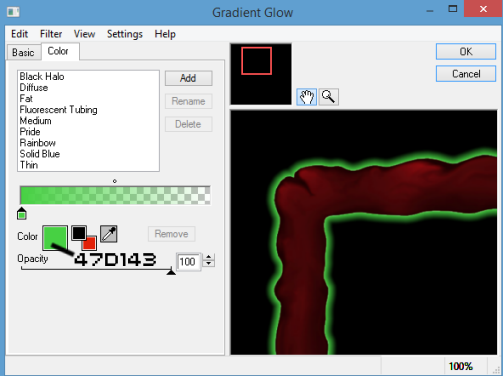
5.
Make frame active
again. Effects Plugins Eyecandy 4000 Gradient Glow with the settings below.
 v
v
6.
Open Element 2, resize
by 70%. Copy and Paste as a new layer moving over to the left. Drop Shadow V3,
H-5, Opacity 35, Blur 7.93, Colour 5cf83c.
7.
Open Element 15. Resize
by 70%. Copy and Paste as a new layer moving over to the left. Drop Shadow as
above.
8.
Open Element 16, resize
by 70%. Copy and Paste as a new layer moving over to the right. Drop Shadow as
above.
9.
Open Element 65, resize
by 65%. Copy and Paste as a new layer moving over to the right placing loop at
top of frame. Sharpen and Drop Shadow as above.
10.
Open Element 51,
Mirror. Copy and Paste as a new layer moving up and slightly right. Drop Shadow
as above.
11.
Open your tube and if
using the same as me Resize by 15% then 80%. Mirror then Copy and Paste as a
new layer moving over to the left. Sharpen and Drop Shadow as above.
12.
Open Element 19, resize
by 35% then 65%. Copy and Paste placing on the grave. Plugins Eyecandy Gradient
Glow with previous settings. Take eraser and erase the bottom so that it looks
like the hand is coming up from the grave.
13.
Open Element 21, resize
by 40%. Copy and Paste as a new layer moving to the left. Drop Shadow as above.
14.
Open Element 49, resize
by 55%. Copy and Paste as a new layer moving down slightly. Drop Shadow as
above.
15.
Open Element 79, resize
by 40%. Copy and Paste as a new layer moving over to the right. Drop Shadow as
above.
16.
Add your copyright and
relevant license details.
17.
Add your name using
Kampung Zombie font Size 72, Colour e10917. Convert to raster and give it a
gradient glow with previous settings.
Save as a Png
That’s it we are all done. I hope you found my tutorial fun
and easy to follow. If you have any questions don’t hesitate to ask. I would
also love to see your results so please feel free to email so I can get them
added to the post.
Hugs
Shaz/Fairygem
No comments:
Post a Comment