
PTU MERMAID LOVE PTU
This Tutorial was written by me Sharon/Fairygem on the 7th
March 2015 and is all my own creation. Any resemblance to other tutorials is
purely coincidental and not intended.
For this Tutorial you will need:-
Paint Shop Pro – I am using PSPX5 but any version will work.
Tube of Choice or the one I am using which is an Exclusive at
Pics for Design called The Brilliant Mermaid. You can buy it HERE.
Ok Ready Lets Begin
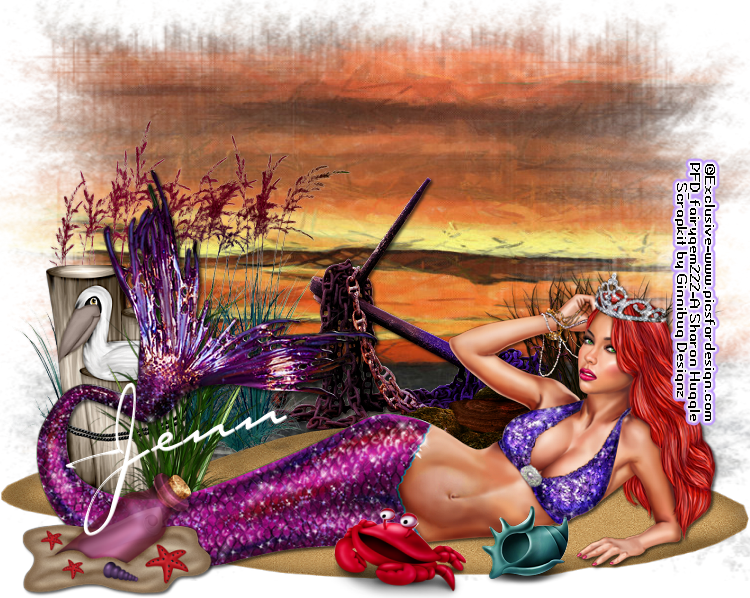
1. Open a new image 750 x 650
2. Open Paper 5 and resize by 85% twice. Copy and Paste as a new layer onto
your image. With your pick tool stretch the paper length ways so it is about
3mm away from the side of your canvas. Move the top and bottom up so that is
about 2mm from the edge of your canvas.
3. Layers, Mask Load Mask from disk and find your 598 Insatiable
Dreams mask. Delete Mask Layer then merge group.
4. Open Element 36, Copy and Paste as a new layer. Take your Pick
tool and move the sides in by 2mm each then move the top of the sand down by
7mm or until you have it flat enough for the tag. Sharpen.
5. Open Element 3 and Resize by 55% three times then 75% once. Copy and paste as a new layer and move
to the left hand side at the bottom. Sharpen and add a drop shadow of 2, 2, 65
and 3.95 Black.
6. Open Element 46 and Resize by 60% , Copy and paste as a new layer moving it
slightly below the sand. See my tag for reference. Sharpen and add a drop
shadow previously used.
7. Open Element 47 and Resize by 35% , Copy and Paste as a new layer moving to the
left side under the sand. Sharpen.
8. Open Element 7 and Resize by 65% twice,
Copy and paste moving above the bird layer slightly to the right. See my tag
for Reference. Sharpen.
9. Open Element 16 and Resize by 55% , Copy and Paste as a new layer moving to the
right side of the canvas. Sharpen and add drop shadow previously used.
10. Open your tube and if using the same tube as me Resize by
50% , Copy and paste as a new layer and
move so she is lying on the sand. Sharpen and add drop shadow previously used.
11. Open Element 65 and Resize by 45% then 65%
, Copy and paste as a new layer and move so its at bottom of the tail.
Sharpen and add drop shadow.
12. Open Element 32 and Resize by 45% then 55%
, Copy and paste as a new layer and place at the bottom middle of the
mermaid. Sharpen.
13. Open Element 30 and Resize by 35% twice then 45% , Copy and paste as a new layer and move near
to the mermaids hand. Sharpen.
14. Add your Copyright and License number.
15. Add your Name using Carpenter Script font and Colour White.
Place where you would like your name to be, I placed mine on a slant by the
tail.
That’s it we are done.
Hope you enjoyed my Tutorial, remember though this is a guideline
only put your own touches to make it yours.
Hugs
No comments:
Post a Comment