
PTU
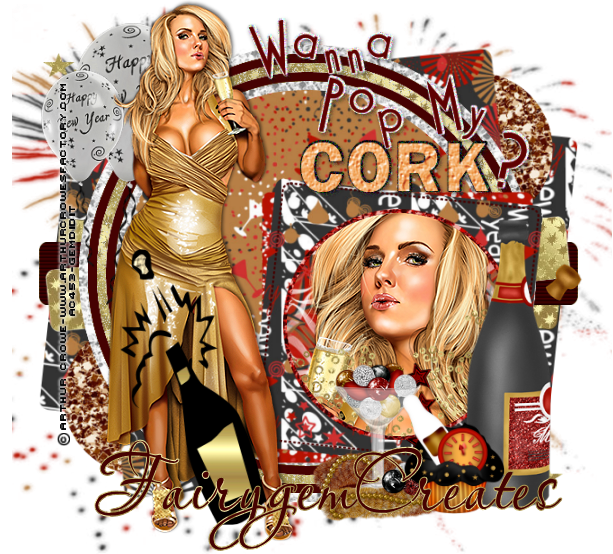
Wanna Pop My Cork
This tutorial was written by me Fairygem, on the 27th December 2012 and is all my own idea. If it resembles any other tutorial its purely coincidental and not intended.
For this tutorial you will need to have a working knowledge of Paint shop pro and working with layers.
For this tutorial you will need:-
Paint Shop Pro - I am using Psp9 but any one will work.
Scrapkit of Choice - I am using a PTU by Jens called Party like its 2013 which you can find HERE
Template of Choice - I am using a collab by Kandee called Pop My Cork which you can find HERE on Kandi's site or HERE on Dee's site.
Tube of Choice - I am using Arthur Crowe which you can find HERE
Mask of Choice or the one i am using - Vix's masks are awesome have a lookie at what she offers for us mere taggers. I'm using her mask 208 which you can get HERE
Font of Choice or the one i am using called Aquarelle which you can find HERE
Ok lets begin
1. Open Kandee's template shift and d to duplicate
2. Open Paper 2 from the scrapkit, resize by 85% twice. Copy and paste as a new layer.
3. Layers load Mask and find Vix's mask 208, delete mask and merge group.
4. Highlight Beige layer, select all float, defloat.
5, Open Paper 6, resize by 85%. Copy and paste as a new layer onto your working layer. Invert and delete. Delete the original beige layer.
6. Highlight the Black strip layer, Select, float defloat. Add a new layer and flood fill with a gold gradient. Selections None. Delete the original.
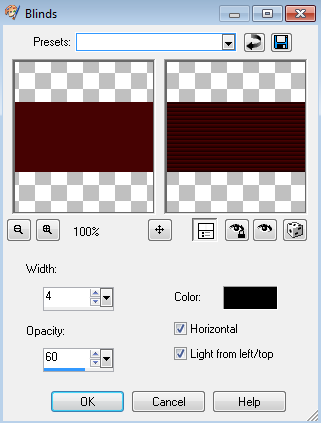
7. Highlight the Green strip, Selections float, defloat. Add a new layer and flood fill with #460202. Then go to Effects blinds, with the settings below.
8. Highlight the white strip, select float defloat. Add a new layer and flood fill with your gold gradient. Delete the original layer.
9. Merge the two Red circles together, select, float defloat.
10. Open Glitter 2, Resize by 85% three times. Copy and paste as a new layer. Invert and Delete. Delete the original.
11. Highlight the Large black square, selections float, defloat. Open Paper 3, Resize by 85% twice, copy and paste as a new layer. Invert delete. Delete the original.
12. Highlight the Green circle, Selections float, defloat. Open Paper 4, resize by 85% twice. Copy and paste as a new layer. Invert delete. Delete the original.
13. Highlight the Red ring, Selections float, defloat and open Glitter 4. Resize by 65%, remember to Sharpen the glitter tile. Adjust Sharpen once. Copy and paste glitter as a new layer. Invert delete. Delete the original.
14. Highlight the Green ring, Selections float, defloat Add a new layer and flood fill with the colour previously used. Delete the original.
15. Highlight the White ring, Selections float, defloat. Add a new layer and flood fill with your gold gradient. Delete the original.
16. Highlight the White square, Selections float, defloat. Open Paper 5, resize by 85% twice, copy and paste as a new layer, invert and delete. Delete the original.
17. Highlight the Black square, Selections float, defloat. Open Paper 6 and resize by 85% twice. Copy and paste as a new layer, invert and delete. Delete the original.
18. Click on the Dashed squares and Add a new layer. Floodfill with the colour previously used. Go back to the Dashed squares and highlight. Selections float, defloat then back to the colour layer hit invert and delete. Delete the original layer. I know this a roundabout way to fill the dashes but i find it the easiest way, if yours is easier then do your way.
19. Highlight the White circle, Selections float, defloat. Open Glitter 1 and resize by 65%. Copy and paste as a new layer, invert and delete. Delete the original.
20. Highlight the Red circle, Selections float, defloat. Open Paper 8, resize by 65%, Copy and paste as a new layer, invert and delete. Do not deselect.
21. Open your close up tube, mirror then Copy and paste as a new layer. Place what part of the tube you wish to show, then hit delete. Deselect and delete the original layer.
22. Highlight the Circle spray then add a new layer. Flood fill with the gold gradient. Go back to your Circle spray layer, select float, defloat, Invert and go to your gold gradient layer and delete. Delete the original.
23. Highlight the Word art back, adjust add remove noise and add at Random 82%. If you wish to use a different colour feel free, remember this is your tag.
24. Highlight the Wordart, go to Adjust, Colour balance, Manuel Colour change and change to a colour you would like, I stuck with Red as that is the base colour of this tag.
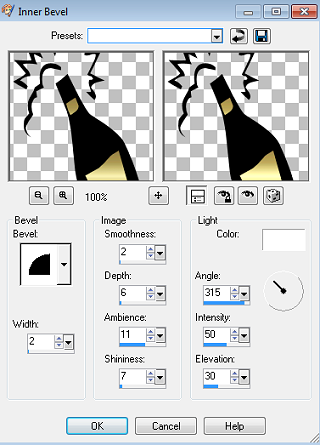
25. Highlight the Bottle layer, Effects Inner Bevel and use the settings below.
26. Highlight the Stars layer and merge with the Dotted lines layer. Add a new layer and flood fill with your gold gradient, then back to the merged layer, Selections float, defloat. Back to the flooded layer Invert and delete. Delete the original layer.
27. Open your tube of choice, Copy and paste placing on the left side of the tag. See my tag for placement. Add a drop shadow of -2, 2, 50 and 5.
28. Open the Champagne element, resize by 65% then copy and paste placing it on the right side of the tag.
29. Open Cupcake 2, resize by 35%, copy and paste placing next to the champagne element.
30. Open the Balloon element and resize by 70%. Copy and paste under your tube at the top of the left side. Duplicate by 70% again, sharpen and move to the left moving down slightly.
31. Open Glass element, resize by 40%, copy and paste as a new layer placing it next to the cupcake but under it if you get my meaning. Check my tag out to make sense of what i'm trying to say.
32. Add your name and place where you want on your tag, i've placed mine on the righthand side at the bottom.
33. Add your copyright and Save as a png.
Thanks it we're done i hope you managed to follow my tutorial and enjoyed making it. Any questions pm and i will be pleased to answer them.
Hugs and All the best for NEW YEAR and 2013
Gem xx
No comments:
Post a Comment