
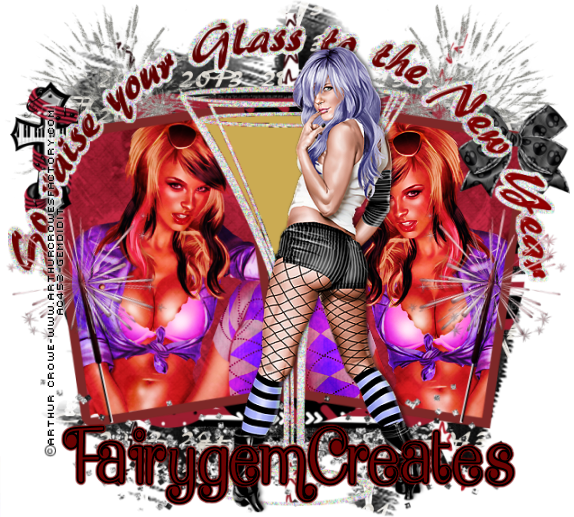
Raise Your Glass To The New Year
Tag and Forum Set
This tutorial was written by me Fairygem on the 23rd December 2012, and is all my own idea. If there is any resemblence any other tutorial it is purely coincidental.
For this tutorial you will need:-
Paint Shop Pro - I am using psp9
Artist of choice for two tubes - I am using Arthur Crowes awesome work which you can find HERE
Scrapkit of choice or the one i am using by Tasha called After the Party which you can grab HERE
My Template which you can get HERE
Font of Choice or the one i am using-Dean Martin Swing HERE
Plugins - Mura Miester - Copies
Eye Candy 4 - Gradient Glow and Glass
Ok lets begin with the Tag
1. Open my template copy and delete the original
2. Highlight the Spike layer, selection float, selection defloat. Open paper 6 and resize by 85% twice copy and paste as a new layer, selections invert and delete the paper hanging over. Delete the original.
3. Highlight the Oval layer, Selections float, selections defloat and open paper 3. Resize by 85% twice, copy and paste as a new layer, selections invert and delete the paper hanging over. Delete the original.
4. Highlight your right small oval and merge down to the left small oval. Selections float, defloat and open paper 4, Copy and paste as a new layer, invert and delete the paper hanging over. Delete the original.
5.Highlight the middle circle, selections float, defloat and open paper 5, resize by 85% twice. Copy and paste as a new layer, invert and delete the paper hanging over. Delete the original.
6.Highlight left rectangle, selections float, defloat and open Paper 1. Resize by 85% twice, Copy and paste as a new layer, selections invert and delete the paper hanging over. Do not deselect.
7. Highlight your tube, copy and paste into the left rectangle, place where you wish the tube to be and hit delete. Delete the original layer. Keep your tube layer selected.
8. Change the blend mode of your tube to Hard Light.
9. Follow steps 6-8 for the right side rectangle.
10. Highlight your two frames and merge together. Selections float, defloat add a new layer and flood fill with 7e2828. Deselect and delete the original layer.
11. I have left the Champagne and wordart background the way they are, but if you want you can change them to your own liking.
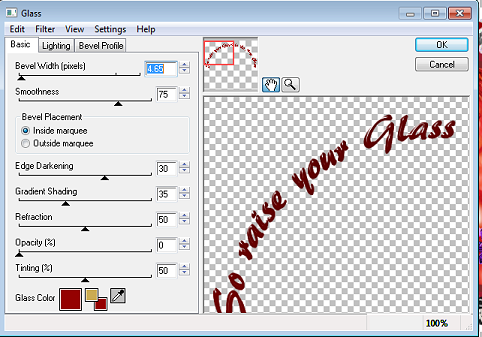
12. Highlight the wordart, selections float, defloat and add a new layer. Flood fill with #950101, deselect and delete the original layer. Eye Candy 4 Glass with settings below.
13. Open your main tube, resize, copy and paste as a new layer. Place where you would like or where i have placed mine, look at finished tag for placing. Give a drop shadow of -2,2.50 and 5.
14. Open the bow element, resize by 45%, copy and paste as a new layer. Place it at the right hand side frame. Look at mine for placement.
15. Open the Music Cross, resize by 40% copy and paste and place on the left hand side frame.
16. Open the Glitter spray, resize by 85% copy and paste under the tube at the bottom.
17. Open Firework 3, resize by 65% copy and paste as a new layer placing on the right side. Copy and mirror, merge down and move to underneath the rectangle layer.
18. Open Firework 1, resize by 45%, copy and paste as a new layer place it to the left of the main tube. Rotate, free rotate by 12%. Duplicate and mirror then merge down.
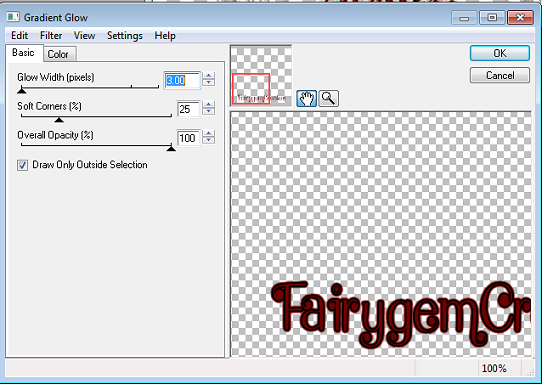
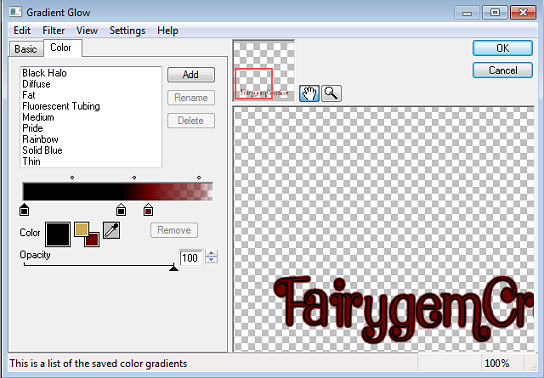
19. Add your name,colour 6c0202, then Eyecandy 4 Gradient glow settings as below.
20. Add your copyright and save as a png.
Now for the Forum Tag
1. Open your working space 600x250
2. Copy and paste your half tube as a new layer. Place to the right side of your workspace. Duplicate and move the duplicate to the middle of the workspace.
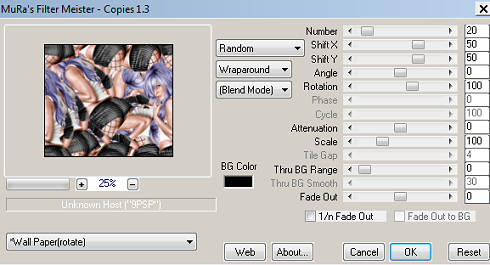
3. Mura Miester Copies Rotate settings as below
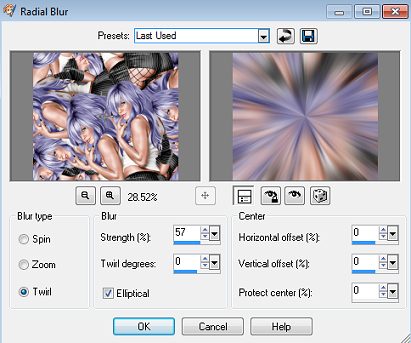
4. Adjust, blur and Radial Blur settings as below.
5. Open paper 1 and resize by 85% copy and paste above the copies layer. Change the blend mode to overlay.
6. Crop your workspace back to 600x250.
7. Open the Cityscape element, resize by 85% copy and paste underneath the main tube.
8. Open Firework 2, copy and paste behind the cityscape layer and move to the top lefthand corner. Duplicate and mirror then merge down.
9. Find a fat font, i used Impact and write out 2013 above the cityscape layer but below the tube layer. Drag the font so that it fits the whole workspace. Change the blend mode to Soft light.
10. Open the Champagne bottle and resize by 65% copy and paste as a new layer placing in the middle of the cityscape element.
11. Add a new layer, select all and contrast by 6, invert and flood fill with a colour of choice.
Add your name as before and use the same gradient glow settings. Add your copyright and save as a png.
Avatar
This one is pretty damn easy.
1. Go to your forum tag and resize your main tube by 85%.
2. With your crop tool go around your tube till you have 180x150.
3. Add a new layer select and contrast by 3 invert and flood fill with the same colour used in your forum tag.
4. Add your name and use the same gradient settings as before. Add copyright then save as a png
Thats it we're done hope you found my tutorial fun and easy to follow, but remember this is only a guideline make the set your's with your own personal touches. Any questions leave me a message.
Hugs
Gem xxx
3. Highlight the Oval layer, Selections float, selections defloat and open paper 3. Resize by 85% twice, copy and paste as a new layer, selections invert and delete the paper hanging over. Delete the original.
4. Highlight your right small oval and merge down to the left small oval. Selections float, defloat and open paper 4, Copy and paste as a new layer, invert and delete the paper hanging over. Delete the original.
5.Highlight the middle circle, selections float, defloat and open paper 5, resize by 85% twice. Copy and paste as a new layer, invert and delete the paper hanging over. Delete the original.
6.Highlight left rectangle, selections float, defloat and open Paper 1. Resize by 85% twice, Copy and paste as a new layer, selections invert and delete the paper hanging over. Do not deselect.
7. Highlight your tube, copy and paste into the left rectangle, place where you wish the tube to be and hit delete. Delete the original layer. Keep your tube layer selected.
8. Change the blend mode of your tube to Hard Light.
9. Follow steps 6-8 for the right side rectangle.
10. Highlight your two frames and merge together. Selections float, defloat add a new layer and flood fill with 7e2828. Deselect and delete the original layer.
11. I have left the Champagne and wordart background the way they are, but if you want you can change them to your own liking.
12. Highlight the wordart, selections float, defloat and add a new layer. Flood fill with #950101, deselect and delete the original layer. Eye Candy 4 Glass with settings below.
13. Open your main tube, resize, copy and paste as a new layer. Place where you would like or where i have placed mine, look at finished tag for placing. Give a drop shadow of -2,2.50 and 5.
14. Open the bow element, resize by 45%, copy and paste as a new layer. Place it at the right hand side frame. Look at mine for placement.
15. Open the Music Cross, resize by 40% copy and paste and place on the left hand side frame.
16. Open the Glitter spray, resize by 85% copy and paste under the tube at the bottom.
17. Open Firework 3, resize by 65% copy and paste as a new layer placing on the right side. Copy and mirror, merge down and move to underneath the rectangle layer.
18. Open Firework 1, resize by 45%, copy and paste as a new layer place it to the left of the main tube. Rotate, free rotate by 12%. Duplicate and mirror then merge down.
19. Add your name,colour 6c0202, then Eyecandy 4 Gradient glow settings as below.
20. Add your copyright and save as a png.
Now for the Forum Tag
1. Open your working space 600x250
2. Copy and paste your half tube as a new layer. Place to the right side of your workspace. Duplicate and move the duplicate to the middle of the workspace.
3. Mura Miester Copies Rotate settings as below
4. Adjust, blur and Radial Blur settings as below.
5. Open paper 1 and resize by 85% copy and paste above the copies layer. Change the blend mode to overlay.
6. Crop your workspace back to 600x250.
7. Open the Cityscape element, resize by 85% copy and paste underneath the main tube.
8. Open Firework 2, copy and paste behind the cityscape layer and move to the top lefthand corner. Duplicate and mirror then merge down.
9. Find a fat font, i used Impact and write out 2013 above the cityscape layer but below the tube layer. Drag the font so that it fits the whole workspace. Change the blend mode to Soft light.
10. Open the Champagne bottle and resize by 65% copy and paste as a new layer placing in the middle of the cityscape element.
11. Add a new layer, select all and contrast by 6, invert and flood fill with a colour of choice.
Add your name as before and use the same gradient glow settings. Add your copyright and save as a png.
Avatar
This one is pretty damn easy.
1. Go to your forum tag and resize your main tube by 85%.
2. With your crop tool go around your tube till you have 180x150.
3. Add a new layer select and contrast by 3 invert and flood fill with the same colour used in your forum tag.
4. Add your name and use the same gradient settings as before. Add copyright then save as a png
Thats it we're done hope you found my tutorial fun and easy to follow, but remember this is only a guideline make the set your's with your own personal touches. Any questions leave me a message.
Hugs
Gem xxx
No comments:
Post a Comment