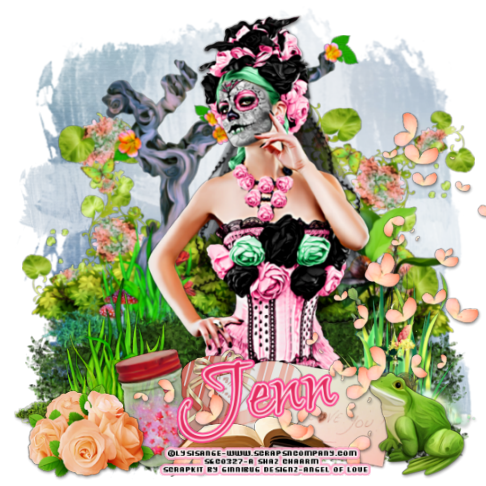
Angel Skull Spring

This tutorial was written by me Fairygem on the 20th
February 2017 and is all my own idea and creation. Any resemblance to another
tutorial is purely co-incidental and not intended.
For this tutorial you will need to have a working
knowledge of Paint Shop Pro and adding layers.
You will also need :-
Paint Shop Pro – I am using pspX5 but any version will
work
Scrapkit – I am using an awesome one by Jenn at Ginnibug
Designz called Angel of Love. Although this kit was designed for Valentines the
Elements can be used in a Spring tag also. You can buy this kit at Hania’s
Design HERE
Tube of Choice – I am using a beautiful tube by Lysisange
called Skull Pink. You can buy this tube at Scraps and Company HERE. Please
remember you need a working license to use art from this company.
Mask of Choice – I am using a beautiful mask by Simone at Scrapy Bit of Fun – Mask 25 – You can find this mask HERE
Font of Choice – I used a beautiful font by Rob called
Shalimar Swash. You can find this font with a search online.
Plugin:-
Eye Candy 5 Impact Gradient Glow.
DropShadow throughout tutorial is V2 H1 Opacity 45 Blur 5
Black.
Ok Lets Begin
Open new image 600x600 Transparent
Open Paper 16 and resize by 85% twice. Load Mask 25 by
Simone. Delete mask and merge group.
Open Element 3, Resize by 85% twice then 90%. Copy and
Paste as a new layer and move slightly up.
Open your Tube, copy and paste as a new layer onto your
image. Resize tube by 45%, Sharpen and give dropshadow previously stated.
Open Element 15, Copy and Paste moving behind main tube.
Duplicate and move slightly down. Duplicate the original element and bring up
above the main tube. Move slightly down. See my tag for placement.
Open Element 4 and resize by 55%, copy and paste as a new
layer moving to right side of tag and down slightly. Sharpen and give
dropshadow previously stated.
Open Element 61 and resize by 35%, copy and paste as a
new layer moving to the left side of tag and down slightly. Sharpen and give
dropshadow previously stated.
Open Element 53 and resize by 25%, copy and paste as a
new layer moving to the left side of tag. Sharpen and give dropshadow
previously stated. Rotate free rotate 12 Left. Make sure all layers is unticked.
Open Element 7 and resize by 30%, copy and paste as a new
layer moving to the right of the tag. Sharpen and give dropshadow previously
used. Rotate Free rotate 12 Right.
Open Element 81 and resize by 30%, copy and paste as a
new layer moving down slightly. Sharpen and give dropshadow previously used.
Open Element 19 and resize by 40%, copy and paste as a
new layer moving down near bottom of tag. Sharpen and give dropshadow
previously used.
Open Element 36 and resize by 30%, copy and paste as a
new layer moving to left side. Sharpen and give dropshadow previously used.
Open Element 72 and resize by 30% then 90%, copy and
paste as a new layer moving to right side. Sharpen and give dropshadow
previously used.
Open Element 47 and resize by 90%, copy and paste as a
new layer moving over to the right side of tag. Sharpen and give dropshadow
previously used.
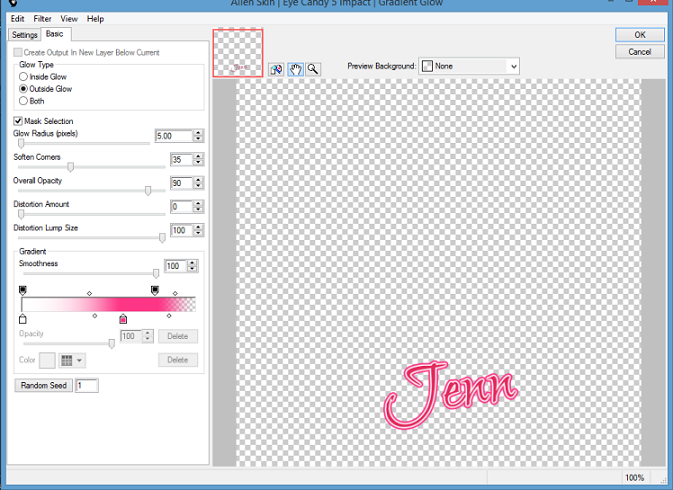
Add your name using your preferred font and give a
Gradient glow settings below:-

Add Copyright and License

Add Copyright and License
Save as a PNG
That’s it we are done, I hope you found this tutorial
easy to follow
Any questions please feel free to message me. I would
love to see your results also so please message me them so I can add them to
the tutorial.
Remember though my tutorial is only a guideline make the
tag your own and have fun
Hugs
Sharon/Gem

No comments:
Post a Comment