
PTU Yummy Spring PTU

This tutorial was written by me Sharon/Fairygem on the 23rd
April 2016 and is all my own creation. Any resemblance to other tutorials is
purely coincidental and not intended.
You will need to have a working knowledge of using layers
in Paint Shop Pro.
For this tutorial you will need:-
Paint Shop Pro – I am using X5 but any version will work.
Tube of Choice – I am using a beautiful tube by Zlata_M
called Tamara. You can find her art HERE
Scrapkit of Choice – I am using an awesome kit by Jenn at
Ginnibug Designz called Kim. You can buy this kit HERE at Hania’s Design.
Mask of Choice – I am using one of Millies gorgeous masks.
MPM 101. You can find Millies masks on her blog HERE.
Font of Choice – I am using Frosting for Breakfast. Google
to find this font.
Plugins used :-
Xero – Porcelain
Ok lets begin.
Open a new image 700x700 transparent. We can resize later.
Open Paper 3, Resize by 85%. Copy and Paste as a new layer.
Layers load Mask, Delete Mask layer and Merge group.
Open Element 6 and resize by 85%. Copy and Paste moving
slightly up on the right side of the canvas. Give a dropshadow -4, 5, 25, 4
Black.
Open Element 92 and resize by 65%. Copy and Paste as a new
layer. Mirror and move over to the left side and slightly up. Give dropshadow
previously used.
Open Element 24. Copy and Paste as a new layer moving
slightly up and right. Duplicate and move over to the left.
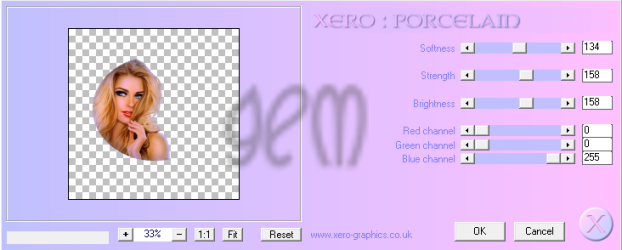
Open your Tube and Copy and Paste as a new layer. If using
same tube resize by 75%. Sharpen then mirror moving over to the right. Effects
Xero Porcelain with settings below. Give previous dropshadow.
Open Element 44, Copy and Paste moving over to the left
side and slightly up. Duplicate and move slightly over to the right and down a
bit. Merge down.
Open Element 43, Copy and Paste as a new layer. Resize up
by 110%. Move over to the right and sharpen.
Open Element 30 and resize by 30%. Copy and Paste as a new
layer moving over to the left. Sharpen and give dropshadow previously used.
Open Element 76 and resize by 65% then 70%. Copy and Paste
as a new layer move over to the left. Sharpen and give dropshadow previously
used.
Open Element 36 and resize by 55%. Copy and Paste as a new
layer. Sharpen and give dropshadow previously used.
Open Element 32 and resize up by 140%. Copy and Paste as a
new layer. Sharpen.
Add your name using colour #d46764 for the stroke and
#ff246e for the fill.
Add your Copyright and License.
Resize if you want, I resized by 85%.
Save as a PNG.
That’s it we are done.
I hope you found my tutorial easy to follow. Any questions
please don’t hesitate to ask.
I would love to see your results and get them added to my
blog so please feel free to message them to me.
Hugs
Sharon/Fairygem
No comments:
Post a Comment