
PTU Steampunk Fox PTU
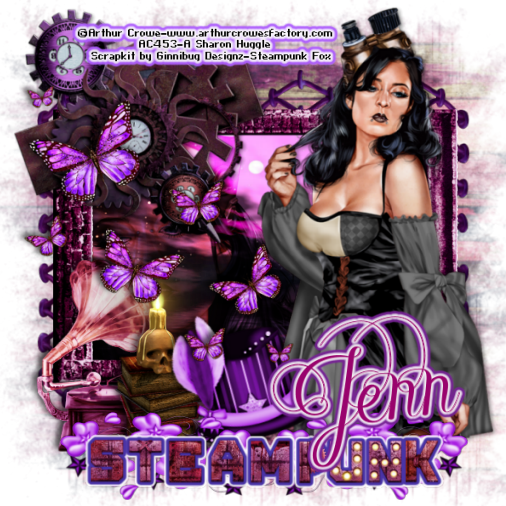
This
tutorial was written by me Fairygem on the 11th March 2016 and is
all my own creation and idea. Any resemblance to other tutorials is purely
coincidental and not intended.
You will
need to have a working knowledge of Paint Shop Pro and layers.
For this tutorial you
will need:-
Paint Shop Pro – I am
using X5 but any version will work.
Tube of Choice – I am
using the awesome artwork of Arthur Crowe. The tube is called Onyx and you can
find it HERE. You will need to have a license to use Arthur Crowes Artwork.
Scrapkit of Choice – I am
using a beautiful kit by Jenn at Ginnibug Designz called Steampunk Fox. You can
buy this kit at Picsfordesign HERE. Jenn uses the name LapisGin for her kits at
PFD.
Mask of Choice – I am
using a beautiful mask by Insatible Dreams Number 598 HERE
Font of Choice – I am
using Janda Celebration Script HERE
Plugins:-
Eye Candy 4000 –
Gradient Glow
Eye Candy 5 – Impact –
Gradient Glow
Ok Lets begin:-
1. Open New Image 700x700.
We can resize later.
2. Open Paper 6 and resize by 85%. Copy and Paste
as a new layer.
3. Load Mask from disk and find your mask. Load,
Delete and merge as Group.
4. Open Element 16. Copy and Paste as a new layer.
Move the element to the top of the canvas. Duplicate and flip. Move the duplicate
down so that both are linked together. Merge down.
5. Open Element 63. Rotate to the right. Copy and
Paste as a new layer.
6. With your magic wand click inside the frame.
Modify and expand by 12. Open Paper 3 and resize by 85% twice. Copy and Paste as
a new layer, Invert and delete excess. Move below the frame. Do Not Select.
7. Open your close up 2 tube. Copy and Paste as a
new layer. Resize by 80% and move to the right side of the frame. Delete Excess
and deselect.
8. Mirror your close up and move under the frame.
Properties and change the blend Mode to overlay.
9. Open your main tube, I am using the Close up
tube. Copy and Paste as a new layer resizing by 80% then 90%. Remember to
unclick all layers. Move over to the right side of canvas and give a dropshadow
of 2, 3, 40, 7.69 Black.
10.
Open
Element 5 and resize by 65%. Copy and Paste as a new layer and moveup to the
top left of frame. Sharpen and give dropshadow as above.
11.
Open
Element 90 and resize by 60%. Copy and Paste as a new layer moving to the left
side of canvas. Sharpen and give dropshadow of -4, -6, 65, 11.93 Black.
12.
Open
Element 76 and resize by 50%. Copy and Paste as a new layer. Mirror and move
down to the gramophone element. Sharpen and give dropshadow as above.
13.
Open
Element 69 and resize by 50% then 65%. Copy and Paste as a new layer. Free
Rotate and rotate by 15% left. Move element to the bottom of the canvas.
Sharpen and give dropshadow as above.
14.
Open
Element 94 and resize by 85%. Copy and Paste as a new layer moving to the
bottom of the canvas. Sharpen,
15.
Open
Element 95 and resize by 85%. Copy and Paste as a new layer moving to the
bottom of the canvas. Sharpen. Effects Eye Candy 4000 Gradient Glow and give a
glow with the settings below.
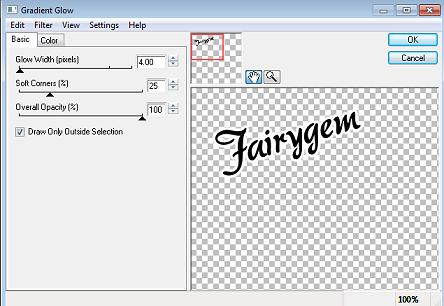
16.
Open
Element 32 and resize by 80%. Copy and Paste as a new layer moving over to the
left side of the Canvas. Sharpen and give a dropshadow previously used.
17.
Resize
all layers by 85% if you wish to. Add your copyright and license.
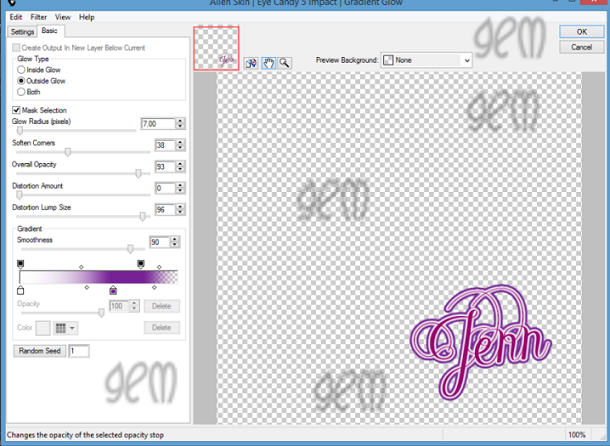
18.
Add
your name using #99036d. Effects Eye Candy 5 Impact Gradient Glow with settings
below.

That’s it we are all
done. I hope you found my Tutorial easy to follow, any problems please feel
free to PM me. Also I would love to see your results and get them added so
please feel free to send me your finished tag. Remember though my tutorial is
only a guideline make it your own and put your own touches to it.
Hugs
No comments:
Post a Comment