
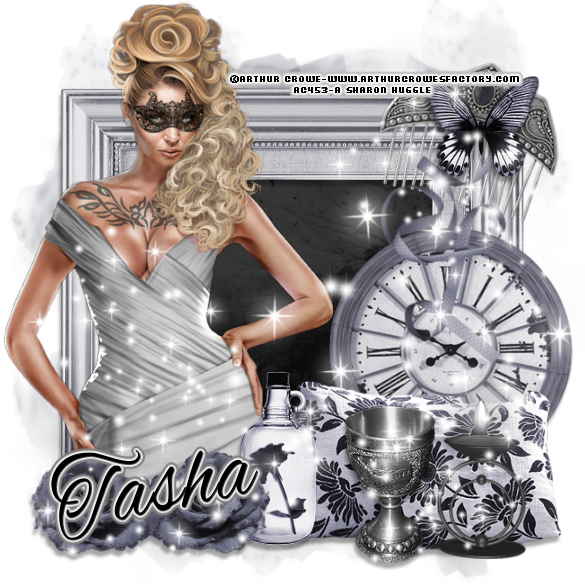
FTU
– The Mask Within – FTU
This
tutorial was written by me Fairygem on the 18th January 2016 and is
all my own creation. Any resemblance to other tutorials is purely co-incidental
and not intended.
For
this tutorial you need to have a working knowledge of layers, Masks and
plugins.
You
will need :-
Paint
Shop Pro-I am using X5 but any version will work.
Tube
of Choice-I am using the awesome art of Arthur Crowe a new tube called
Nightflower-You can get this HERE but please do not use the same tube as me
without a proper license.
Scrapkit
of Choice-I am using a beautiful kit by Tasha’s Playground called Broken Dreams
which you can find HERE.
Mask
of Choice-I am using Vix bigmask005 which you can find HERE.
Sparkles
of Choice-You can find a lot on Deviantart just search for sparkles.
Font
of Choice-I am using Alex Brush which you can find HERE.
Outside
Plugins:-
EyeCandy
5-Perspective Shadow
Eye
Candy 5-Gradient Glow
Ok
lets begin……..
1. Open new image 650x650. We can resize when
finished.
2. Open Paper 1, resize 90%. Copy and Paste as a new layer. Find Mask and
load, delete and merge group.
3. Open Frame 3, copy and paste as a new
layer. With the Magic Wand click inside the frame and expand by 10.
4. Open Paper 6 and resize by 85% twice. Copy
and paste as a new layer, selections Invert and delete excess paper. Move this
layer below the frame.
5. Go back to the frame layer and give it a
dropshadow of 6, -2, 35 and 4.93.
6. Open your tube and if using the same tube
as me choose what colour you would like the dress to be, I chose Silver as it
goes with the kit perfectly. Copy and Paste the tube as a new layer, and resize
by 70%.
7. Go to your freehand selections and draw
around the puffy part of the dress, see my image to help with the selection.
Delete this part of the dress then move into position. I moved mine to the
bottom left of the frame.
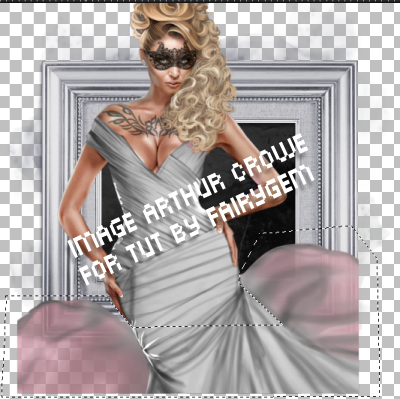
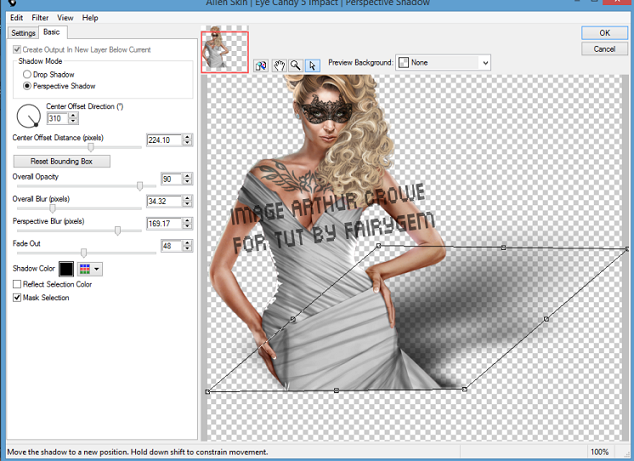
8. Sharpen the tube and add a dropshadow. I
used Eye Candy5 Perspective Shadow with the settings below:-
9. Open Pillows Element, Copy and Paste as a
new layer and move to right side of frame bottom. Give a dropshadow previously
used.
10. Open
Clock Element and resize by 90%. Copy and Paste as a new layer moving it behind
the pillows. Give a dropshadow previously used.
11. Open
Bottle Element and resize by 55%. Copy and apste as a new layer moving to the
centre bottom of the frame. Give a dropshadow previously used.
12. Open
Flower 1 and resize by 75%. Copy and Paste as a new layer moving to bottom
left. Duplicate and mirror placing next to each other (see my tag for
reference). Merge together and give a dropshadow previously used.
13.
Open
Hairpin Element and resize by 80%. Copy and Paste as a new layer moving to the
top right corner of the frame. Go to free rotate 14% right. Make sure all
layers is unchecked. Sharpen.
14. Open
Butterfly Element and resize by 65%. Copy and Paste as a new layer placing on
the hairpin. Sharpen and give dropshadow previously used.
15.
Open
Ribbon Element and resize by 55%. Copy and Paste as a new layer placing under
the butterfly.
16.
Open
Candle Element and resize by 65%. Copy and Paste as a new layer placing in
front of the pillows. Sharpen and give dropshadow previously used.
17. Open
Goblet Element and resize by 70%. Copy and Paste as a new layer placing it next
to the candle element. Sharpen and give dropshadow as previously used.
18. Add a
new layer and find your sparkles brush. Change your foreground colour to white
#fffff. Add your sparkle covering your tube slightly and more onto the
elements.
19. Add
your copyright and relevant license number.
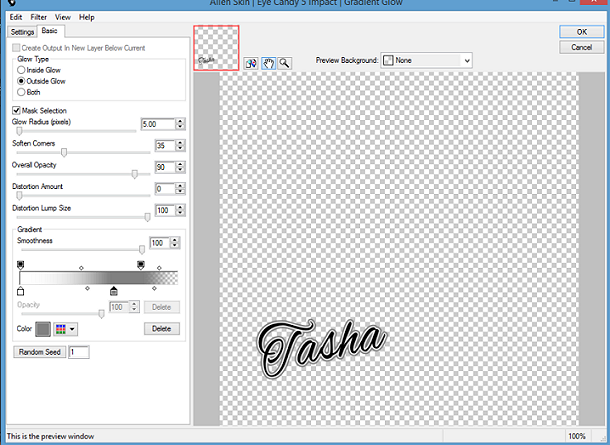
20. Go to
fonts and find your Alex Brush font. Add your name then give it a gradient glow
settings as below.
Save as a PNG
That’s it we are done I hope you found my
tutorial easy to follow. If you have any questions please don’t hesitate to
ask. I would love to see your results so that I can share them on here.
Hugs
Sharon/Fairygem
No comments:
Post a Comment