
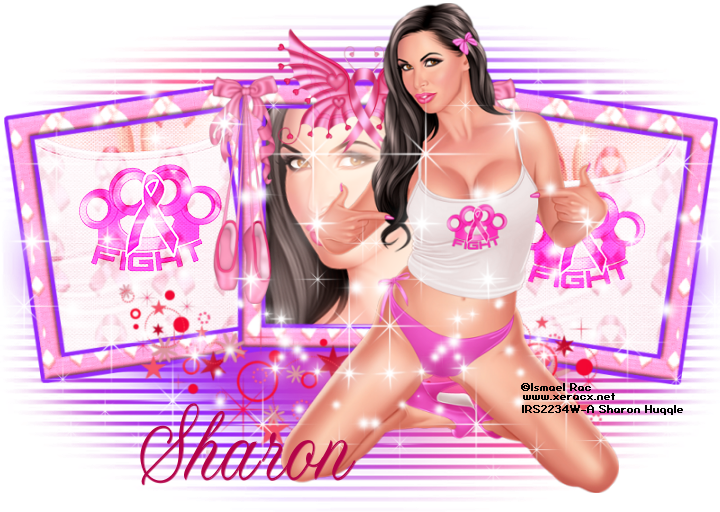
Fight for the Boobies
This tutorial was written by me Fairygem on the 26th
November 2014 and is all my own creation. It is purely coincidental if it
resembles any other tutorial and not intended.
For this tutorial you will need:-
Paint Shop Pro-I used Paint Shop Pro X5 but any version will
work.
Tube of Choice-I used the free tube Ismael Rac gave away on
his facebook Here-Thank you Ismael for sharing your brilliant work with us
pspers.
Scrap kit of choice or mine – Boobies R Us which you can get
Here
Mask of choice or the one I used -0mask011_lt, I can’t
remember where I got this mask, but if you know please pm me so I can add the
makers site to this tutorial.
No outside plugins
Font of choice or the one I am using Altast Greeting Here.
Lets begin
1. Open 750 x 600
2. Open Paper 6, then go to Palette and Pattern and find the
paper. Scale size 100. Keep this in your foreground colour.
3. Go to your preset shapes and find the rectangle, on the
top bar change your width to 25.
4. Close off your background colour and draw a rectangle in
the middle of your layer. Once happy
covert to layer.
5. Add another layer then back to your rectangle, float, de
float modify and expand by 5.
6. On your background colour change to #9629fb. Flood fill
your new layer. Move this underneath your rectangle layer.
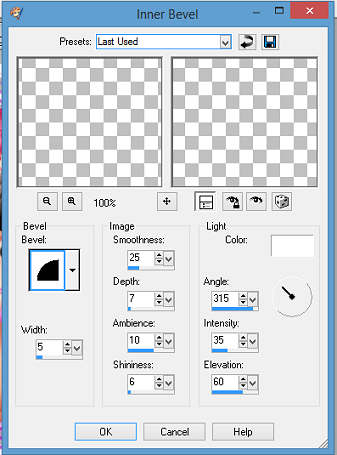
7. Back to your rectangle layer, go to 3D effects Inner bevel
and use the settings below.
8. Merge the two layers together.
9. Duplicate and move to the left side, rotate free rotate 8.
Duplicate the new rectangle and mirror moving to the right side. You should now
have three frames.
10. Merge the frames together and with your magic wand click
in the 3 frames.
11. Open Paper 5 copy and paste as a new layer, invert and
delete the overhanging paper. De select.
12. Take your magic wand and click inside your left frame,
Copy and paste your tube into the frame putting the writing in the middle.
Invert Delete and deselect.
13. Follow instructions for the right frame as above.
14. Take your magic wand again and click inside the middle
frame, Copy and Paste your tube into the layer placing her face into the frame.
Invert and Delete. Deselect.
15. On your frame layer give a drop shadow of -2, 2, 50 and 5
colour black.
16. Open the Ballerina Shoes, resize by 65% and place in the
middle of the left frame where it meets the middle frame.
17. Duplicate and mirror placing in the middle of the right
and middle frame. Merge the two layers together and give a drop shadow, the one
we previously used.
18. Open the Butterfly Ribbon and resize by 55%. Copy and
Paste into the middle frame. Give the same drop shadow previously used.
19. Open your Tube and resize by 42% copy and paste as a new
layer placing in the middle but slightly to the right. Sharpen the tube. Give it the same drop shadow
as previously used.
20. Make the first layer active. On your colour palette
change the foreground to #ff5990 and your background colour to #9629fb. Change
your colours to a foreground/background gradient angle 45 repeats 3. Flood fill
your layer.
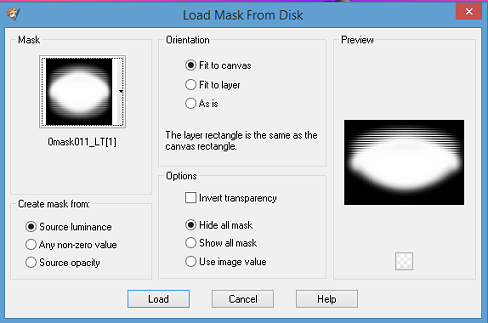
21. Load Mask with settings below. Delete mask layer and
Merge group.
22. Make your frame layer active. Open the trail element.
Resize by 60%. Copy and paste placing at the bottom of the frames.
23. Make your top layer active, open Sparkle 1 and resize by
90%. Copy and Paste placing to the left side of the tag, duplicate and mirror
moving slightly more to the right. Merge
the two layers together.
24. Add your name using a font that you like or the one I
have used.
25. Add copyright and save as a png.
Hope you have enjoyed my tut and kit. I would love to see
your results so please feel free to email them to me.
Hugs
No comments:
Post a Comment