Pages

Saturday, 7 March 2015

PTU Admiring Spring PTU
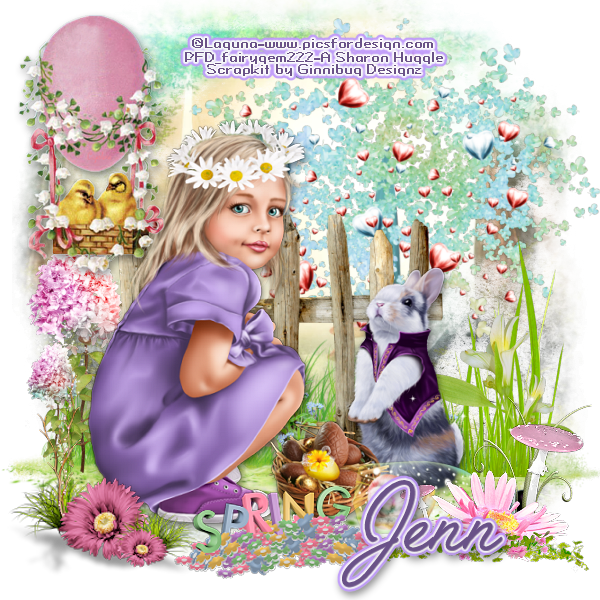
PTU  Admiring Spring  PTU
Jenn Admiring Spring
This tutorial is written by me Sharon/Fairygem on the 6th March 2015 and is all my own creation. Any resemblance to other tutorials is purely coincidental and not intended.
For this tutorial you will need:-
Paint Shop Pro I am using PSPX5 but any version will work
Scrap Kit of Choice I am using Admiring Spring by Ginnibug Designz which you can get HERE
Tube of Choice I am using Laguna which you can get HERE
Please remember you need a license to use this artist.
Mask of Choice I am using DBV Mask 114 which you can get HERE
Font of Choice I am using Angelface which you can get HERE

Ok Ready Lets Begin.

1. Open an image 600 x 600.
2. Open Paper 2 and resize by 80%   then 90%  . Copy and paste as a new layer.
3. Layers load mask DBV 114, delete mask and merge group.
4. Open Element 14 and resize by 80%   copy and paste moving down near the bottom of your image.
5. Open your tube, if using the same as mine resize by 30%   then 80%  . Copy and paste as a new layer moving near the bottom of the image, check mine for position.
6. Add a drop shadow of 4, 2, 45 and 12, colour Black.
7. Open Element 5 and resize by 35%  , copy and paste as a new layer and move to the right side moving behind your tube layer.
8. Open Element 31 and resize by 35%  ,then 65%  , copy and paste moving in between the rabbit and basket. See mine for position.
9. Open Element 24, Resize by 65%   then 85%  . Copy and paste above your mask layer but below the fence layer, move slightly to the right.
10. Open Element 11, Resize by 35%  . Copy and paste as a new layer above your fence layer moving to the left side of the layer.
11. Open Element 40, Resize by 35%  . Copy and Paste as a new layer moving to the left side of your tube. Sharpen.
12. Open Element 25, Resize by 35%  . Copy and paste as a new layer moving to the bottom right side of the layer. Sharpen.
13. Open Element 50 and Resize by 45%  . Copy and Paste as a new layer moving to the middle of the bottom layer. Sharpen.
14. Open Element 118 and Resize by 65%  . Copy and paste as a new layer moving to the top left side of the layer. Sharpen and give drop shadow previously used.
15. Add your copyright I use a nice pixel font when doing the copyright it stands out and looks better.
16. Add your name using Angelface font and colour #6a5288. Add Plugin Eye Candy 5 Impact Gradient Glow with the settings below
Add the drop shadow previously used.
17. Save your tag as a png
Thats it were done
Hope you enjoyed doing my tutorial remember its only a guideline make it your own. I would love to see your results so email me so I can add them to my blog
Hugs

Friday, 6 March 2015

PTU Shamrock Shimmers PTU

PTU   Shamrock Shimmers  PTU
Shamrock Shimmers tag

This tutorial was made by me Sharon/Fairygem on the 6th March 2015 and is purely my own creation. Any resemblance to other tutorials is purely coincidental and not intended.
This is a Pay to Use tutorial but can be used with a free to use kit.
For this tutorial you will need:-
Paint Shop Pro I am using PSPX5 but any version will work.
Tube of Choice I am using the wonderful artwork of Zlata_M which you can purchase at PicsForDesign HERE.
Scrap Kit of Choice or the one I am using by Scrapping with Lil ole Me which you can find HERE
Mask of Choice or the one I am using a mask by Me called fairygemcloverspiral which you can find HERE on Misfits blog
Font of Choice or the one I am using called Abbeyline which you can get HERE
Plugins:-
Eye Candy 5 Impact Glass
Eye Candy 5 Impact Gradient Glow
Ok lets begin :-

1. Open a new image 600 X 600
2. Open paper 18, resize by 85%   x2. Copy and paste as a new layer.
3. Layers load mask and find my mask or one that you would prefer. Delete mask layer and merge group.
4. Open cm-Ele104 and resize by 85%   copy and paste as a new layer placing in middle of your working area.
5. Take your magic wand and click inside the frame, expand by 7. Open Paper 22 and resize by 70%   copy and paste as a new layer. Invert and delete do not deselect yet. Move the paper below the frame layer.
6. Copy your tube and place into your frame, resize by 70%  . Move to the left hand side of the frame. Change the opacity to hard light. Deselect.
7. Add a dropshadow to the frame layer of 2, 2, 35 and 10. Use the same dropshadow for your tube layer.
8. Copy and paste your main tube above the frame layer and resize by 70%   then 90%   place on the right side of your image. Sharpen.
9. Add the same drop shadow used for your frame layer.
Now add your elements of choice
I used
Ele 127 under the tube
Ele 140 in the Frame
Ele 21 which I resized and mirrored
Ele 69 on left side of canvas
Ele 6 in front of the Harp on the left side
Ele 36 in front of the main tube
Ele 88 in front of the main tube near ele 36
Ele 123 in the center of your canvas.
10. Remember to sharpen each element after resizing.
11. I added a drop shadow of 2, 2, 55 and 5.95 to each element
12. Add your copyright and license number.
13. Add your name using colour #2d6c2a

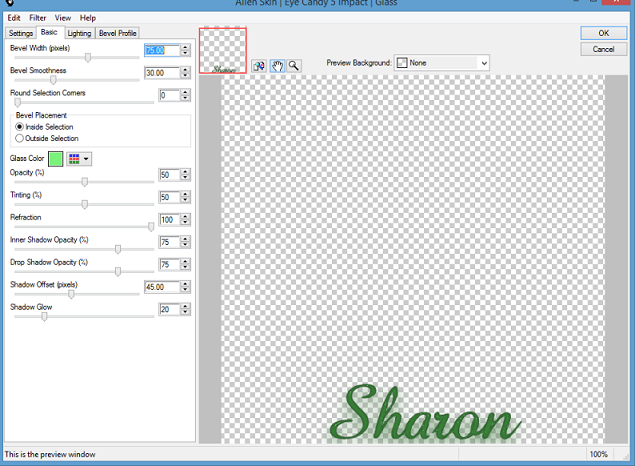
14. Effects Plugins, Eye Candy Impact Glass setting, use the settings below:-
Glass Settings Shamrock Shimmers
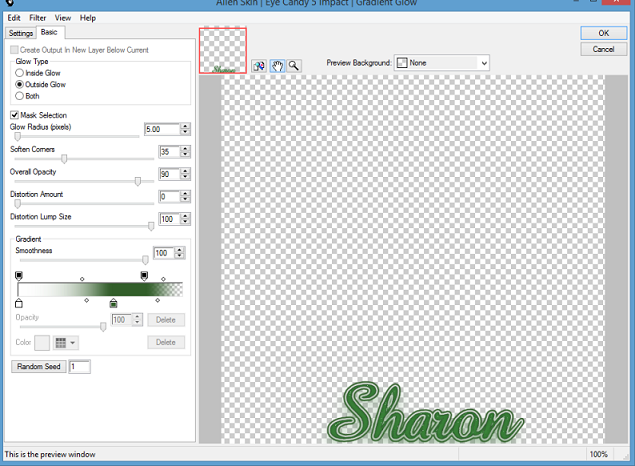
15. Effects Plugins, Eye Candy Impact Gradient Glow Setting, use the settings below:-
Graident Settings Shamrock Shimmers
Save as a png
Hope you enjoyed my tutorial
I would love to see your results so please email me so I can show them off on my blog
Hugs