
PTU Smells of Spring PTU
Forum Set


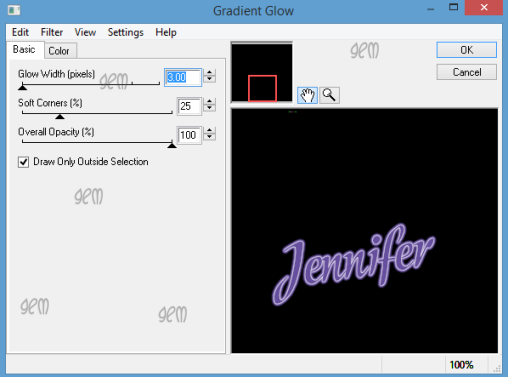
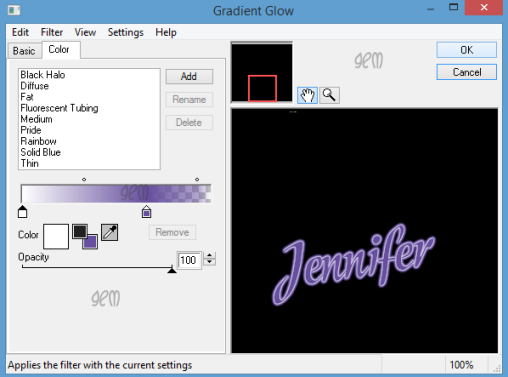
Eyecandy 4000 - Gradient Glow
Drop Shadow throughout unless otherwise stated - V2, H1, Opa 75, Blur 5 Black.
We will Start with the Tag:-
1. New Image 750x700 We will resize later.
2. Open Paper 12. Copy and Paste as new layer. Layers Load Mask and find mask you are using. Delete Mask layer and merge Group.
3. Open Frame 2. Copy and Paste moving slightly up. Magic Wand , Click inside frame, Expand by 10.
4. Open Paper 20, Resize by 65%. Copy and Paste moving paper until happy with the position. Invert and delete overhanging. Move paper below frame and give Drop Shadow.
5. Open Element 44, Resize by 90%. Copy and Paste moving right of frame. Drop Shadow.
6. Open Element 110. Copy and Paste moving slightly up. Drop Shadow.
7. Open Tube, if using same as me Resize by 75%. Copy and Paste moving slightly down. Drop Shadow.
8. Open Element 6, Resize by 40%. Copy and Paste moving over to the right. Sharpen and Drop Shadow.
9. Open Element 68, Resize by 45%. Copy an Paste moving right and slightly down. Sharpen and Drop Shadow.
10. Open Element 2, Resize by 30% then 55%. Copy and Paste moving right and down. Duplicate and Resize by 80%. Move slightly right. Merge down, Sharpen and Drop Shadow.
11. Open Element 41, Resize by 45%. Copy and Paste moving left. Sharpen and Drop Shadow.
12. Open Element 40, Resize by 45% then 65%. Copy and Paste moving left and down slightly. Sharpen and Drop Shadow.
13. Open Element 5, Resize by 50%. Copy and Paste moving down. Sharpen and Drop Shadow.
14. Open Element 51, Resize by 80%. Copy and Paste moving slightly up. Sharpen and Drop Shadow.
15. Open Element 70. Mirror then Copy and Paste moving slightly up. Drop Shadow.
16. Resize Image by 90% all layers checked. Add Copyright and License details.
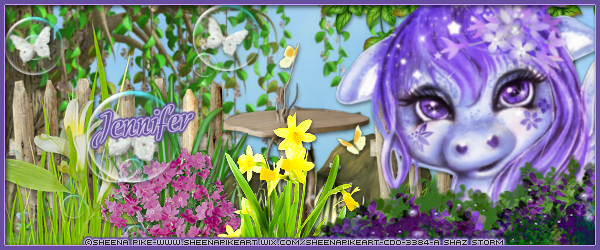
17. Add name using font and colour #664f9e.
18. Add gradient glow using settings below. Add Drop Shadow.
Save as a png.
Now Onto the Forum Tag.
1. Open New Image 600x250.
2. Open Paper 20, Resize by 75%. Copy and Paste moving paper to where you want showing.
3. Open Element 17, Resize by 65%. Copy and Paste moving to the right. Drop Shadow.
4. Open Element 7, Resize by 65%. Copy and Paste moving slightly down. Drop Shadow.
5. Open Element 85, Resize by 45%. Copy and Paste moving slightly down. Drop Shadow.
6. Open Element 39, Resize by 40%. Copy and Paste moving left and slightly down. Drop Shadow.
7. Open Element 26, Resize by 35%. Copy and Paste moving slightly left and down. Drop Shadow.
8. Open Element 33, Resize by 30% then 70%. Copy and Paste placing in front of Element 26. Drop Shadow.
9. Open Tube, Resize by 80%. Copy and Paste moving far right. Drop Shadow.
10. Open Element 58, Resize by 30%. Copy and Paste moving slightly down. Drop Shadow.
11. Open Element 42, Resize by 70%. Copy and Paste moving in front of tube. Drop Shadow.
12. Open Element 104, Resize by 45%. Copy and Paste moving left. Drop Shadow.
13. Shift D and Duplicate forum tag. Leave this and go back to original.
14. Add New Layer. Selections all, Modify and Contract by 5, Invert and flood fill with #669f9e. Selections None. Effects Edge Enhance. Drop Shadow then change V1, H2 and Drop Shadow again.
15. Add copyright and license details. Add name using same font and colour as Main tag. Add gradient glow previously used. Add Drop Shadow
Save as a png.
Avatar
I find this way a lot easier and i know its a cheat but its a good cheat lol.
1. Go back to Duplicated Forum tag.
2. Highlight Tube layer and Resize by 70%. Mirror and move over to left side.
3. With your Crop tool place over your Tube and set it at 170x170 making sure you have the parts you want showing in the crop. Once happy click the tick and crop the tag.
4. On layer palette delete layers that are blank. I also deleted the butterfly bubbles layer.
5. Add a new layer, Selections all, Modify Contract by 2. Invert and flood fill with same colour as forum tag. Edge Effects Enhance. Drop Shadow as Forum tag.
6. Add Copyright and License details. Add name using a Pixel font i used pf Arma 5 size 11.
7. Add Gradient glow previously used. Add Drop Shadow.
Save as png.
Thats it we are done with your Forum Set.
I hope you found the tutorial easy to follow and enjoyed it as much as i did writing it.
Any Questions please leave a comment or email me.
I would love to see your results so if you would like to share with me please email me at fairygem1@gmail.co.uk
Thanks so much
Hugs
Shaz/Fairygem
Forum Set
This tutorial was written by me Shaz/Fairygem on 24th April 2018 and are all my own idea and creations. Any resemblance to other tutorials is purely coincidental and not intended.
For this tutorial you will need to have a good working knowledge of paint shop pro and working on different tags. This tutorial is a long one but hopefully i have explained everything you need to know and it will be worth the end result.
For this you will need:-
Paint Shop Pro - I am using X5 but any version will work the same.
Scrapkit - I am using a stunning new kit by Jennifer at Ginnibug Designz called Smells of Spring. You can buy this kit at Hanias Design HERE or at Picsfordesign HERE under the name LapisGin.
Tube of Choice - I am using a gorgeous new tube by Sheena Pike. You can buy this tube at CDO HERE. Please make sure you have a working license to use this artwork.
Mask of Choice - I am using WSL_424 by Chelle at WeeScotsLass Creations HERE.
Font of Choice - I am using Modeschrift font for the Name on the Tag and Forum tag and PF Arma five for the Avatar. You can download HERE and HERE
Plugins :-Eyecandy 4000 - Gradient Glow
Drop Shadow throughout unless otherwise stated - V2, H1, Opa 75, Blur 5 Black.
We will Start with the Tag:-
1. New Image 750x700 We will resize later.
2. Open Paper 12. Copy and Paste as new layer. Layers Load Mask and find mask you are using. Delete Mask layer and merge Group.
3. Open Frame 2. Copy and Paste moving slightly up. Magic Wand , Click inside frame, Expand by 10.
4. Open Paper 20, Resize by 65%. Copy and Paste moving paper until happy with the position. Invert and delete overhanging. Move paper below frame and give Drop Shadow.
5. Open Element 44, Resize by 90%. Copy and Paste moving right of frame. Drop Shadow.
6. Open Element 110. Copy and Paste moving slightly up. Drop Shadow.
7. Open Tube, if using same as me Resize by 75%. Copy and Paste moving slightly down. Drop Shadow.
8. Open Element 6, Resize by 40%. Copy and Paste moving over to the right. Sharpen and Drop Shadow.
9. Open Element 68, Resize by 45%. Copy an Paste moving right and slightly down. Sharpen and Drop Shadow.
10. Open Element 2, Resize by 30% then 55%. Copy and Paste moving right and down. Duplicate and Resize by 80%. Move slightly right. Merge down, Sharpen and Drop Shadow.
11. Open Element 41, Resize by 45%. Copy and Paste moving left. Sharpen and Drop Shadow.
12. Open Element 40, Resize by 45% then 65%. Copy and Paste moving left and down slightly. Sharpen and Drop Shadow.
13. Open Element 5, Resize by 50%. Copy and Paste moving down. Sharpen and Drop Shadow.
14. Open Element 51, Resize by 80%. Copy and Paste moving slightly up. Sharpen and Drop Shadow.
15. Open Element 70. Mirror then Copy and Paste moving slightly up. Drop Shadow.
16. Resize Image by 90% all layers checked. Add Copyright and License details.
17. Add name using font and colour #664f9e.
18. Add gradient glow using settings below. Add Drop Shadow.
Save as a png.
Now Onto the Forum Tag.
1. Open New Image 600x250.
2. Open Paper 20, Resize by 75%. Copy and Paste moving paper to where you want showing.
3. Open Element 17, Resize by 65%. Copy and Paste moving to the right. Drop Shadow.
4. Open Element 7, Resize by 65%. Copy and Paste moving slightly down. Drop Shadow.
5. Open Element 85, Resize by 45%. Copy and Paste moving slightly down. Drop Shadow.
6. Open Element 39, Resize by 40%. Copy and Paste moving left and slightly down. Drop Shadow.
7. Open Element 26, Resize by 35%. Copy and Paste moving slightly left and down. Drop Shadow.
8. Open Element 33, Resize by 30% then 70%. Copy and Paste placing in front of Element 26. Drop Shadow.
9. Open Tube, Resize by 80%. Copy and Paste moving far right. Drop Shadow.
10. Open Element 58, Resize by 30%. Copy and Paste moving slightly down. Drop Shadow.
11. Open Element 42, Resize by 70%. Copy and Paste moving in front of tube. Drop Shadow.
12. Open Element 104, Resize by 45%. Copy and Paste moving left. Drop Shadow.
13. Shift D and Duplicate forum tag. Leave this and go back to original.
14. Add New Layer. Selections all, Modify and Contract by 5, Invert and flood fill with #669f9e. Selections None. Effects Edge Enhance. Drop Shadow then change V1, H2 and Drop Shadow again.
15. Add copyright and license details. Add name using same font and colour as Main tag. Add gradient glow previously used. Add Drop Shadow
Save as a png.
Avatar
I find this way a lot easier and i know its a cheat but its a good cheat lol.
1. Go back to Duplicated Forum tag.
2. Highlight Tube layer and Resize by 70%. Mirror and move over to left side.
3. With your Crop tool place over your Tube and set it at 170x170 making sure you have the parts you want showing in the crop. Once happy click the tick and crop the tag.
4. On layer palette delete layers that are blank. I also deleted the butterfly bubbles layer.
5. Add a new layer, Selections all, Modify Contract by 2. Invert and flood fill with same colour as forum tag. Edge Effects Enhance. Drop Shadow as Forum tag.
6. Add Copyright and License details. Add name using a Pixel font i used pf Arma 5 size 11.
7. Add Gradient glow previously used. Add Drop Shadow.
Save as png.
Thats it we are done with your Forum Set.
I hope you found the tutorial easy to follow and enjoyed it as much as i did writing it.
Any Questions please leave a comment or email me.
I would love to see your results so if you would like to share with me please email me at fairygem1@gmail.co.uk
Thanks so much
Hugs
Shaz/Fairygem
No comments:
Post a Comment