
Darkness
This tutorial was written by me Shaz/Fairygem on the 13th April 2018 and is all my own idea and creation. Any resemblance to other tutorials is purely coincidental and not intended.
For this tutorial you will need:-
Paint Shop Pro - I am using X5 but any version will work.
Scrapkit - I am using an awesome kit by Jennifer at Ginnibug Designz called Dark Night. You can buy this kit at Hanias Design HERE.
Tube of Choice - I am using a wonderful tube by Kajenna called Black Wolf. You can buy this tube and many more at Picsfordesign HERE.
Mask of Choice - I am using Mask 12 by Leah at Gimptastic Tutorials. You can download HERE.
Font of Choice - I am using Condiment Regular. You can download HERE.
Plugins:-
Eyecandy 4000 - Gradient Glow
Drop Shadow throughout - V2, H2, 45 and 15 Black.
Lets Begin:-
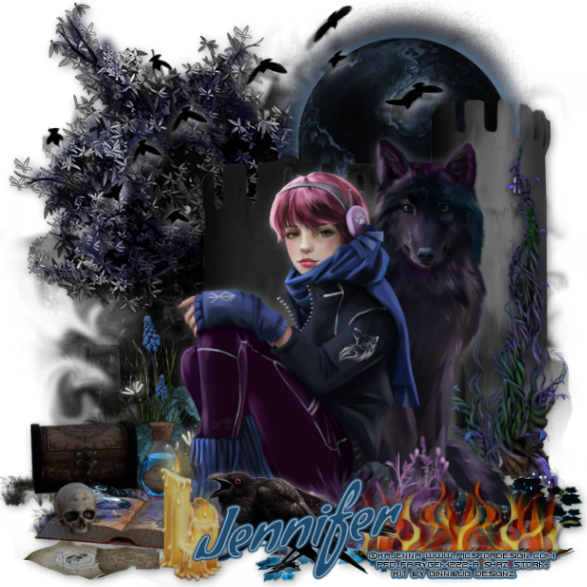
1. Open new image 650 x 650.
2. Open Paper 6, Resize by 85%. Copy and Paste. Load Mask and find the mask you are using. Delete mask layer and merge group.
3. Open Element 1. Copy and Paste moving left and slightly up. Drop Shadow.
4. Open Element 7. Copy and Paste moving right and slightly up. Drop Shadow.
5. Open Element 12, Resize by 50%. Copy and Paste moving slightly up and right. Drop Shadow. On layer palette move below castle.
6. Open Element 6, Resize by 60%. Mirror. Copy and Paste moving down and right. Drop Shadow.
7. Open Element 35, Resize by 45%. Copy and Paste moving down and left. Drop Shadow.
8. Open Tube and if using same as me Resize by 30% then 80%. Copy and Paste moving slightly right. Drop Shadow but change colour to white.
9. Open Element 61, Resize by 85%. Mirror. Copy and Paste moving down and right. In layer palette move under leaves. Eraser tool and erase overhanging. Drop Shadow but change colour back to black.
10. Open Element 9, Resize by 70%. Copy and Paste moving down and left. Drop Shadow.
11. Open Element 42, Resize by 30% then 70%. Copy and Paste moving down and slightly left. Drop Shadow.
12. Open Element 27, Resize by 40%. Copy and Paste moving down and right. Drop Shadow.
13. Open Element 73, Resize by 85%. Mirror. Copy and Paste moving up and left. Drop Shadow x2 but change colour to white. Eraser tool and erase birds over Wolfs face.
14. Open Element 38, Resize by 30%. Copy and Paste moving down. Drop Shadow as above.
15. Add Copyright and License details.
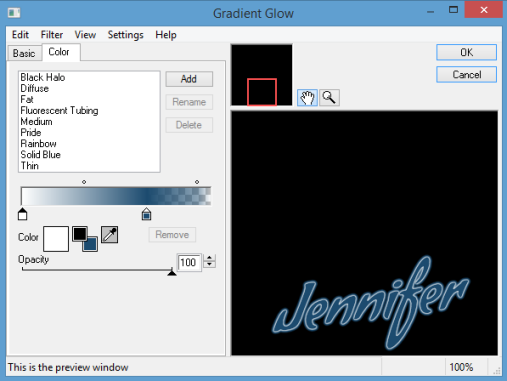
16. Add your name using Condiment Font and colour #1c4b6f. Effects Plugins Eyecandy 4000 Gradient glow with settings below. Drop Shadow.

Thats it we are done. I hope you enjoyed my tutorial remember though this is only a guideline make the tag you're own.
Would love to see your results. If you would like to share them with me so i can add them please leave a message on here and send to my email addy fairygem1@gmail.com.
Hugs
Shaz/Fairygem
No comments:
Post a Comment