
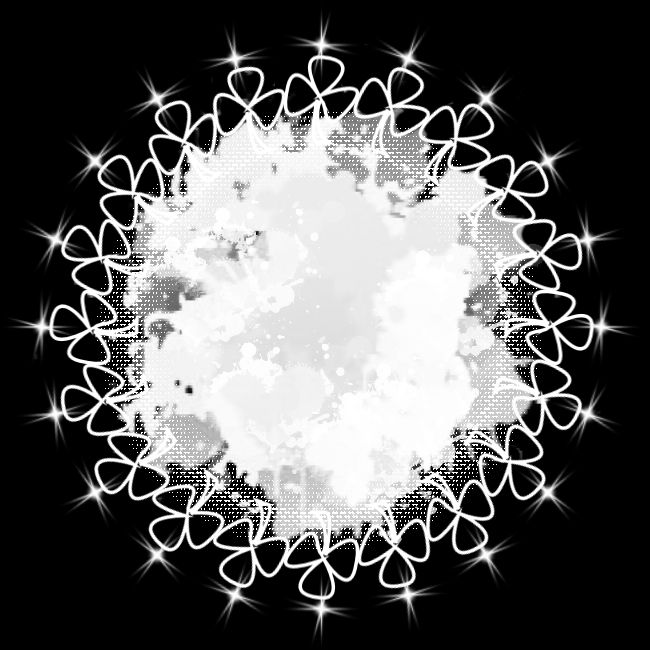
Cloves of Luck Tutorial

This tutorial was written by me Shaz/Fairygem on the 8th March 2018 and is all my own idea and creation. Any resemblance to other tutorials is purely coincidental and not intended.
You will need to have a working knowledge of Paint shop Pro program.
You will need
Paint Shop Pro - I am using PsPX5 but any version will work.
Scrapkit - I am using an awesome new kit by Jennifer at Ginnibug Designz called Irish Cloves. You can buy this kit at Hania's Design HERE
Tube of Choice - I am using a beautiful tube by Alehandra Vanhek called Clovia. You can buy this tube and many more at Hania's Design. Please make sure you have the proper Hania's license before using the same tube. HERE
Mask - Right click and save my mask into your mask folder or chose one of your own
Font of Choice - I am using a paid for font so can't share sorry.
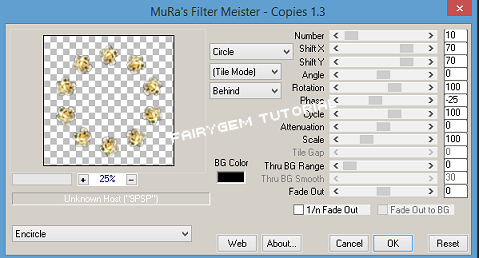
Plugins - Mura Miester - Copies
Ready!!
1. New Image 650x650
2. Open Paper 4 from kit, resize by 85%. Copy and Paste. Layers/Load Mask and find my mask. Invert and Delete mask layer. Merge group.
3. Open frame 4, resize by 95%. Copy and paste moving slightly up.
4. With your magic wand click inside the frame. Selections/Modify and expand by 10. Open paper 1, resize by 65%. Copy and paste positioning paper where you want. Invert and delete overhanging. Give frame dropshadow of V1, H2, Opacity 35, Blur 9.23 Black.
5. Open Element 6, Resize by 65%. Copy and paste moving over to the left. Duplicate and Mirror. Merge down and give D/S as above.
6. Open Element 7, Resize by 35% then 70%. Copy and paste. Plugins-Mura Miester-Copies with the settings below. D/S as above.
7. Open Element 10, Resize by 55%. Copy and Paste moving over to the right. Sharpen and D/S as above.
8. Open Element 29, Resize by 45%. Copy and paste. Image rotate 10% right. Mover over to the right. Sharpen and D/S as above.
9. Open Element 62. Copy and paste. D/S as above.
10. Open your tube and if using same as me Resize by 55% then 70%. Copy and Paste. Mirror then move slightly over to the left. D/S as above.
11.Open Element 14, Resize by 35%, Copy and Paste moving left. D/S as above.
12. Open Element 26, Resize by 65%. Copy and paste moving to the right. D/S as above.
13. Open Element 27, Resize by 35%. Copy and paste moving to the right. D/S as above.
14. Open Element 84, Resize by 35%. Copy and paste moving down. D/S as above.
15. Open Element 67, resize by 35% then 85%. Mirror then Copy and Paste moving down and slightly left. Sharpen and D/S as above.
16. Open Element 7, Resize by 70%. Copy and paste moving so rainbow looks like its going into the pot. With Eraser tool erase the overhanging part of the rainbow, so take it up to the rim of the pot.
17. Open Element 69, Resize by 80%. Copy and paste moving down. D/S as above.
18. Add Copyright, Relevant license details and Name.
Save as a png.
Thats it we are done. I hope you enjoyed my tutorial and found it easy to follow. Remember though this is a guideline add more elements if wanted to make the tag more yours.
Any questions or queries send me an email or leave a comment.
Would also love to see your results, if you want to share send your tag to fairygem1@gmail.co.uk
Hugs

No comments:
Post a Comment