
Santa Baby

This tutorial was written by me Fairygem/Sharon on the 1st December 2017 and is all my own idea and creation. Any resemblance to other tutorial is purely coincidental and not intended.
For this tutorial you will need:-
Paint Shop Pro - I am using X5 but any version will work
Scrapkit of Choice - I am using a beautiful kit by Jenn at Ginnibug Designz called Santa's Sweetheart. You can buy this kit at Hania's Design HERE
Tube of Choice - I am using the wonderful artwork of Keith Garvey. The tube is called Noel and you can buy this at Keith's online shop HERE. Please remember if you are using the same tube you must have the proper license details.
Mask of Choice - I am using one of Vix's masks called Vix'sBigMask019. You can get this mask HERE
Font of Choice - I am using Bu Glenda which you can download HERE.
Plugins:-
Mura Miester - Copies
Ok lets begin:-
1. Open New Image 650x650 transparent
2. Open Paper 1, resize by 80%. Copy and Paste as a new layer. Load Mask and find your mask. Delete the Mask Layer and Merge Group.
3. Open Element 8 and resize up by 120%. Copy and Paste as a new layer. Drop Shadow V2, H3, Opa 30, Blur 6.75 Black.
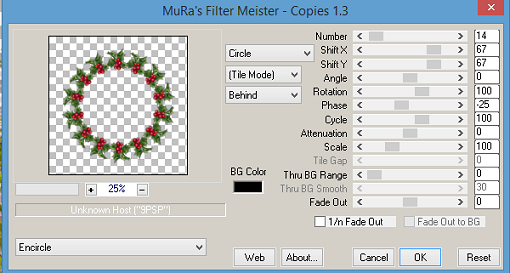
4. Open Element 13, resize by 35% then 65%. Copy and Paste as a new layer. Effects Plugins Mura Miester Copies, Encircle with settings Below. Drop Shadow as Above.
5. Go to Freehand Selection tool. Draw a circle round the Holly Frame, right click until you have the marching ants showing.
6. Open Paper 4, resize by 75%. Copy and Paste as a new layer moving the paper to where you would like it showing. Invert and Delete. Move your paper under both frames.
7. Open your Tube and if using the same as me resize the whole tube by 75%. Copy and Paste as a new layer moving over to the right. D/S as above.
8. Open Element 41, resize by 45% then 70%. Copy and Paste moving up and left. D/S as above.
9. Open Element 29, resize by 85%. Copy and paste as a new layer moving over to the left. On layer palette move this under your tube. Sharpen and D/S as above.
10. Open Element 50, resize by 45%. Copy and paste as a new layer moving down. D/S as above.
11. Open Element 64, resize by 45%. Copy and paste as a new layer moving down. Sharpen then D/S as above.
12. Open Element 66, resize by 45% then 70%. Copy and paste as a new layer moving down and left. Sharpen and D/S as above.
13. Open Element 12. Copy and Paste as a new layer moving left a wee bit.
14. Add your Copyright and License details.
15. Add your name using the font and colour #480607.
Save as a PNG.
That's it we are finished.
I hope you enjoyed my tutorial and found it easy to follow, remember though this is just a guideline make your own personal touches to your tag.
I would love to see your results and add them to the post so please feel free to message me with your results.
Hugs
Fairygem/Sharon
No comments:
Post a Comment