Rocking Emo-tion
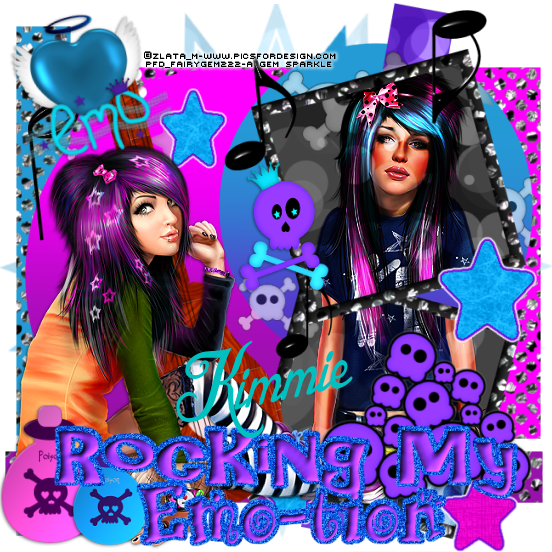
Welcome to my new Tutorial. I am writing this after becoming a CT for Kimmie. This is using one of her new kits.
I wrote this tutorial on the 19th February 2013 and is all my own idea, any resemblance to another tutorial is purely coincidental and not intended. You will need to have a working knowledge of Paint shop pro and using layers.
For this tutorial you will need:-
Paint shop pro - I am using Psp9 but any version will work.
Tubes of choice - i am using Emo Dreams and Gloria by Zlata_M which you can get at Pics for Design HERE
Scrapkit by the wonderful Kimmie called Emo Rocks which you can get HERE
Template - Made by Me called Rocking My Emo-tions which you can download HERE
Mask of Choice or the one i am using by Vix mask 151 which you can get HERE
Font of Choice or the one i am using called Blessed Day which you can get HERE
Plugins used:-
Eyecandy 4 - Gradient Glow
Filters Unlimited - Paper Texture - Fibrous Paper - Course
and Papyrus.
Ok are you ready, then lets begin
Drop Shadow throughout the tutorial 1, -1, 50 and 5
1. Open my template, Shift D and delete the original. Delete the TOU.
2. Open Paper 11 from Kimmies Kit, Resize by 75%. Copy and paste as a new layer at the bottom of the template.
2. Layers load mask and load Vix Mask 151. Delete the mask layer in your palette then merge group.
3. Highlight the rectangle layer, select float, defloat. Open Paper 4 and resize by 80%, Copy and paste as a new layer, Invert and delete. Delete the original layer.
4. Highlight the Upright Strip, select float, defloat. Open Paper 5 and resize by 80%, Copy and Paste as a new layer, Invert and Delete. Delete the original layer.
5. Highlight the Longways strip, select float, defloat. Open Paper 3, resize by 80%. Copy and paste as a new layer, Invert and Delete. Delete the original layer.
6. Highlight the Big Circle, Select float, defloat. Open Paper 2 and resize by 80%. Copy and Paste as a new layer, Invert and Delete. Delete the original layer.
7. Highlight the Small Circle, Select float, defloat. Open Paper 1 and resize by 80%. Copy and paste as a new layer, Invert and Delete. Delete the original layer.
8. Highlight the Leaning Strip, Select float, defloat. Open Paper 9 and resize by 80%. Copy and Paste as a new layer, Invert and Delete. Delete the original layer.
9. Highlight Bottom Square, Select float, defloat. Open Paper 8 and resize by 80%. Copy and paste as a new layer, Invert and Delete. Don't delete the original yet we are going to need it in a moment.
10. Highlight Bottom Frame, Select float, defloat. Open Paper 7 and resize by 80%. Copy and paste as a new layer, Invert and Delete. Delete the original layer. Effects inner bevel using the settings below
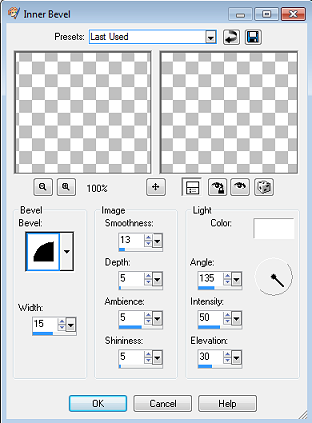
11. Highlight the Top Square, Select float, defloat. Open paper 8 and resize by 80%. Copy and paste as a new layer, Invert and Delete. Don't delete the original layer yet.
12. Take your magic wand and Highlight the bottom square and the top square, once you've got the marching ants copy your tube that you are going to use and paste as a new layer where the marching ants are. Invert and Delete making sure you go to both layers. Change the blendmode to Hard light.
13. Highlight the Top Frame, select float, defloat. Open paper 7 and resize by 80%. Copy and paste as a new layer, Invert and Delete. Delete the original layer. Effects, inner bevel and use the settings we previously used. Delete the original layer.
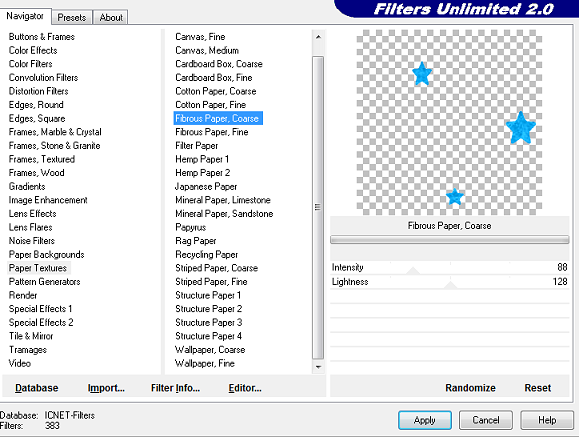
14. Highlight the Stars Layer. Taking your magic wand click on 3 of your stars. Add a new layer and flood fill with #0cabf4. Deselect and go to Effects, Plugins Filters unlimited Paper Textures, Fibrous Coase using settings below.
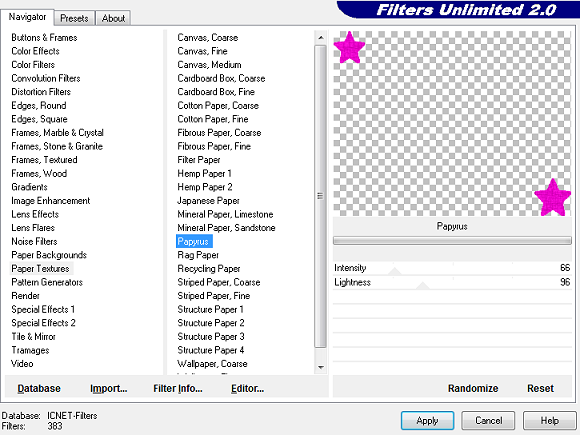
15. Highlight the Star layer again. Taking your magic want click on the last two stars. Add a new layer and flood fill with #ec04ce. Deselect and go to Effects, Plugins Filters unlimited Paper Texturs, Papyrus with the settings below. Delete the original star layer and merge your two Star palettes together.
16. Staying on the Stars layer, Effects Eye Candy 4, Gradient Glow with the settings below.
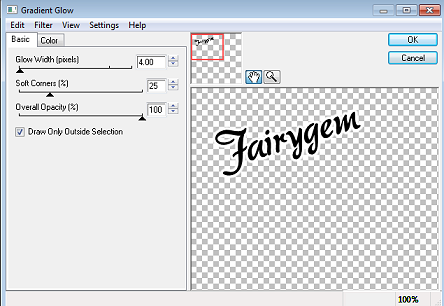
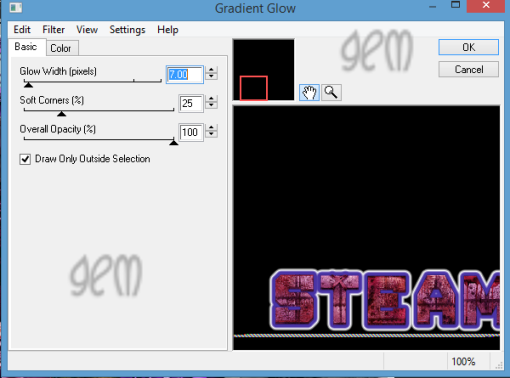
18. Highlight the Wordart Background, Select float, defloat. Modify Expand by 2. Add a new layer and flood fill with #0461ec. Delete the original layer.
19. Staying on the Wordart background, go to Adjust Add/Remove noise Random, monochrome ticked 65%.
20. Highlight the Word art, select float, defloat. Add a new layer and flood fill with #9438fc. Deselect, Effects Inner Bevel with the settings we used previously.
21. Copy and paste your tube as a new layer, resize if needed and place in at the bottom on the left side under the wordart. Add a dropshadow.
22. Open element 5. Resize by 30% twice, copy and paste as a new layer placing at the top left corner. Add a dropshadow.
23. Open element 51 and resize by 30% then 40%. Copy and paste as a new layer placing at the bottom left side see my tag for placement. Image rotate free rotate 15%. Add a dropshadow.
24. Open element 50 and resize by 30% twice. Copy and paste as a new layer placing next to element 51. Add a dropshadow.
25. Open element 29 and resize by 30% then 85%. Copy and paste as a new layer placing to the right side under the wordart. Add a dropshadow.
26. Open element 17 and resize by 30% twice. Copy and paste as a new layer placing under element 5. Image rotate free rotate 15%. Add a drop shadow.
27. Open element 9 and resize by 30% twice. Copy and paste as a new layer placing in the middle of the top frame. Add a drop shadow.
28. Resize the whole tag by 85%. Don't forget to Sharpen your tube etc as it goes a wee bit blurry when resizing.
29. Add your Copyright and license if needed.
30. Add your name using the font then save as a png.
Thats it we're done hope you enjoy my tut and found it easy enough to follow.
Any questions leave me a message.
Hugs to all
Gem xxx

No comments:
Post a Comment