
FCUK Karma
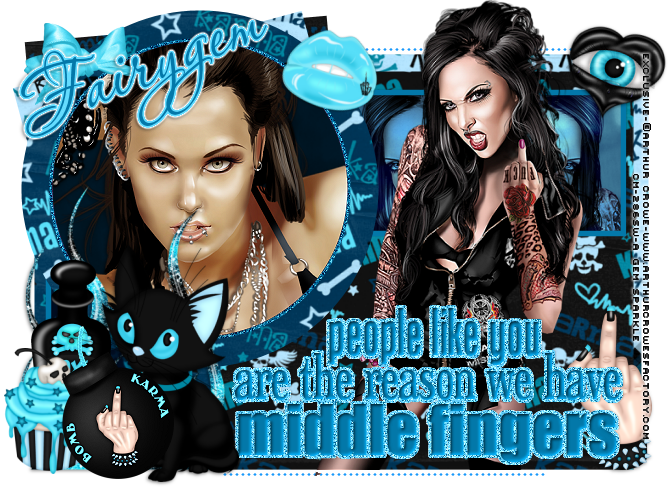
I'm not a big swearer but when i saw this template and kit from Minxy and Kirstin they just go together and i had to tut it lol.
The Scrapkit is part of a collab with Kristin, Justine and Mel and the colours are so vibrant it just tells you to make a tag.
I wrote this on the 8th Feb 2013 and is all my own idea, any resemblance to another tutorial is purely coincidental and not intended.
For this tutorial you will need:-
Paint shop pro - I am using Psp9 but any version will work
Two tubes of choice, Mine are exclusives by Arthur Crowe for Creative Misfits HERE
Scrapkit by Kristin, Mel and Justine its called Karma which you can find the start of HERE
Template 385 by Missy over at Divine Intentionz you can get the template HERE
Font of Choice - I am using Aquarelle which you can find HERE
Plugins :- Eye candy 4 Gradient Glow
Ok lets begin.
1. Open your Template shift d and close the original.
2. Raster 2 on template, selections float defloat. Open Paper 10 by Kristin and resize by 75%, copy and paste as a new layer, Invert delete and delete your original layer.
3. Raster 1 on the template, selections float, defloat. Open Paper 4 by Kristin and resize by 75%, copy and paste as a new layer, Invert and delete. Delete your original layer.
4. Rectangle 1, selections float, defloat. Open Paper 11 by Kristin and resize by 85%, copy and paste as a new layer, Invert and Delete. Delete the original layer.
5. Rectangle 2, Selections float, defloat. Open Paper 6 by Kristin and resize by 85%, copy and paste as a new layer, Invert and Delete. Delete the original layer.
6. Rectangle 3, Selections float, defloat. Open Paper 9 by Kristin and resize by 85%, copy and paste as a new layer, Invert and Delete. Delete the original layer.
7. Square, Selections float, defloat. Open Paper 5 by Kristin and resize by 85%, copy and paste as a new layer, Invert and Delete. Delete the original layer.
8. Small Squares, Selections float, defloat. Open Paper 7 by Mel and resize by 90%, copy and paste as a new layer, Invert and Delete. Delete the original layer. Do not deselect.
9. Take one of your tubes, copy and paste as a new layer into the left sqaure, don't worry if some of the tube goes into the right square we can erase that when we deselect. Delete and deselect. Erase any part thats in the right square. Now copy and mirror your tube and place it in the right side of the squares. Merge the two together then change the blendmode to Overlay.
10. Copy of small squares, Selection float defloat. Open Paper 8 by Mel and resize by 90%, copy and paste as a new layer, Invert and Delete. Delete the original layer.
11. Merge down the dotted lines, Add a new layer and flood fill with #1999fb. Back to the dotted lines, Selections float, defloat then back to your flood filled layer, Invert and delete. Delete the dotted lines.
12. Move the Small squares shadow next to each other then merge down. Do the same with the Small squares frame.
13. Small Squares frame, Selections float defloat add a new layer and flood fill with #0378a9. Delete the original layer.
14. Circle, Selections float, defloat. Open Paper 1 by Kristin, copy and paste as a new layer, Invert and Delete. Delete the original layer.
15. Circle2 back, Selections float, defloat. Add a new layer and floodfill with #0378a9. Deselect and delete the original layer. Adjust Add/Remove noise Random 65% Monochrome Checked.
16. Circle 2, Selections float, defloat. Open Paper 6 by Mel, copy and paste as a new layer, Invert and Delete. Delete the original layer. Do no Deselect.
17. Copy your other tube and paste as a new layer in the center of the circle. Delete any hanging over. Deselect.
18. Wordart Background, Selections, float and defloat. Add a new layer and floodfill with #65d0fd. Delete the original layer. Adjust Add/Remove noise and use the settings we used previously.
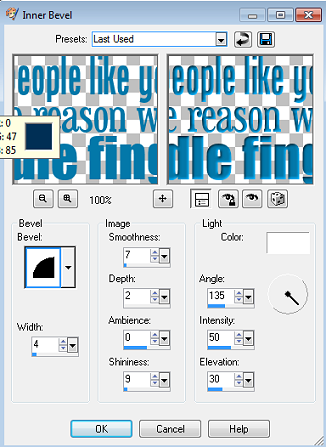
19. Wordart, Selections float, defloat. Add a new layer and floodfill with #0378a9. Delete the original layer. Add an Inner Bevel settings below.
20. Copy and Paste your main tube and place it on the right hand side below the wordart. If using the same one as me resize by 55%. Sharpen the tube after you have resized.
21. Open Elements from Kristins kit,
Bomb
Bottle
Bow3
Crying Eye
Cupcake
Flame
Cat
Lips.
Resize the Elements to fit into your tag and place where you wish to put them, see my tag for references but try and make it your own. When you are resizing the elements sharpen before pasting onto the working layers.
22. Add a dropshadow of 1,-1,50 and 5 to all the elements and your tubes.
23. Add your copyright with proper credits and licenses.
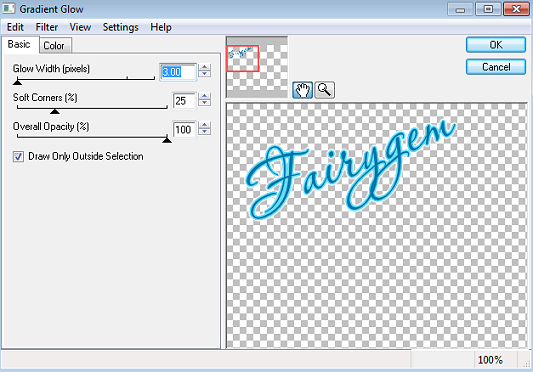
24. Find your Aquarelle font and write out your name using the colour #0378a9. Then add a gradient glow settings below. Add a dropshadow
25. Save your work as a png
Thats it we're done hope you found my tutorial fun and easy to follow. Remember if you have any questions feel free to message me.
Hugs
Gem xxx
No comments:
Post a Comment