
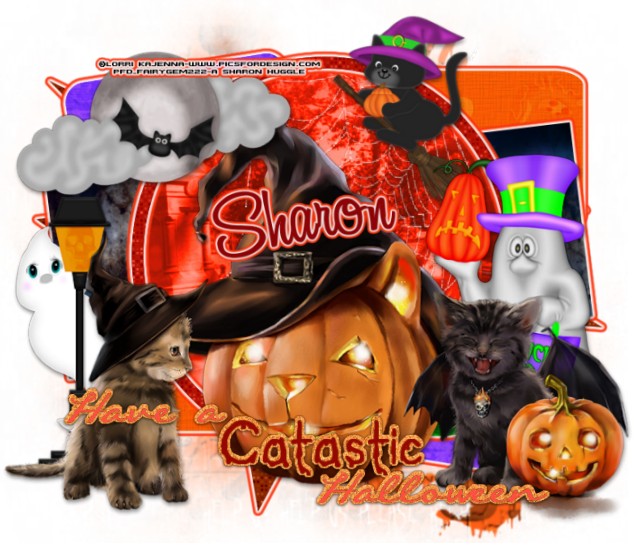
Catastic Halloween
This tutorial is written by Me on
the 10th October 2014 and is all my own idea. Any resemblance to any
tutorial is purely co-incidental and not intended. You must have a working
knowledge of working with layers for the tutorial.
For this Tutorial you will need:-
Paint Shop Pro – I am using PspX5
but any addition will work.
Tube of Choice or the one I am
using by Lorri Kajenna at Picsfordeisgn HERE
My Scrapkit - AutumnWeenie which
you can download HERE
My Template which you can
download HERE
Mask of Choice – I am using Vix
Halloween 0904 which you can get HERE
Plugins Used
Xero Fritillary
Eye Candy 5 – Impact - Gradient Glow
Font of Choice or the one I am
using – Al Serenade – I got this font at fonts101.com.
My Spider Web – Right Click and Save

Ready to begin – Here we go
1. Open my template, Shfit D and
delete the original.
2. Delete the TOU layer, Canvas
size and change to 785x700.
3.
Open Paper 14 from my kit, Copy and paste as a new layer. Layers Load/Save mask
and load Vix Halloween 0904. Delete Mask layer and merge Group.
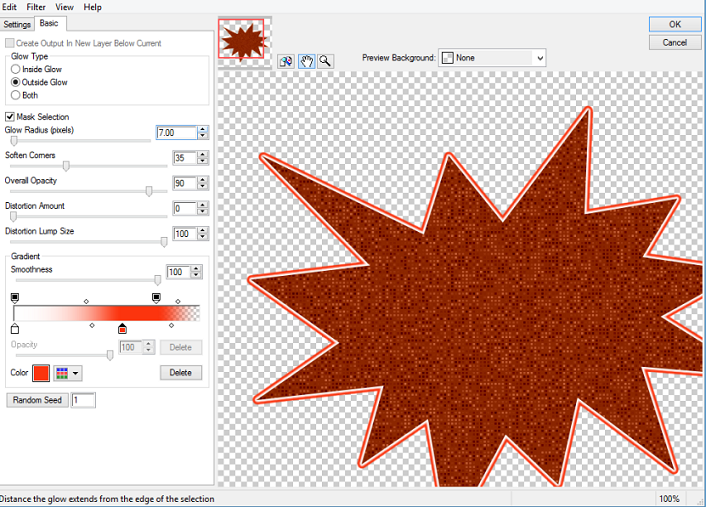
4. Highlight Blast Layer – Xero Fritillary
with the settings 5, 30, 40, and 55. Eye Candy Impact Gradient Glow with the
settings below.
5. Merge the two Small Squares,
Select float defloat. Open paper 1, resize by 85%. Copy and Paste, invert and
delete the excess paper. Add the same gradient glow as above. Delete the
original layer.
6. Merge the two Small
Rectangles, Select, float, defloat. Open Paper 5, resize by 85%. Copy and
paste, Invert and delete the excess Paper. Add the same gradient glow. Delete
the original layer.
7. Merge the two Small Circles,
Select float, defloat. Open Paper 12, resize by 85% twice. Copy and paste,
Invert and delete the excess paper. Add same gradient glow. Delete the original
layer.
8. Highlight the Long rectangle.
Select, float, defloat. Open Paper 19, resize by 85%. Copy and paste, Invert
and delete the excess paper. Add the same gradient glow. Delete the original
layer.
9. Highlight the Large Circle
layer, Select, float, defloat. Open Paper 17, resize by 85%. Copy and paste,
Invert and delete the excess paper. Change the blend mode to Hard light and the
Opacity to 65%. Do not delete the circle layer.
10. Highlight the Frame layer,
Select, Float, defloat and use the settings for Xero Fritillary we used before.
Give it the same Gradient glow.
11. I didn’t change the wordart
to a different colour as I liked the ones I used when making the template. But
you can change them to your liking. Remember to add a dropshadow to the
background. I used V1, H0, Opacity 65, Blur 4.91 Black.
12. Add your tube, if using the
same as mine the tubes are in different layers, so add them to where you think
they look best. Use my tag as a guideline. Remember to resize the tube, I resized
by 45% then sharpened.
13. Open Bat n Moon, resize by 55%,
copy and paste moving to the top left corner. Free Rotate 12% left.
14. Open Ghost Lamp, resize by
110%. Click on the frame layer, copy and paste moving behind the cat on the
left. Sharpen.
15. Open Ghostie Trick or Treat,
resize by 85%, Copy and paste behind the tube, moving to the right side.
Sharpen.
16. Open my Spider Web that you
saved at the begin of the Tutorial, Copy and paste in the Large Circle. Move to
the right side of the circle and erase any overhanging.
17. Open Witchy Cat, resize by
70%, copy and paste moving it to the top of the circle layer. Sharpen.
18. Add a drop shadow to all the
elements you have used. My settings were – V3, H1, Opacity 48% Blur 8.15 Black.
19. Add your copyright and Name,
Resize the whole tag by 90% and save as a png.
I hope you enjoyed my tutorial
and could follow it with no trouble. Any questions leave me a comment. I would
love to see your results.
Hugs
No comments:
Post a Comment