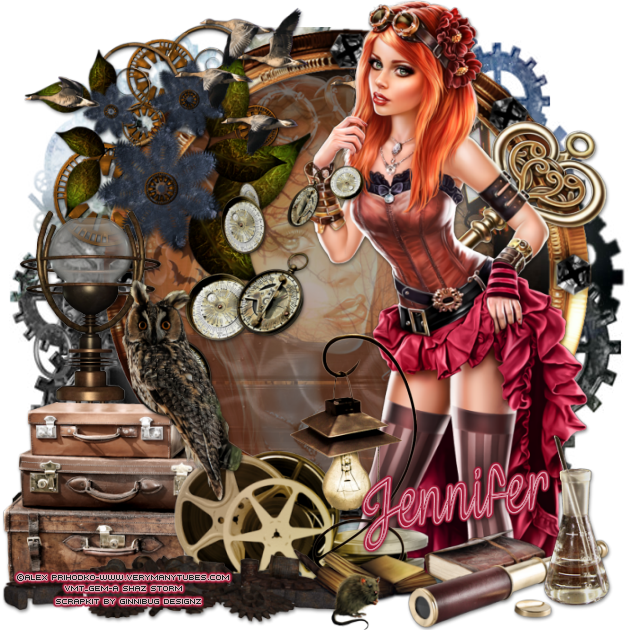
Tick Tock Tick Tock

This tutorial was written by me Shaz/Fairygem on the 26th April 2018 and is all my own idea and creation. Any resemblance to other tutorials is purely coincidental and not intended.
For this tutorial you will need:-
Paint Shop Pro - I am using X5 but any version will work.
Scrapkit - I am using a wonderful kit by Jennifer at Ginnibug Designz called Steampunk Wizard. You can buy this kit and many more of Jenns at Hanias Design HERE.
Tube of Choice - I am using a wonderful tube by Alex Prihodko called Steampunk Doll. You can buy this tube HERE where Alex has started selling her art.
Mask of Choice - I am using a wonderful Steampunk mask by Babs at Bitzy Bee Designz called BBD_2012SPMask 5. You can download it HERE.
Font of Choice - I am using MF Wedding Bells. You can download it HERE.
Plugins:-
EyeCandy 4000 - Gradient Glow
Xero - DuoChrome
Ok lets begin:-
1. Open New Image 700x700.
2. Open Paper 12, Copy and Paste. Load Mask with Invert Transparency Ticked. Delete mask layer and merge group.
3. Open Frame 1, Resize by 90%. Copy and Paste moving right and up.
4. Magic wand and click inside of frame. Modify Expand by 10. Open Paper 11, Resize by 75%. Copy and Paste moving paper to the part you want showing. Invert and delete overhanging paper. DO NOT DESELECT
5. Open your tube and click on Close Up. Mirror and resize by 55%. Copy and Paste moving over to the left side in the frame. Once happy with position Delete. Selections None.
6. Give frame layer and close up layer drop shadow.
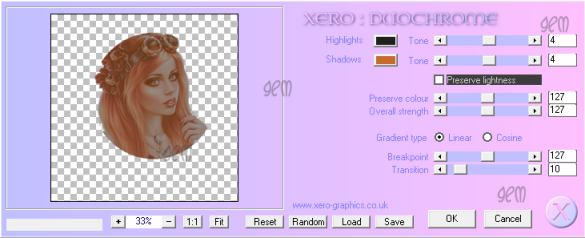
7. On Close Up layer go to Plugins Xero-DuoChrome settings below. Layer Palette and change Opacity to 65.

8. Open your Main tube and choose the colours you wish to use. Copy and Paste then Resize by 55% then 85%. Move tube up and slightly over to the right. Drop Shadow.
9. Open Element 16, Resize by 40%. Copy and Paste moving left and up so its at the top of frame. Sharpen and Drop Shadow.
10. Open Element 5, Resize by 55%. Copy and Paste moving left. Drop Shadow.
11. Open Element 13, Resize by 55%. Copy and Paste moving left. Drop Shadow.
12. Open Element 11, Resize by 60%. Copy and Paste moving left. Drop Shadow.
13. Open Element 35, Resize by 55%. Copy and Paste moving towards the tube. Sharpen and Drop Shadow.
14. Open Element 34, Resize up by 115%. Copy and Paste moving towards the tube. Drop Shadow.
15. Open Element 6, Resize by 55%. Copy and Paste moving left. Drop Shadow.
16. Open Element 21, Resize by 40%. Copy and Paste moving right. Drop Shadow.
17. Open Element 97, Resize by 40%. Copy and Paste moving far right.
18. Open Element 32. Copy and Paste moving down. Drop Shadow.
19. Open Element 9, Resize by 40%. Copy and Paste moving up slightly. Drop Shadow.
20. Open Element 49, Resize by 70%. Copy and Paste moving up to top of frame. Eraser tool and erase the goose in front of the tube. Drop Shadow.
21. Open Element 99, Resize by 40%. Copy and Paste moving so that it looks like its sitting on the luggage. Drop Shadow.
22. Add License details and Copyright.
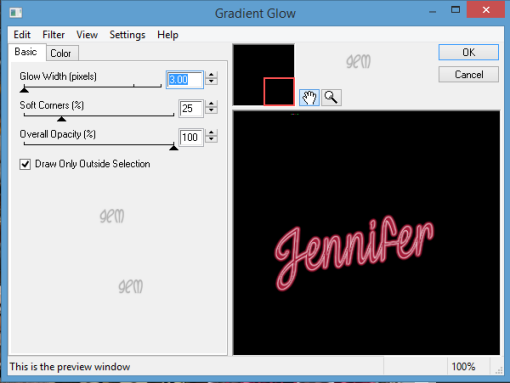
23. Add your name using font and colour #a51a37. Add Gradient glow settings below. Drop Shadow.


Save as a PNG.
That's it we are done. I hope you found my tutorial easy to follow. Any questions please don't hesitate to ask.
Remember my tut is a guideline only make the tag yours.
I would love to see your results so if you would like to share just email me and i will get them added.
Hugs
Shaz/Fairygem

No comments:
Post a Comment