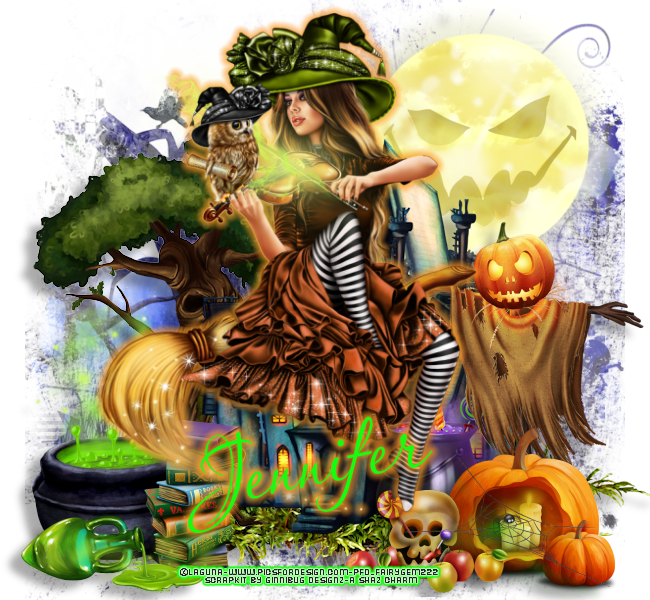
Halloween Fun

This tutorial was
written by me Shaz/Fairygem on 24th October 2018 and is all my own
idea and creation.
Any resemblance to
other tutorials is purely coincidental and not intended.
For this tutorial you
will need to have a working knowledge of Paint Shop Pro and working with
layers.
You will need:-
Paint Shop Pro programme
– I am using X5 but any version will work.
Scrapkit – I am using a
wonderful new kit by Jennifer at Ginnibug Designs called Spells of Fun. You can
buy this kit from Hanias Design HERE
Tube of Choice – I am using
an older Halloween tube by Laguna called Halloween Orchestra. You can buy this
tube at Picsfordesign HERE
Mask of choice – I am
using an awesome Halloween mask by Kristin at Toxic Desire. You can find her
site HERE
Font of choice – I am
using Aquarelle which you can find through google if you don’t have it already
Plugins – Eyecandy 4000
– Gradient Glow
Drop Shadow throughout
tutorial unless otherwise stated - V9,
H-12, Opa 33, Blur 11.23 Black
Lets begin:-
Open tube in Psp and
minimise.
1.
Open
New image 650x600.
2.
Open
Paper 8 from kit. Resize 85%. Copy and Paste. Layers mask and load your mask.
Delete mask layer and merge Group.
3.
Open
Cluster 1. Mirror. Copy and Paste moving down and slightly right. Give drop
shadow.
4.
Open
Element 54. Resize 60%. Copy and Paste moving up and right. In layer palette
move this layer below layer 2. Drop shadow.
5.
Open
Element 8. Resize 40%. Copy and Paste moving down and left. Drop Shadow.
6.
Open
Element 15. Resize 25%. Copy and Paste moving down and left. Drop Shadow.
7.
Open
Element 33. Resize 45%. Copy and Paste moving down and right. Drop Shadow.
8.
Open
Element 19. Resize 35%. Copy and Paste moving down and right placing in front
of Scarecrow. Drop Shadow.
9.
Open
Element 52. Resize 35%. Copy and Paste moving down and left. Drop Shadow.
10.
Open
Element 59. Resize 35%. Copy and Paste moving down and slightly right. Drop
Shadow.
11.
Open
Element 72. Resize 40%. Copy and Paste moving in front of Pumpkins. Drop Shadow
as before but change the colour to #27fa10. Repeat twice more.
12.
With
your Tube if using the same as me, close off layers you don’t want to use. Once
happy Copy Merged and paste as a new layer onto your canvas. Resize by 40% then
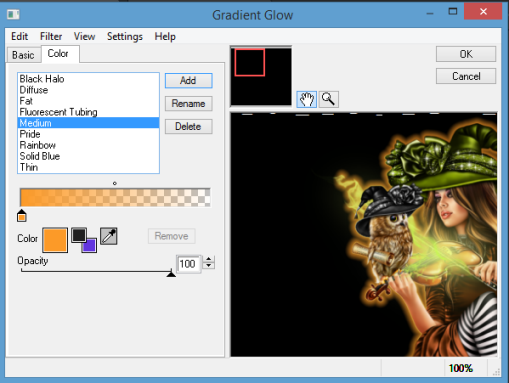
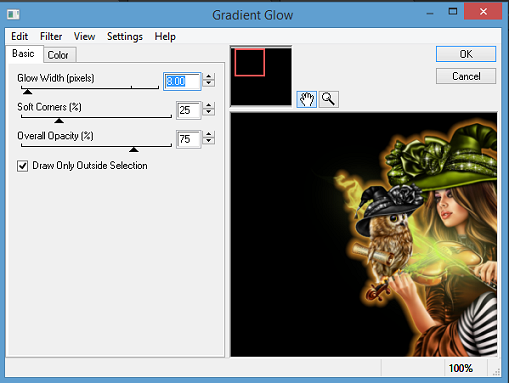
60%. Mirror then move slightly up. Plugins Gradient Glow with settings below.


13.
Add
Copyright and License details.
14.
Add
name using Aquarelle and colour #16fb0f. Same Gradient glow as above. Drop Shadow
as before but change colour back to black.
Save as a Png.
That’s it we are done.
I hope you enjoyed my tutorial and found it easy to follow.
Any questions please
don’t hesitate to ask.
I would love to see
your results so please if you wish Email me and I will get them added.
Hugs to all
Shaz

No comments:
Post a Comment