
Luck of the Irish

This tutorial was written by me Fairygem on the 19th February 2013. Any resemblance to another tutorial is purely coincidental and not intended.
For this tutorial you will need to have a working knowledge of Paint Shop Pro and using layers.
For this tutorial you will need:-
Paint Shop Pro - I am using Psp9 but any version will work.
A tube of Choice - I am using the awesome art of Elias Chatzoudis, you need to have a license to use his art which you can find HERE
Scrapkit - I am using a new kit by Kimmie called St Patties which you can find HERE
My Template Luck of the Irish which you can find HERE
My Shamrock Mask which you can find HERE
Plugins :-
Eyecandy 4 - Glass
Eyecandy 4 - Gradient Glow
Xero - Fritillary
Font of Choice
Dropshadow settings throughout - 2, -2,50 and 5
Ok ready to begin Here goes
1. Open my Template Shift D and delete the original.
2. Open Paper 10, Resize by 85%, copy and paste at the bottom of the layers. Layers Load/Save mask and find my shamrock mask. Load the mask. Delete mask layer and merge group.
3. Highlight the Splat Layer, Select float, defloat. Add a new layer and flood fill with #41994d. Selections none and delete the original layer.
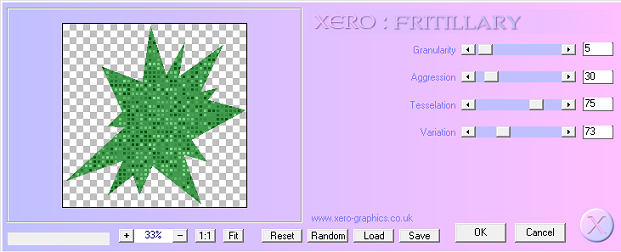
4. Staying on the Splat layer, Effects Xero Fritillary with the settings below
5. Highlight the tilted rectangle layer, Select float, defloat. Open Paper 9 and resize by 85% twice. Copy and Paste as a new layer, Invert and Delete. Delete the original layer.
6. Highlight the Long rectangle layer, select float, defloat. Open Paper 5 and resize by 85% then 90%. Copy and paste as a new layer, Invert and Delete. Delete the original layer.
7. Highlight the Small rectangle layer, Select float, defloat. Open Paper 4 and resize by 85% twice. Copy and paste as a new layer, Invert and Delete. Delete the original layer.
8. Highlight the Rounded Square layer, Select float, Defloat. Open Paper 7 and resize by 90% twice. Copy and paste as a new layer, Invert and Delete. Delete the original layer.
9. Highlight the Small Circle layer, Select float, Defloat. Open paper 2 and resize by 90% twice. Copy and paste as a new layer, Invert and Delete. Delete the original layer.
10. Highlight the Large Circle layer, Select float, Defloat. Open paper 1 and resize by 90% twice. Copy and paste as a new layer, Invert and Delete. Delete the original layer.
11. Highlight the Square Background, Select float, Defloat. Open paper 6 and resize by 90% twice. Copy and paste as a new layer, Invert and Delete. Delete the original layer.
12. Highlight the Frame layer, Select float, Defloat. Add a new layer and floodfill with #4cfc65. Adjust Add/Remove noise Random Monochrome ticked and 80%. Do not deselect.
13. Take your tube Copy and Paste as a new layer. Grab your eraser tool and rub out the overhanging part of your tube at the bottom of the frame. Add a dropshadow settings at start of tut.
14. Add a dropshadow to your frame layer.
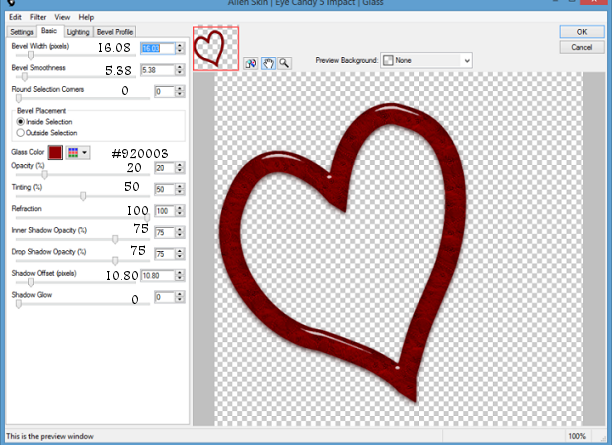
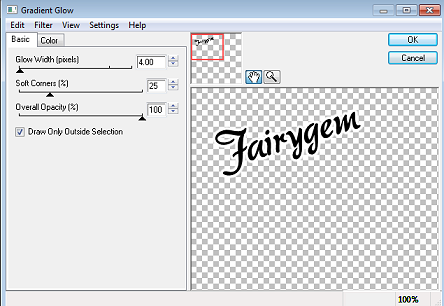
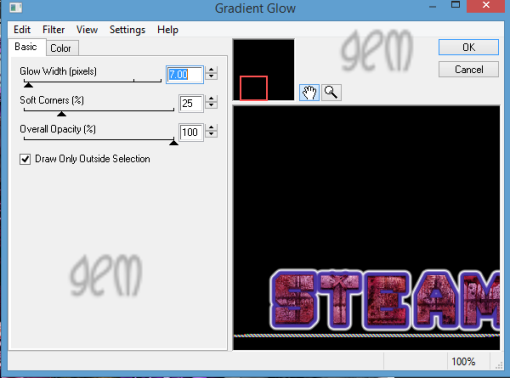
15. Highlight your Shamrock layer, Effects Eyecandy Glass and use the settings below. Effects Eyecandy Gradient Glow using settings below.
16. Highlight the Thin Rectangles layer, Select float, Defloat and add a new layer. Floodfill with #131f12. Effects Fritillary using settings previously used.
17. Highlight the Background wordart. I kept the colour as it was but you can change it to your own liking if you so wish. Add Noise settings Random Monochrome ticked 80%.
18. Highlight the Wordart, Select float, Defloat and add a new layer. Floodfill with #619652. Effects Eyecandy Glass using settings previously used.
19. Open Element 4 and resize by 45%. Copy and paste under the wordart but above the rectangles and make it look as though the rainbow is going through your tube.
20. Open Element 9 and resize by 45% twice then 70%. Copy and Paste as a new layer placing it to the right of your tube.
21. Open element 5 and Resize by 20% then 55%. Copy and Paste as a new layer placing next to the pot of gold. Rotate by 14% to the left.
22. Open Element 6 and Resize by 20% then 55%. Copy and paste as a new layer placing next to element 5. Rotate by 14% to the right.
23. Open Element 12 and Resize by 35%. Copy and paste as a new layer, placing it at the bottom of the thin rectangles. Duplicate and mirror. Merge down and give a dropshadow.
24. Open element 24 and resize by 35%. Copy and paste as a new layer placing it at the top of the left side. Sharpen and give a dropshadow.
25. Open element 27 and resize by 20% then 45%. Mirror then Copy and paste as a new layer placing it next to the glass we added earlier. Add a dropshadow.
26. Open Element 31 and resize by 15%. Copy and paste placing at the top left hand side. Sharpen and give a dropshadow.
27. Add your name placing it above the rectangles.
28 Add your copyright and correct licenses then save as a png.
Thats it we're done hope you had fun don't forget my tutorial is only a guideline make the tag your own.
Hugs
Gem xxxx
No comments:
Post a Comment