
Rockstar Forum Set - FTU

This tutorial was written by Me, Fairygem on the 13th January 2013 and is all my own idea. Any resemblance to another tutorial is purely coincidental and not intended.
For this tutorial you will need to have a working knowledge of paint shop pro and working with layers.
For this tutorial you will need:-
Paint Shop Pro - I am using Psp9 but any version will work.
Tube of Choice or the same as i am using by Arthur Crowe HERE please make sure you have the proper license for using his artwork.
Forum Template - I am using one by Spawns Template 007 Which you can get HERE
Scrapkit of Choice or the one i am using by Alikas Scraps called Rockstar which you can get HERE
Font of Choice or the one i am using called Kingthing San which you can find HERE
Plugin:-
Xero - Porcelain
ColourRave - Atmosphere 1.1
Ok lets begin.
1. Open your template shift D and close the original. Delete the Copyright layer. Delete the Middle musical notes layer aswell.
2. Highlight your Middle Background, Selections float, defloat, Open Paper 9 copy and paste as a new layer, Invert Delete then delete the original layer.
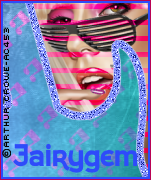
3. Highlight the middle layer again Selections float, defloat and Open your tube. Copy and paste as a new layer and position where you think it looks best. Invert Delete, and deselect. Xero Porcelain default settings.
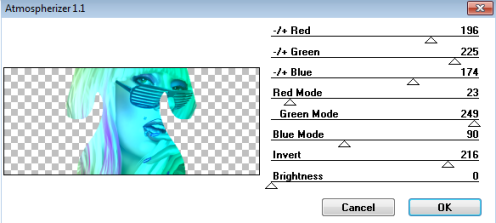
4. Change the Blend mode to Hard Light then go to ColourRave Atmosphere 1.1 and use the settings below.
5. Merge the Left Guitar background with the Right Guitar background. Select, float, defloat and open Paper 5, Copy and Paste as a new layer, Invert Delete and Deselect. Delete the original layer.
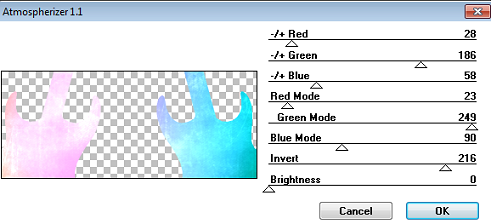
6. ColourRave Atmosphere 1.1 with the settings below.
7. Merge the Left corner background with the Right corner background. Selections float, defloat and choose a colour from your tube. Add a new layer and floodfill, I am using #e13c9a. Delete the original layer. Do not deselect.
8. Copy your tube again and place on the left side where you would like it positioned i used the eyes as a point. See my tag for placement. Invert and delete. Duplicate and Mirror the tube.
9. Merge the Left lines with the Right lines, Selections float, Defloat and flood fill with a colour from your tube, i used #ed0588. Change the blendmode to Overlay
10. Highlight the Right Musical Notes, Adjust Colour balance Manual Colour correction and change the target to #fb4d93. Change the blendmode to Overlay.
11. Highlight the Left Musical Notes, Adjust Colour balance Manual Colour correction and change the target to #8eb3fe. Change the blendmode to Overlay.
12. Merge the two Outlines together, Selections float, defloat and flood fill with #818ffb. Adjust Add/Remove noise with settings Random Monochrome checked 45%.
13. Highlight the Black Border, Adjust Colour balance Manual Colour Correction and change the target to #ba0254.
14. Highlight the White Border, Adjust Colour Balance, Manual Colour Correction and change the target to #2e4bfa.
15. Open Element 48, resize by 65% twice. Copy and paste as a new layer positioning at the middle of the outline on the left. Duplicate and mirror. Merge down the two layers.
16. Effects ColourRave Atmosphere 1.1 with previous settings used. Mirror and give a dropshadow of 2, 2, 33, 3.00.
17. Open Element 57, resize by 65%. Copy and paste below the Skulls. Effects ColourRave Atmosphere 1.1 settings previously used.
18. Add your Copyright then using the font provided Add your name.
Save as a PNG.
Avatar
I find this an easy way to produce an avatar rather than going through making it from scratch and this way it matches your main tag perfectly.
1. Shift D your main tag.
2. Grab your crop tool and choose which side of the tag you want to use. I went for the right side.
3. Get your length to 180 and your width to 150 then click crop and your left with your avatar.
4. Delete any layers that are not in the Avatar.
5. Add a new layer, Selections Modify and Contrast by 3. Invert and Floodfill with #2e4bfa. Selections None.
6. Selectoins Modify and Contrast by 1, Invert and Floodfill with #ba0254. Selections none.
7. Add your Copyright and Your name then Save as a PNG.
Thats it we're done hope you found this easy to follow, if you have any questions don't hesitate to ask.
Hugs
Gem xxx
No comments:
Post a Comment