Pages

Saturday, 11 November 2017

PTU Sunflowers in Autumn PTU


Sunflowers in Autumn
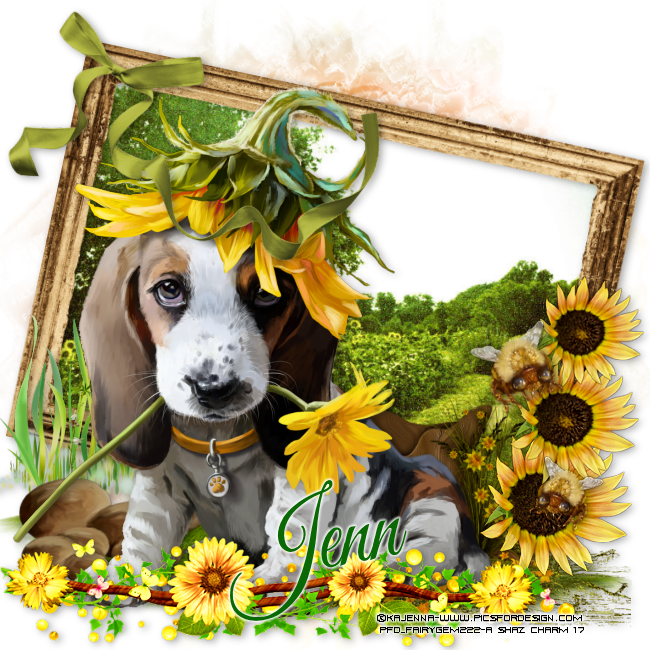
Jennsunflowersinautumn


This tutorial was written by me Fairygem/Sharon on the 9th November 2017 and is all my own idea and creation. Any resemblance to other tutorials is purely coincidental and not intended. You will need to have a working knowledge of Paint shop pro.

You will need:-

Paint Shop Pro – I am using X5 but any version will work.

Scrapkit – I am using an awesome Autumn kit by Jenn at Ginnibug Designz called Sunflower Days. You can buy this kit at Hania’s Designs HERE

Tube of Choice – I am using a stunningly cute tube by Lorri Kajenna called Sunflower. You can buy this tube at Picsfordesign HERE

Mask of Choice – I am using an awesome Autumn mask by Tonya called Falling Leaves. You can find this mask on Tonya’s blog HERE

Font of Choice – I am using Great Vibes Regular. You can google for this font.


Lets Begin:-

1.  Open new image 650x650. You can resize when finished if you so wish.

2.  Open Paper 11, resize by 85%. Copy and paste as a new layer. Load Mask and find your mask. Delete mask layer and merge Group.

3.  Open Element 2. Copy and Paste as a new layer. Image free rotate and rotate by 12 right, all layers unchecked, rotate single layer around canvas centre checked.

4.  Magic wand, click inside frame, Modify Expand by 10. Open Paper 12, resize by 70%. Copy and paste as a new layer moving paper into frame. Once happy with position Invert and delete overhanging. Selections None. Give frame drop shadow V2. H3, 35, 11.93, Black.

5.  Open Element 39, resize by 85%. Copy and paste as a new layer, move down and right. Duplicate and on layers moved down behind the frame then over to the left.

6. Open Element 40, resize by 85%. Copy and paste as a new layer moving over to the right. Drop Shadow as above.

7. Open Element 17, resize by 55%. Copy and paste as a new layer moving over to the left. D/s

8.  Open Element 35, resize by 50% then 80%. Copy and paste as a new layer moving over to the left.

9.  Open your tube and if using same as mine resize by 55% x2. Copy and paste as a new layer moving down slightly. D/s

10.              Open Element 19, resize by 55% then 65%. Copy and paste as a new layer placing at bottom of frame on the right. Duplicate and resize by 85% moving up. Duplicate again and resize by 85% moving up again. Merge all sunflowers together Sharpen and D/s.

11.              Open Element 41, Copy and paste as a new layer moving to bottom of image. Sharpen and D/s

12.              Open Element 37, resize by 35% then 45%. Copy and paste as a new layer moving over to the right. Duplicate and resize by 80%, mirror and move down to the bottom sunflower. Sharpen both and D/s

13.              Open Element 56, resize by 65%. Copy and paste as a new layer. Mirror and move over to the left top frame. D/s

14.             Add your copyright and license details

15.              Add your name using Great Vibes and colour #0a6095. Give a wee glow and Drop shadow as above.


Ok that’s it we are done.

Hope you found my tutorial easy to follow just remember this is only a guideline make you’re tag yours. Any questions or queries please don’t hesitate to ask.

Hugs

Gem/Sharon

Thursday, 9 November 2017

PTU Spooks On the Loose PTU

Spooks on the Loose
jenn-spooksonloose
This tutorial was written by me Fairygem/Sharon on the 30th October 2017 and is all my own idea and creation. Any resemblance to other tutorials is purely coincidental and not intended. You will need to have a working knowledge of working in Paint Shop Pro and using Plugins.
You will need:-
Paint Shop Pro – I am using X5 but any version will work.
Scrapkit – I am using a gorgeous cheeky Halloween kit by Jenn from Ginnibug Designz. The kit is called Ghoulish Spooks. You can buy this kit at Hania’s Design HERE
Tube of Choice – I am using the awesome artwork of Maryline Cazenave called Halloween Pug. You can buy this tube at CDO HERE
Mask of Choice – I am using a Halloween mask by Vix. The mask is called Vix-MaskHalloween2012-6 You can download this mask HERE
Font of Choice – I am using Forever Brush which you can find HERE
Plugins Used:-
Eyecandy 4000 – Gradient Glow

Ok Lets Begin
1.  Open New Image 650x650 Transparent
2. Open Paper 3, resize by 85%. Copy and Paste as a new layer. Load Mask and find mask your using. Delete mask layer and merge group.
3.  Open frame 1, resize by 85%. Copy and paste as a new layer moving up and over to the right. With magic wand click inside, Modify and expand by 10.
4. Open paper 1, resize by 85% x3. Copy and paste as a new layer moving so that paper is inside the frame. Once happy with position Invert delete. Selections None, Give a drop shadow to the frame of V4, H5, 54, 11.93 Black
5.  Open element 9. Copy and paste as a new layer moving into the frame at the bottom. With eraser tool erase overhanging.
6.  Open element 42, resize by 55%. Copy and paste as a new layer placing in the frame to the left. D/s as above.
7. Open element 69, resize by 55%. Copy and paste as a new layer placing in the frame behind element 42. Erase any overhanging the D/s as above.
8. Open element 22, resize by 40%. Copy and paste as a new layer placing in the frame. D/s as above.
9. Open element 20, resize by 40%. Copy and paste as a new layer placing in the frame. Change Opacity to 65. Duplicate and resize by 80%, mirror and move to top of frame.
10.             Open Element 13, resize by 40%. Copy and paste as a new layer moving down and right. Sharpen then D/s as above.
11.             Open element 64, resize by 35%. Copy and paste as a new layer moving down. Sharpen and D/s as above.
12.             Open your tube and if using same as me choose which one you would like to use. Copy and paste as a new layer. Resize by 85% x2, Move over to the left of image. D/s as above.
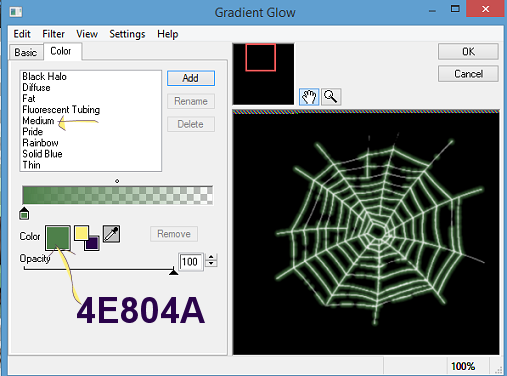
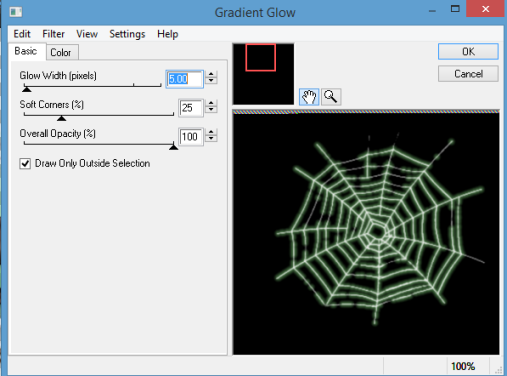
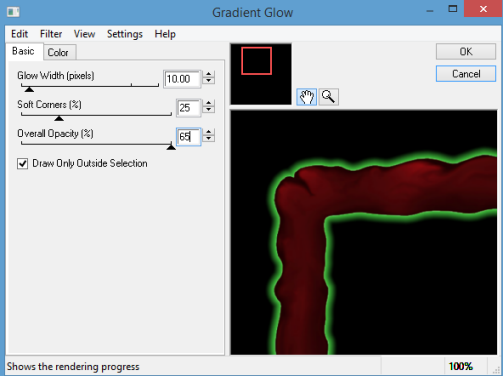
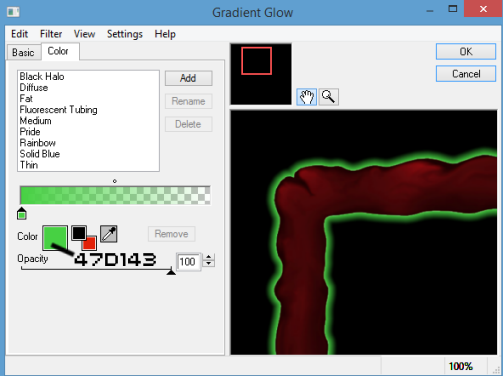
13.             Open element 34, resize by 50%. Copy and paste as a new layer moving up to top left side of frame. Plugins Eyecandy 4000, Gradient glow with settings below.
gradientglowspooksonloose1
gradientglowspooksonloose2
14.            Open element 71, resize by 85%. Copy and paste as a new layer moving so it looks as though dangling from the web. Gradient glow with settings above.
15.             Add your copyright and license details.
16.            Add your name using Forever brush font and colour #4e804a. D/s as above.
That’s it we are done. I hope you found it easy to follow. Remember though this is just a guide make the tag yours. Any questions or queries please message me and I will do what I can to help.
Hugs
Gem/Sharon 

Monday, 30 October 2017

PTU I Put a Spell on You PTU

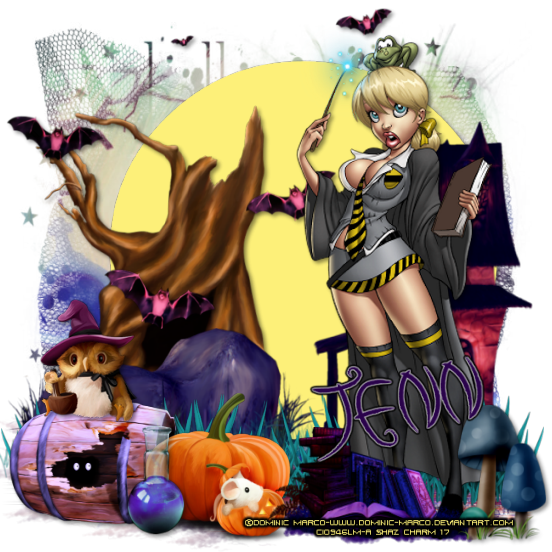
I Put a Spell on You
jenn-putaspellonyou
This tutorial was written by me Fairygem/Sharon on the 30th October 2017 and is all my own idea and creation. Any resemblance to other tutorials is purely coincidental and not intended. You will need to have a working knowledge of Paint Shop Pro for this tutorial.
You will need:-
Paint Shop Pro – I am using X5 but any version will work.
Scrapkit – I am using a stunning kit by Jenn at Ginnibug Designz called Spellcaster. You can buy this kit at Hania’s Design HERE
Tube of Choice – I am using a very old tube by Dominic Marco that I received during a Xmas gift when CILM was open. I have looked around the net to see if Dominic is selling elsewhere and have come up blank. If anyone knows where he’s selling please email me so I can add the link.
Mask of Choice – I am using another awesome Halloween mask by Vix called Vix-MaskHalloween2012-1. You can download HERE
Font of Choice – I am using My Dark Halloween which you can get HERE
Plugins – Dsb Flux – Blast
Ok ready to begin:-
1.         Open new image 650x650 transparent
2.        Open Paper 11, resize 85%. Copy and paste as a new layer. Load Mask and find the mask you are using. Delete Mask layer and Merge Group.
3.        Open Element 49, resize by 70%. Copy and paste as a new layer moving over to the left. Drop Shadow V3, H3, 45, 6.92 Black
4.        Open Element 48. Copy and paste as a new layer moving to the right and down. Plugins Dsb Flux – Blast with settings 40% Left.
5.        Open Element 68, resize by 70%. Copy and paste as a new layer moving down and left. Drop Shadow as above.
6.        Open Element 56, resize by 80%. Copy and paste as a new layer moving to the right. Drop Shadow as above.
7.        Open Element 60. Copy and paste as a new layer. Adjust – Hue & Saturation – Colourize – Hue 130 – Saturation 192. Duplicate and move over to the left. With Eraser tool erase overhanging grass. Merge down.
8.         Make Mask layer active. Go to Presets and find Eclipse. Put background colour at #fdf079. Draw out a circle 300 by 300. Once happy convert to raster. Drop Shadow as above.
9.         Open Element 21, resize by 90%. Copy and Paste as a new layer moving up. Drop Shadow as above.
10.    Open Tube. Copy and paste as a new layer moving over to the right. Drop Shadow as above.
11.    Open Element 52, resize by 30%. Copy and paste as a new layer moving down and left. Drop Shadow as above.
12.   Open Element 13, resize by 35% then 85%. Copy and paste as a new layer moving so its sitting on barrel. Sharpen and Drop shadow as above.
13.   Open Element 2, resize by 45%. Copy and paste as a new layer moving down.
14.   Open Element 18, resize by 45% then 65%. Copy and paste as a new layer moving down and left. Drop Shadow as above.
15.   Open Element 116, resize by 45%. Copy and paste as a new layer moving down and right slightly. Drop Shadow as above.
16.   Open Element 88, resize by 30%. Copy and paste as a new layer moving down and far right. Drop Shadow.
17.   Add name, Copyright and license details.
Save as a png.
That’s it we are done. I hope you found my tutorial easy to follow. Any questions or queries please don’t hesitate to ask.
Hugs
Gem/Sharon
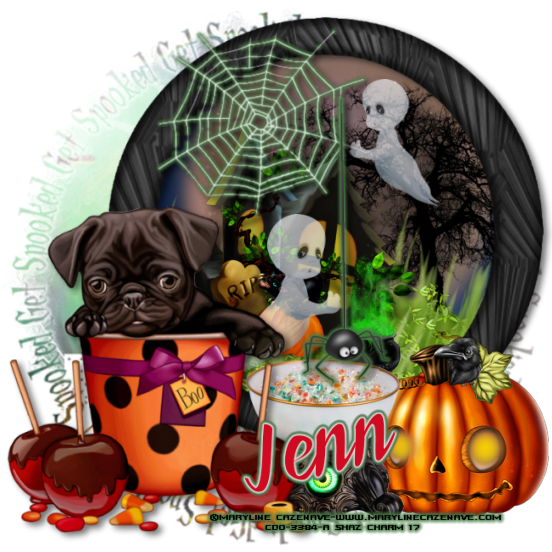
PTU They call it Witchcraft PTU

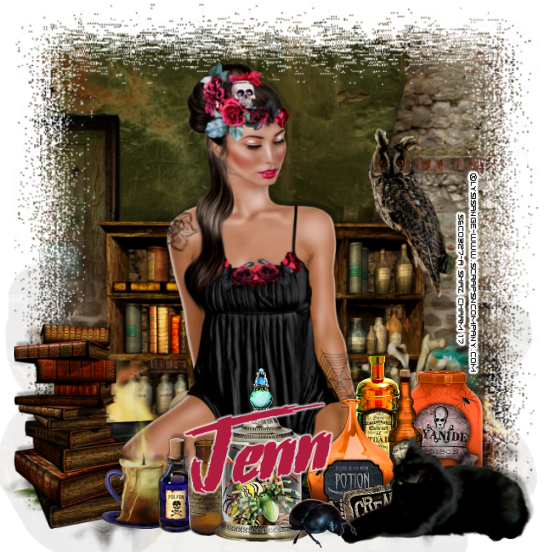
They call it Witchcraft
Jenn-Witchcraft
This tutorial was written by me Fairygem/Sharon on the 28th October 2017 and is all my own idea and creation. Any resemblance to other tutorials is purely coincidental and not intended. You need to have a basic knowledge of working with Paint Shop Pro to understand this tutorial.
You will need:-
Scrapkit – I am using a beautiful kit by Jenn at Ginnibug Designz called Witchcraft. Oh wow this kit is totally amazing with so many elements etc to use.
You can buy this kit at Hania’s Design HERE
Tube of Choice – I am using a gorgeous tube by Lysisange called Witchcraft. You can buy Lysisange Art at Scraps and Company HERE
Mask of Choice – I am using a wonderful mask by Vix called VixMask96. You can download it HERE
Font of Choice – I am using a font called Stranger in the Night. You can download HERE
No outside plugins used
This tutorial is going to be so easy to follow!!
Lets begin
1.  Open new image 650x650 transparent
2. Open Paper 4, Resize by 90%. Copy and paste as a new layer. Load Mask and find mask you are using. Delete and merge group.
3.  Open Cluster 2, Resize by 65%. Copy and paste moving down the canvas
4. Open your tube and if using same as me choose which colour you would like and make that layer active. Resize by 65% x2 then 85%. Copy and paste as a new layer moving down the canvas. Drop Shadow V-5, H3, Opacity 30, Blur 3.23 Black.
5. Open Element 42, Resize by 30%. Copy and paste as a new layer moving down and to the left. Sharpen then Drop Shadow as above.
6. Open Element 89, resize by 65% then mirror. Copy and Paste as a new layer moving down and right. D/S as above.
7. Open Element 83, Resize by 30% then mirror. Copy and Paste as a new layer moving down and left. D/s as above.
8. Open Element 81, resize by 25%. Copy and Paste as a new layer moving down and slightly left. Sharpen and D/S as above.
9.  Open Element 37, resize by 15% then 90%. Copy and paste as a new layer moving down and left. Sharpen then D/s as above.
10.             Open Element 96, resize by 40%. Copy and paste as a new layer moving down. Sharpen then D/s
11.             Make layer 4 Active. Open element 113, Resize by 35%. Copy and paste as a new layer moving over to the right. Sharpen and D/s.
12.             Open Element 19, resize by 35% x2 then 45%. Copy and paste as a new layer moving down and slightly right. D/s
13.             Add your name using font and colour #af1c3e.
14.            Add your copyright and license details.
Save as a png.
That’s it we are done, told ya it was easy didn’t i. Hope you enjoyed the tut and didn’t find anything confusing.
If you have any questions please feel free to ask.
Hugs
Gem/Sharon

Thursday, 19 October 2017

PTU Zombies Smile PTU

Zombies Smile
jennzombiesux
This tutorial was written by me Fairygem on the 19th October 2017 and is all my own idea and creation. Any resemblance to other tutorials is purely coincidental and not intended. You will need to have a working knowledge of Paint Shop Pro for this tutorial.
You will need:-
Paint Shop Pro – I am using X5 but any version will work.
Scrapkit – I am using an awesome kit by Jenn at Ginnibug Designz called Zombie Snow. You can buy this kit at Hania’s Design Here.
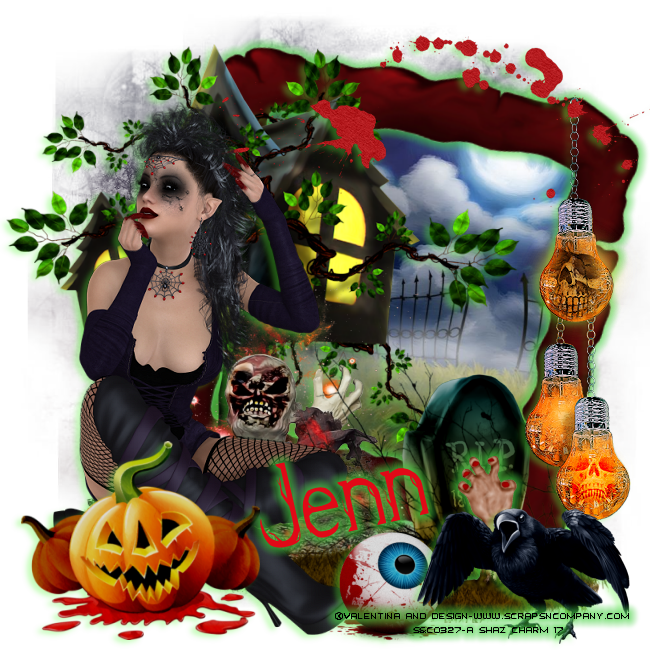
Tube of Choice – I am using the wonderful artwork of Valentina and Design. This tube is called Evalle. You can buy this tube at Scraps N Company Here.
Mask of Choice – I am using an awesome Halloween mask by Tonya called Tbt_HalloweenMask 2. You can download this mask on the Creative Misfits blog under Bca_Halloween mask 2016 Here.
Font of Choice – I am using a Halloween font called Kampung Zombie. You can get this font Here.
Plugins – Eyecandy 4000-Gradient Glow
Lets Begin :-
1.           Open new image 650x650 transparent
2.          Open Paper 1, resize by 85%. Copy and paste as a new layer. Layers Load mask and find the mask you are using. Delete Mask layer and Merge group.
3.          Open Frame 2, resize by 70%. Copy and paste as a new layer moving up and over to the right. Free rotate by 12 right.
4.         With your magic wand click inside the frame, modify and expand by 10. Open Paper 2 and resize by 70% then Mirror. Copy and paste placing into the frame. Once happy with position Invert and Delete. Selections None.
5.         Make frame active again. Effects Plugins Eyecandy 4000 Gradient Glow with the settings below.
Zombiesuxgradientsettings1
zombiesuxgradientsettings2v
6.          Open Element 2, resize by 70%. Copy and Paste as a new layer moving over to the left. Drop Shadow V3, H-5, Opacity 35, Blur 7.93, Colour 5cf83c.
7.          Open Element 15. Resize by 70%. Copy and Paste as a new layer moving over to the left. Drop Shadow as above.
8.         Open Element 16, resize by 70%. Copy and Paste as a new layer moving over to the right. Drop Shadow as above.
9.          Open Element 65, resize by 65%. Copy and Paste as a new layer moving over to the right placing loop at top of frame. Sharpen and Drop Shadow as above.
10.      Open Element 51, Mirror. Copy and Paste as a new layer moving up and slightly right. Drop Shadow as above.
11.       Open your tube and if using the same as me Resize by 15% then 80%. Mirror then Copy and Paste as a new layer moving over to the left. Sharpen and Drop Shadow as above.
12.       Open Element 19, resize by 35% then 65%. Copy and Paste placing on the grave. Plugins Eyecandy Gradient Glow with previous settings. Take eraser and erase the bottom so that it looks like the hand is coming up from the grave.
13.      Open Element 21, resize by 40%. Copy and Paste as a new layer moving to the left. Drop Shadow as above.
14.      Open Element 49, resize by 55%. Copy and Paste as a new layer moving down slightly. Drop Shadow as above.
15.      Open Element 79, resize by 40%. Copy and Paste as a new layer moving over to the right. Drop Shadow as above.
16.      Add your copyright and relevant license details.
17.      Add your name using Kampung Zombie font Size 72, Colour e10917. Convert to raster and give it a gradient glow with previous settings.
Save as a Png
That’s it we are all done. I hope you found my tutorial fun and easy to follow. If you have any questions don’t hesitate to ask. I would also love to see your results so please feel free to email so I can get them added to the post.
Hugs
Shaz/Fairygem

PTU Spooks N Kittens PTU

PTU  Spooks N Kittens  PTU
Jennspksnkits

This tutorial was written by me Fairygem on the 18th October 2017 and is all my own idea and creation. Any resemblance to other tutorials is purely coincidental and not intended. You will need to have a working knowledge of Paint Shop Pro and using layers and filters.
For this tutorial you will need:-
Paint Shop Pro – I am using PSP X5 but any version will work.
Scrapkit – I am using an awesome kit by Jenn at Ginnibug Designz called Spooky Kitties N Co. You can buy this kit at Hania’s Design HERE.
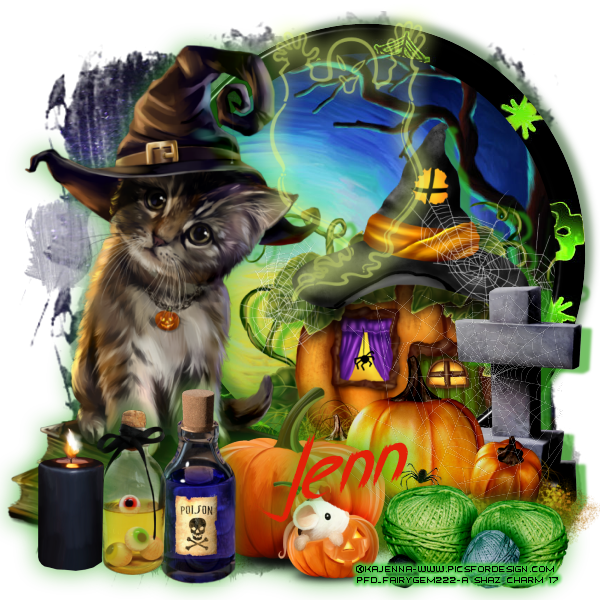
Tube of Choice – I am using a beautiful tube by Kajenna that I bought last year. The tube is called Magic Cat and you can buy it at Picsfordesign HERE. Remember that you must have a license to use Kajenna’s artwork.
Mask of Choice – I am using a gorgeous mask by SophistocatSimone at Scrappy Bit of Fun. Mask 25. You can download this mask HERE.
Font of Choice – I am using Breathe Karma Italic which you can download HERE.
Plugins :-
Eye Candy 4000 – Glass

Ok Ready Lets begin :-

1.  Open new image 600x600 transparent.
2.  Open Paper 16, resize by 85% x2. Copy and Paste as new layer. Layers Load Mask and find the mask you are using. Delete mask layer and merge group.
3.  Open Paper 6, Go to your colour palette and find your paper in Patterns. Make sure it shows in Foreground/Stroke Palette. Close Background.
4. Go to Presets and find your Eclipse shape. Width 30, Anti-Alas and create as vector. Draw out a circle 400x400. Once happy with the size Convert to Raster and move over to the right of canvas.
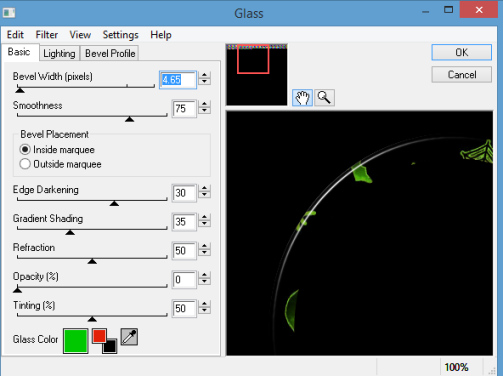
5.  Effects – Plugins – Eyecandy 4000 Glass with settings below.
Glass Preset Spooks and Kittens
6.  With your magic wand click inside the frame, Modify, Expand by 7. Open Paper 5, resize by 70%. Copy and paste as new layer moving paper into frame. When happy Invert, Delete. Selections None. Move Paper below frame.
7. Make frame layer active and give a drop shadow V-6, H-7, Opacity 65, Blur 11.24, Colour #3e6537.
8.  Open Element 3, resize by 70% and Copy. Make the paper layer active, and Paste as a new layer. Move over to the right side of frame. Erase any overhanging house. Give a drop shadow of V4, H10, Opacity 65, Blur 3.55, Colour #2ca115.
9.  Open Element 20, resize by 45%. Copy and Paste as a new layer moving over to the right side. Drop Shadow as above.
10.             Open Element 9. Copy and Paste as a new layer. Mirror then move over to the right.
11.             Open your tube and if using same as me resize by 25%. Copy and paste as a new layer and move over to the left. Drop shadow V1, H-1, Opacity 65, Blur 32.55 Same colour as above.
12.             Open Element 15, resize by 60%. Copy and Paste as a new layer. Move over to the left and down slightly. Drop Shadow as above.
13.             Open Element 14, resize by 45%. Copy and paste as a new layer moving over to the right side. Sharpen.
14.            Open Element 48, resize by 40%. Copy and Paste as a new layer moving over to the left. Drop shadow as above.
15.             Open Element 64, resize by 40% then 65%. Copy and paste as a new layer moving over to the left. Drop shadow as above.
16.            Open Element 73, resize by 30%. Copy and paste as a new layer moving over to far left. Drop shadow as above.
17.            Open Element 104, resize by 45%. Copy and paste as a new layer moving over to the right. Drop shadow as above.
18.             Open Element 43, resize by 75%. Copy and paste as a new layer moving slightly up and to the right (see mine for placement). Lower the Opacity to 65%.
19.             Add copyright and relevant license details.
20.            Add name using colour #e22108. Add drop shadow as above then repeat.
Save as a PNG.
That’s it we are done. I hope you enjoyed my tutorial and found it easy to follow. If you have any questions don’t hesitate to ask. I would love to see your results so please feel free to email me them and I will get them added to the post.
Hugs
Sharon/Fairygem