Pages

Wednesday, 17 February 2016

PTU Love Is PTU


PTU  Love Is  PTU


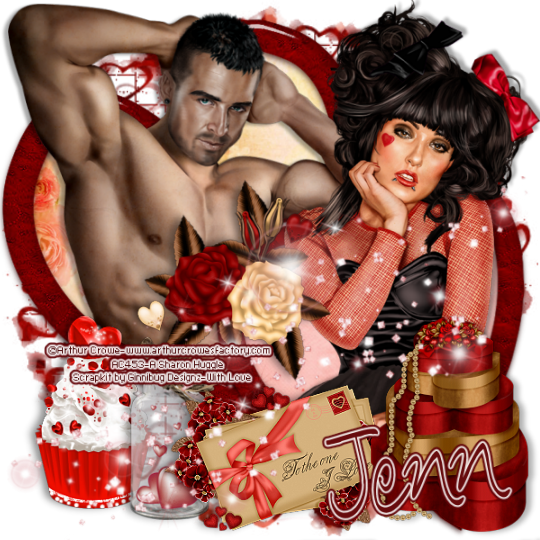
Jenn Love is

This Tutorial was written by me Fairygem on the 13th February 2016 and is all my own creation and idea. Any resemblance to other tutorials is purely coincidental and not intended.

For this tutorial you will need to have a working knowledge of Paint Shop Pro and Vector Shapes.

You will need:-

Paint Shop Pro – I am using X5 but any version will work.

Tubes of Choice – I am using the awesome artwork of Arthur Crowe. You can get his work HERE

Scrapkit of Choice – I am using awesome one by Jenn at Ginnibug Designz called With Love which you can download HERE at Hania’s Design or HERE at Picsfordesign

Mask of Choice – I am using one of Vix’s awesome Masks Number 191 which you can get HERE

Font of Choice – I am using Ananda Hastakchyar which you can get HERE.

Heart Preset Shape – This comes in Psp but in case you don’t have it you can download some awesome Shapes HERE.

Outside Plugins :-

Eye Candy 5 Impact:-

Glass

Gradient Glow


Ok Lets Begin


1.  Open New Image 600x600

2.  Open Paper 13 and resize by 85%. Go to Layers Load Mask and find the mask your using. Delete mask layer and merge group.

3.  Open Paper 3. Go to your foreground colour, Patterns and find the paper. Now go to your Preset Shapes and find the heart you are using. Width 35 and close off background colour.

4. Draw out the heart roughly 400 by 450. When happy convert to Raster layer. Now go to Effects Plugins and find Eye Candy 5 Glass. Used settings below.
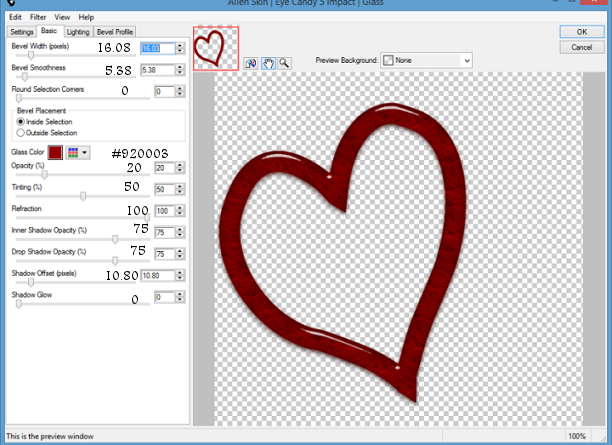


glass settings

5.  Duplicate the heart and resize by 85%. Move down to the right side bottom of canvas (See my tag for Reference).

6. With your magic wand click inside the heart and expand by 15. Open Paper 8 and resize by 70%. Copy and Paste as a new layer, Invert and delete the excess paper. De-select

7.  With your Magic Wand click inside the heart again. Expand by 8. Copy and Paste your female tube as a new layer and if using same as me Resize by 70%. Invert and with the eraser tool erase the bottom overhanding parts. De-select and give a dropshadow of -4, 5, 35, 4.93 Black.

8.   Make the original heart active and click inside with your magic wand. Expand by 15. Open Paper 4 and resize by 75%. Copy and Paste as a new layer, Invert and delete excess paper. De-Select.

9.   With  your Magic Wand click inside the original heart again. Expand by 8. Copy and Paste your male tube as a new layer and if using the same as me resize by 75%. Invert and with the eraser tool erase the bottom overhanging parts. De-select and give a dropshadow of 2, -5, 35, 4.93 Black.

10.              Open Element 3 and resize by 45%. Copy and Paste as a new layer moving to the left bottom side of the image. Sharpen and give dropsahdow of -1, -6, 45, 13.09.

11.              Open Element 7 and resize by  40% then 90%. Copy and Paste as a new layer moving next to the cupcake. Sharpen and give same dropshadow as above.

12.              Open Element 41 and resize by 45% then 90%. Copy and Paste as a new layer moving to the centre of the two hearts. Sharpen and give the same dropshadow as above.

13.              Open Element 85 and resize by 40%. Copy and Paste as a new layer moving to the right side of Element 7. Sharpen and give same dropshadow as above.

14.             Open Element 93 and resize by 40%. Copy and Paste as  new layer moving to the bottom right Sharpen and give a dropshadow of 1, 6, 30, 8.93.

15.              Open Element 101. Copy and Paste as a new layer moving to the bottom of the tag over the elements.

16.             Add your Name using #670b0d. Add Eye Candy Impact Gradient Glow with the settings below.
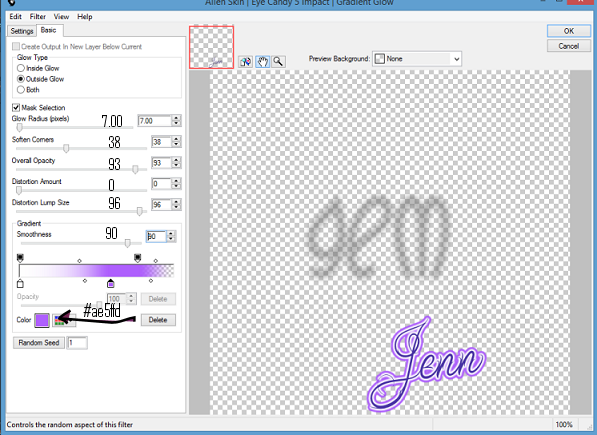
gradient glow settings

17.             Add your Copyright and relevant license Number.

Save as a PNG

I hope you enjoyed my tutorial, remember this is just a guideline make the tag your own. I would love to see your results so please feel free to email me so I can get them added.

Hugs

Sunday, 7 February 2016

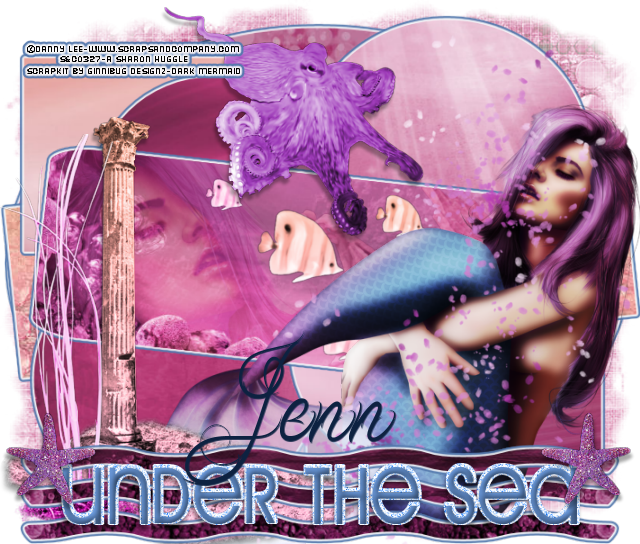
PTU Under the Sea PTU


PTU   Under The Sea  PTU
Jenn preview

This Tutorial was written by me Fairygem on the 7th February 2016 and is my own creation. Any resemblance to other tutorials is purely co-incidental and not intended.

For this Tutorial you will need to have a working knowledge of template layers, masks and plugins.

You will need:-

Paint Shop Pro-I am using X5 but any version will work.

My Under the Sea Template HERE

Tube of Choice-I am using the wonderful artwork of Danny Lee-Danny sells at Scraps and Company HERE

Scrap kit of choice-I am using a wonderful kit by Jenn at Ginnibug Designz called Dark Mermaid. This kit is for sale at Hania’s Design HERE

Mask of Choice-I am using 201 Insatible Dreams HERE

Font of Choice-I am using Ababil Script HERE

Plugins:-

Eye Candy 5-Gradient Glow

Xero-Radiance

Ok Lets Begin

1.  Open my Template, Shift D and delete the original Template.

2.  Select the Oval layer, Selections float, defloat. Open Paper 5 and resize by 90%. Copy and Paste as a new layer Invert and delete excess paper. Delete original layer.

3.  Select 1st long rectangle, Selections float, defloat. Open Paper 6, copy and paste as a new layer Invert and delete excess paper. Delete original layer.

4.  Merge the small rectangles together, Select float, defloat. Open Paper 12 resize by 85%. Copy and Paste as a new layer Invert and delete excess paper. Delete the original layer.

5.  Merge the large circles together, Select float, defloat. Open Paper 9 and resize by 85%. Copy and paste as a new layer, Invert and delete excess paper. Delete original layer.

6. Merge the two small circles together, Select float, defloat. Open Paper 11 and resize by 85%. Flip the paper by going to Image Flip Vertical. Copy and paste as a new layer Invert and delete excess paper. Delete original layer.

7. Select rounded rectangle, Select float, defloat. Open Paper 10 and resize by 85%. Copy and paste as a new layer moving the paper up towards the top till you have the picture elements at the bottom of the rectangle. See my tag for reference. Invert and delete the excess paper. Do Not De-Select.

8.  Open your tube and click on the Close up if using the same tube as me. Copy and paste as a new layer and resize by 50%. Delete excess and de-select.

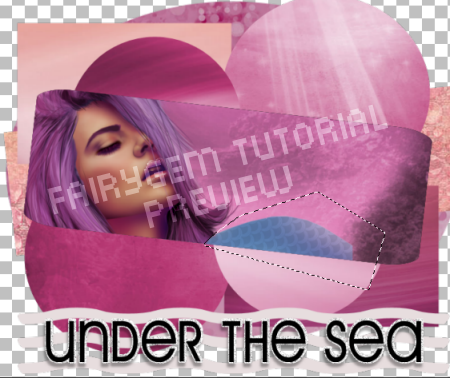
9.   With your freehand selection tool draw around the tail that has been left. See Image Below. Press delete and de-select. Change the blend mode to soft light.
 dancing ants preview

10.              Go back to the rounded rectangle, select float, defloat. Open Element 55 and resize by 80% twice. Mirror then Copy and paste as a new layer moving to the right side of the rectangle. Make sure the Element is between the Paper and Tube layer. Invert and delete excess paper. Change blend mode to soft light. Do Not De-select.

11.              Open Element 86 and resize by 75% twice. Copy and paste as a new layer moving over to the right side of the rectangle. De-select and delete the original layer.

12.              Select wavy lines, Select float, defloat. Open Paper 14 and resize 90%. Copy and Paste as a new layer Invert and delete excess paper. Delete original layer.

13.              Select Noise layer, Adjust Hue-Saturation-Colorize. Change the Hue to 151 and Saturation to 255.

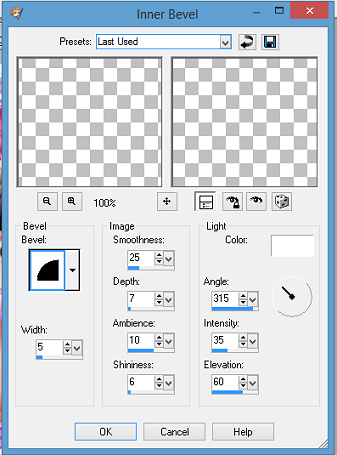
14.             Select Wordart Select float, defloat and add a new layer. Change your foreground colour to #5479AD. Flood fill layer. De-select and delete the original layer. On the flood fill layer go to 3d effects Inner Bevel. Settings below:-
 Inner bevel settings

15.              Go back to Layer 1 and open Paper 7. Copy and Paste as a new layer. Load your chosen Mask or use the same one I am using. Delete Mask layer and Merge Group.

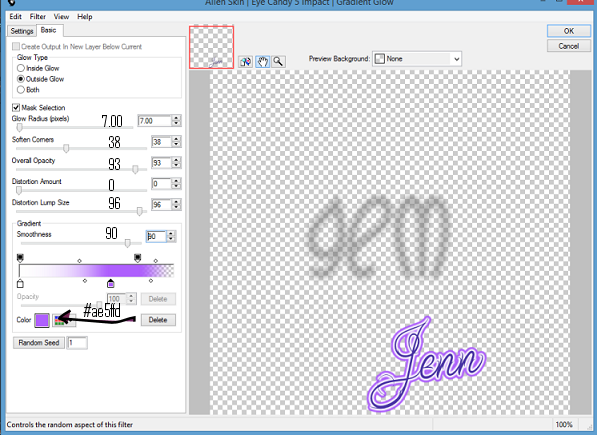
16.             Now working our way up the Template add Eye Candy Impact Gradient Glow with the following settings. Do this till you reach the Shipwreck Element then move to the Wavy Lines and add the glow to these too.
 gradient glow settings

17.             Make your close up layer active. Copy and Paste the main tube as a new layer and resize by 55%. Mirror and move over to the right. Give your tube a dropshadow of 6,-2,35,4.93 Black. Apply Xero Radiance settings, 115,60,120,245.

Now to Add your Elements

I used:-

Element 5-Resize by 85%-Sharpen-Dropshadow as Above.

Element 3-Resize by 80%-Sharpen-Dropshadow as Above.

Element 22-Resize by 50%-Sharpen-Dropshaow as Above.

Element 27-Resize by 80%-Sharpen-Mirror and place over tube.

Element 104-Resize by 20%-Sharpen-Dropshadow as Above. Duplicate-Mirror-Merge Down.

18.              Resize all layers by 90% then add your copyright and license details.

19.              Add your name using #0d2241. Save as a Png.


That’s it we are done. I hope you enjoyed my tutorial but remember this is a guide only put your own touches to the tag. I would love to see your results so please feel free to email me so I can get them added.

Hugs to all