Pages

Sunday, 7 February 2016

PTU Under the Sea PTU


PTU   Under The Sea  PTU
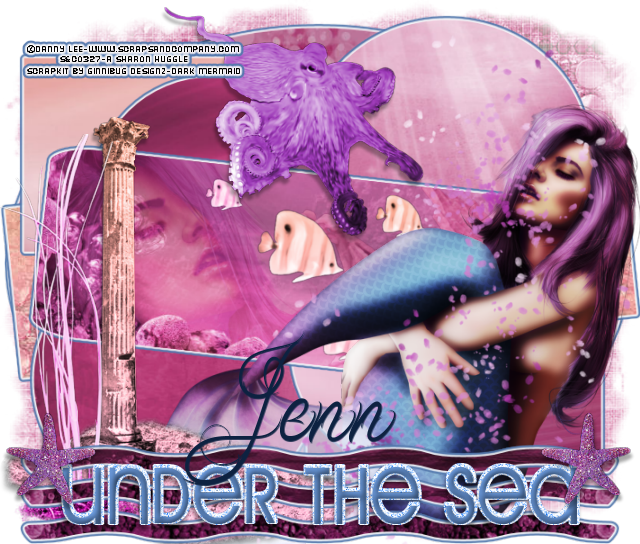
Jenn preview

This Tutorial was written by me Fairygem on the 7th February 2016 and is my own creation. Any resemblance to other tutorials is purely co-incidental and not intended.

For this Tutorial you will need to have a working knowledge of template layers, masks and plugins.

You will need:-

Paint Shop Pro-I am using X5 but any version will work.

My Under the Sea Template HERE

Tube of Choice-I am using the wonderful artwork of Danny Lee-Danny sells at Scraps and Company HERE

Scrap kit of choice-I am using a wonderful kit by Jenn at Ginnibug Designz called Dark Mermaid. This kit is for sale at Hania’s Design HERE

Mask of Choice-I am using 201 Insatible Dreams HERE

Font of Choice-I am using Ababil Script HERE

Plugins:-

Eye Candy 5-Gradient Glow

Xero-Radiance

Ok Lets Begin

1.  Open my Template, Shift D and delete the original Template.

2.  Select the Oval layer, Selections float, defloat. Open Paper 5 and resize by 90%. Copy and Paste as a new layer Invert and delete excess paper. Delete original layer.

3.  Select 1st long rectangle, Selections float, defloat. Open Paper 6, copy and paste as a new layer Invert and delete excess paper. Delete original layer.

4.  Merge the small rectangles together, Select float, defloat. Open Paper 12 resize by 85%. Copy and Paste as a new layer Invert and delete excess paper. Delete the original layer.

5.  Merge the large circles together, Select float, defloat. Open Paper 9 and resize by 85%. Copy and paste as a new layer, Invert and delete excess paper. Delete original layer.

6. Merge the two small circles together, Select float, defloat. Open Paper 11 and resize by 85%. Flip the paper by going to Image Flip Vertical. Copy and paste as a new layer Invert and delete excess paper. Delete original layer.

7. Select rounded rectangle, Select float, defloat. Open Paper 10 and resize by 85%. Copy and paste as a new layer moving the paper up towards the top till you have the picture elements at the bottom of the rectangle. See my tag for reference. Invert and delete the excess paper. Do Not De-Select.

8.  Open your tube and click on the Close up if using the same tube as me. Copy and paste as a new layer and resize by 50%. Delete excess and de-select.

9.   With your freehand selection tool draw around the tail that has been left. See Image Below. Press delete and de-select. Change the blend mode to soft light.
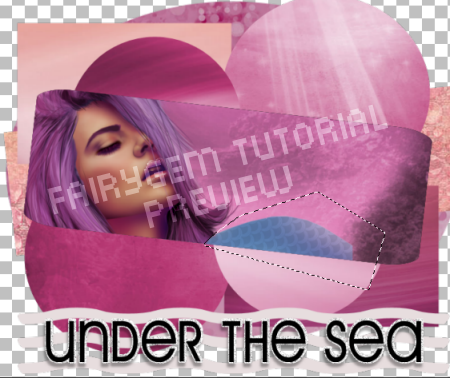
 dancing ants preview

10.              Go back to the rounded rectangle, select float, defloat. Open Element 55 and resize by 80% twice. Mirror then Copy and paste as a new layer moving to the right side of the rectangle. Make sure the Element is between the Paper and Tube layer. Invert and delete excess paper. Change blend mode to soft light. Do Not De-select.

11.              Open Element 86 and resize by 75% twice. Copy and paste as a new layer moving over to the right side of the rectangle. De-select and delete the original layer.

12.              Select wavy lines, Select float, defloat. Open Paper 14 and resize 90%. Copy and Paste as a new layer Invert and delete excess paper. Delete original layer.

13.              Select Noise layer, Adjust Hue-Saturation-Colorize. Change the Hue to 151 and Saturation to 255.

14.             Select Wordart Select float, defloat and add a new layer. Change your foreground colour to #5479AD. Flood fill layer. De-select and delete the original layer. On the flood fill layer go to 3d effects Inner Bevel. Settings below:-
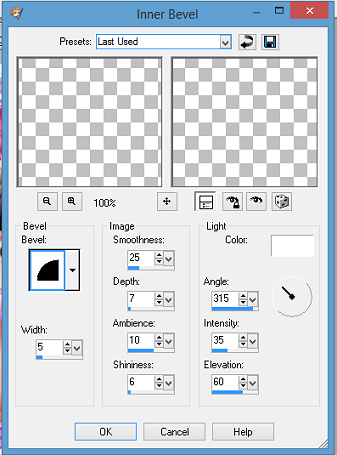
 Inner bevel settings

15.              Go back to Layer 1 and open Paper 7. Copy and Paste as a new layer. Load your chosen Mask or use the same one I am using. Delete Mask layer and Merge Group.

16.             Now working our way up the Template add Eye Candy Impact Gradient Glow with the following settings. Do this till you reach the Shipwreck Element then move to the Wavy Lines and add the glow to these too.
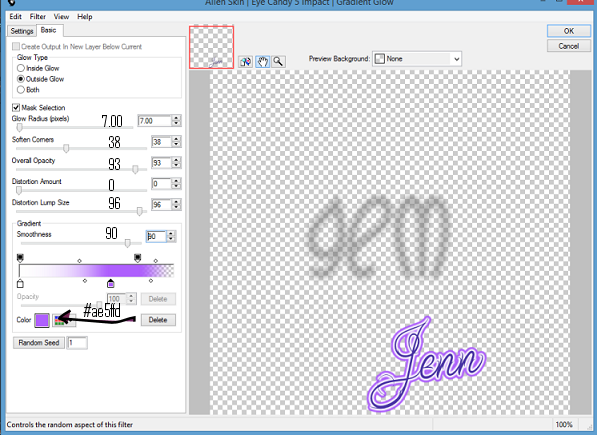
 gradient glow settings

17.             Make your close up layer active. Copy and Paste the main tube as a new layer and resize by 55%. Mirror and move over to the right. Give your tube a dropshadow of 6,-2,35,4.93 Black. Apply Xero Radiance settings, 115,60,120,245.

Now to Add your Elements

I used:-

Element 5-Resize by 85%-Sharpen-Dropshadow as Above.

Element 3-Resize by 80%-Sharpen-Dropshadow as Above.

Element 22-Resize by 50%-Sharpen-Dropshaow as Above.

Element 27-Resize by 80%-Sharpen-Mirror and place over tube.

Element 104-Resize by 20%-Sharpen-Dropshadow as Above. Duplicate-Mirror-Merge Down.

18.              Resize all layers by 90% then add your copyright and license details.

19.              Add your name using #0d2241. Save as a Png.


That’s it we are done. I hope you enjoyed my tutorial but remember this is a guide only put your own touches to the tag. I would love to see your results so please feel free to email me so I can get them added.

Hugs to all

Monday, 18 January 2016

FTU-The Mask Within-FTU


FTU – The Mask Within – FTU
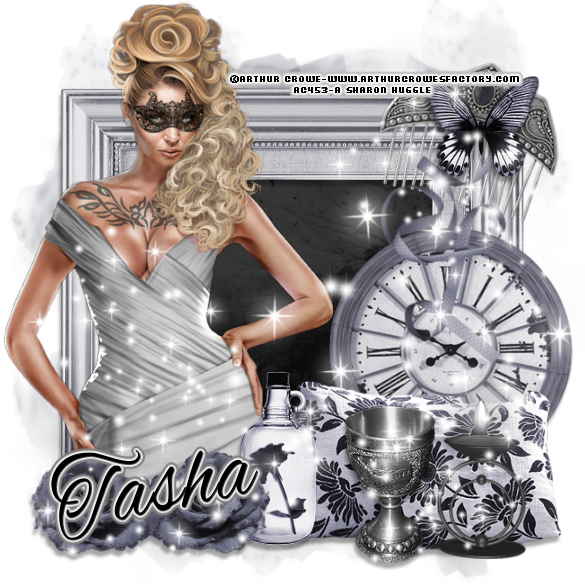
the mask within tag
This tutorial was written by me Fairygem on the 18th January 2016 and is all my own creation. Any resemblance to other tutorials is purely co-incidental and not intended.
For this tutorial you need to have a working knowledge of layers, Masks and plugins.
You will need :-
Paint Shop Pro-I am using X5 but any version will work.
Tube of Choice-I am using the awesome art of Arthur Crowe a new tube called Nightflower-You can get this HERE but please do not use the same tube as me without a proper license.
Scrapkit of Choice-I am using a beautiful kit by Tasha’s Playground called Broken Dreams which you can find HERE.
Mask of Choice-I am using Vix bigmask005 which you can find HERE.
Sparkles of Choice-You can find a lot on Deviantart just search for sparkles.
Font of Choice-I am using Alex Brush which you can find HERE.
Outside Plugins:-
EyeCandy 5-Perspective Shadow
Eye Candy 5-Gradient Glow
Ok lets begin……..
1.  Open new image 650x650. We can resize when finished.
2.  Open Paper 1, resize 90%.  Copy and Paste as a new layer. Find Mask and load, delete and merge group.
3.  Open Frame 3, copy and paste as a new layer. With the Magic Wand click inside the frame and expand by 10.
4. Open Paper 6 and resize by 85% twice. Copy and paste as a new layer, selections Invert and delete excess paper. Move this layer below the frame.
5.  Go back to the frame layer and give it a dropshadow of 6, -2, 35 and 4.93.
6. Open your tube and if using the same tube as me choose what colour you would like the dress to be, I chose Silver as it goes with the kit perfectly. Copy and Paste the tube as a new layer, and resize by 70%.
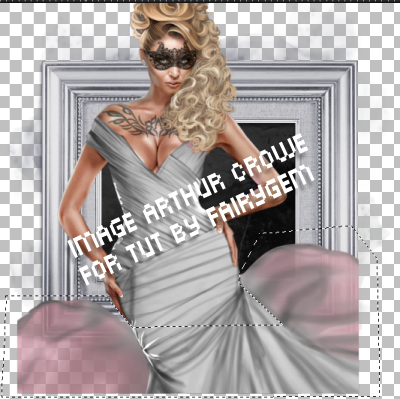
7. Go to your freehand selections and draw around the puffy part of the dress, see my image to help with the selection. Delete this part of the dress then move into position. I moved mine to the bottom left of the frame.
Freehand Preview
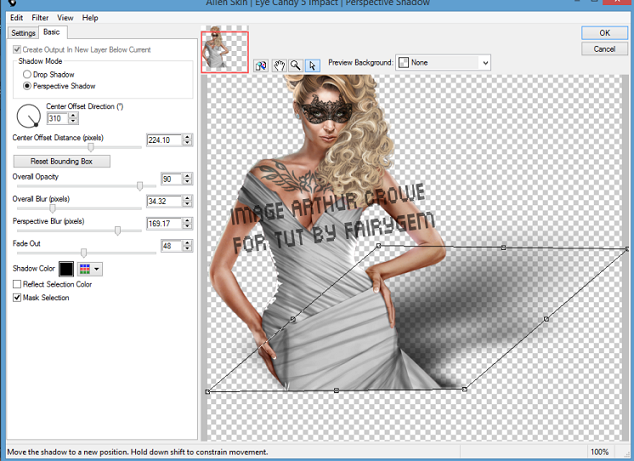
8.  Sharpen the tube and add a dropshadow. I used Eye Candy5 Perspective Shadow with the settings below:-
Perspective Shadow preview1
9.  Open Pillows Element, Copy and Paste as a new layer and move to right side of frame bottom. Give a dropshadow previously used.
10.  Open Clock Element and resize by 90%. Copy and Paste as a new layer moving it behind the pillows. Give a dropshadow previously used.
11. Open Bottle Element and resize by 55%. Copy and apste as a new layer moving to the centre bottom of the frame. Give a dropshadow previously used.
12.    Open Flower 1 and resize by 75%. Copy and Paste as a new layer moving to bottom left. Duplicate and mirror placing next to each other (see my tag for reference). Merge together and give a dropshadow previously used.
13.      Open Hairpin Element and resize by 80%. Copy and Paste as a new layer moving to the top right corner of the frame. Go to free rotate 14% right. Make sure all layers is unchecked. Sharpen.
14.   Open Butterfly Element and resize by 65%. Copy and Paste as a new layer placing on the hairpin. Sharpen and give dropshadow previously used.
15.   Open Ribbon Element and resize by 55%. Copy and Paste as a new layer placing under the butterfly.
16.    Open Candle Element and resize by 65%. Copy and Paste as a new layer placing in front of the pillows. Sharpen and give dropshadow previously used.
17.     Open Goblet Element and resize by 70%. Copy and Paste as a new layer placing it next to the candle element. Sharpen and give dropshadow as previously used.
18.      Add a new layer and find your sparkles brush. Change your foreground colour to white #fffff. Add your sparkle covering your tube slightly and more onto the elements.
19.      Add your copyright and relevant license number.
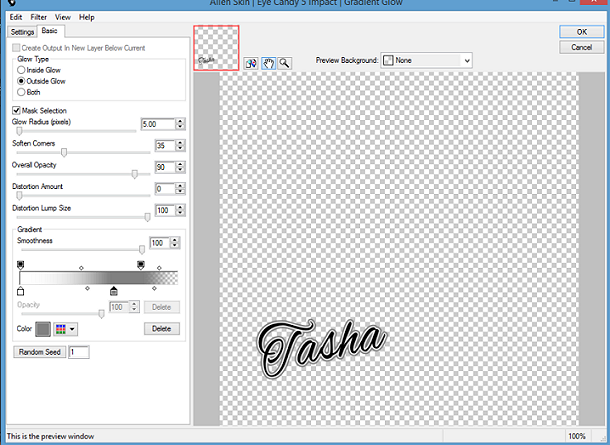
20.  Go to fonts and find your Alex Brush font. Add your name then give it a gradient glow settings as below.
gradient glow preview
Save as a PNG
That’s it we are done I hope you found my tutorial easy to follow. If you have any questions please don’t hesitate to ask. I would love to see your results so that I can share them on here.
Hugs
Sharon/Fairygem

Been A While

Been a While
So sorry things have stopped here since October but i have been really down since losing Mum to cancer in Feb last year and the closer it got to Christmas the more i withdrew from Online and Psp. Christmas was so hard buying presents for everyone but Mum and though we had a quiet Christmas here at home it was still strange knowing Mum wasn't there to celebrate with us. Dad bought us the most precious gift, well all the lassies in the family. When Mum passed the funeral home took a fingerprint of Mum's index finger and Dad got it made into a beautiful silver necklace for us. The pendant is in the shape of a tear on engraved on the back was a personal message from Mum. As we all opened our presents we sat and cried the four of us in awe as to the beautiful gift. In a way it made Christmas day a bit more bearable. My brother was heading down to Newcastle for Hogmanay and New Year so the girls and i decided we would head up to Aberdeen to be with Dad so that he wasn't alone. My niece was already there having spent Christmas with Dad and Chris but we wanted the house to be full of noise so it wouldn't be so bad on him. It turned out to be a good Hogmanay and New year, we played games talked about Mum and toasted her and others that have gone as the bells rang. We had lost Dad's best friend and my Uncle, Dad's brother during 2015 so it had really been a hard year for us all. Hayley my eldest daughter stayed at home as her partner was working and she was supposed to be helping out some people, plus she was looking after my dog while we were away. She came up on New years day with the grandbabies which my Dad was over the moon to see and of course my grandson loves his Great and couldn't stop cuddling him. Dad said it made his Christmas and New Year seeing all the family even for a couple of hours. 
Anyway i haven't touched Psp or come online properly till now and i think the break has done me the world of good as i feel ready to start creating again. 
Keep an eye on things as there will be some new templates, masks and Tutorials coming up.
Thanks for being so patience with me and a big thank you to all those that have helped me through all this.
Hugs
Sharon/Gem xxxx 

Thursday, 22 October 2015

Halloween Templates

Halloween Templates

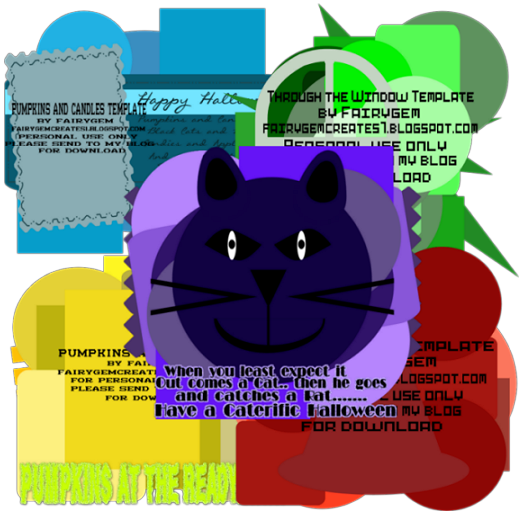
Hey all here are the templates for Halloween. I hope you make some brilliant tags using them. I would love to see your work so please feel free to email me so that i can get them posted. 
These templates are all my own idea so please do not copy and say they are your own work. 
If you download please leave a wee thanks it takes a second but lasts a lifetime.
Heres the preview of the Templates - There are five in total
Template Preview


You can download them 
Have fun 
Hugs
Sharon/Gem xx

Halloween Fun - New Halloween Masks

Hi all, i hope everyone is getting ready for Halloween and having fun picking out the Pumpkins, and getting them there Ghouls ready for the bairns coming round for Candy. 
I made some new Halloween Masks and am in the middle of making some template too so keep checking back.
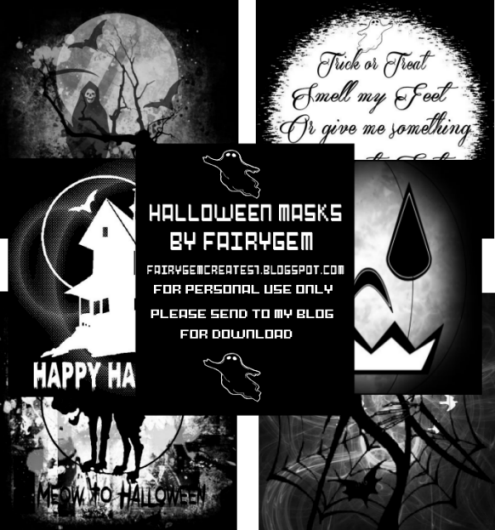
Here is a preview of the Masks there are 6 in total


FG Mask Preview


You can download them 
Please remember to leave some love when downloading it only takes a minute but lasts a lifetime.
Hugs 
Sharon/Gem  

Friday, 16 October 2015

Having a wee rant!!!

Sorry i am coming on here to have a major rant and i hope i don't upset people with this rant if so a big sorry to those whom i love and care about.
At the moment in America a video is going round of a nasty wee girl beating up on her so called friend, dragging her by the hair onto the asphalt and kicking utter shit out of this poor wee thing. 
What this girl did is despicable and she is being charged to the max for her actions over a stupid hoodie. 
Now here is where my rant begins. 
The mother of this girl put on facebook that if people had a problem with her daughter then to meet her at a place so she could 'kill them if needed'. I myself am a mother and would of done the same if people were threatening any of my kids with death, being beaten up badly etc. But what she did is called a spur of the moment madness. 
Now if this girl was any of my three daughters i would of blackened her ASS with my hand so she wouldn't be able to sit for a year never mind a day and i would of made her apologize for her actions. But this mother did none of this and well people can be dang cruel with their words and actions.
The mother and her daughter have been given death threats over the internet and facebook and when the cyber bullying is mentioned that person is a psycho schizophrenic or better yet in my case i am a crap mother because my arse of a husband walked out on my daughters and has no contact with them. 
Being divorced, separated etc does not make a bad person and anyone can go look at a persons' profile on FB and get the little average message that the person put up about themselves. 
I have had two people square me down because my Ex walked out and because i 'stuck up' for this mothers actions. 
The first one went onto my FB and got my details then proclaimed that my ex walked out to get someone smarter!!!! 
The second one put that one of the people trying to get through to people that what they are doing is cyber bullying is called a psycho schizophrenic for no other reason that what he is saying is true. I then asked this person if she was St J*de to which i got the first lot of abuse then she came on and followed on with the abuse about me being a single parent. 
OMG why do people do this is that the best they can do when they don't like what people are saying. This wee girl is only 22/23 and thinks she knows the world better than anyone and her mother taught her the difference between right and wrong as a single parent yet my own Children and those who know me know my kids weren't bought up right because my ex husband walked away. If that is the way her mother bought her up she must be so bloody proud because she can dis and threaten anyone that she doesn't like and slander them and thats ok coz she was bought up right!!!!
Hello if my kids ever threatened someone they didn't know wish them dead they are scum a CUNT and i use that word loosely as its my one pet hate word i would beat the crap out of them then make them retract what they have put on. 
THAT IS BEING A PARENT AND TEACHING YOUR CHILDREN THE DIFFERENCE BETWEEN RIGHT AND WRONG AND IF THAT MAKES ME A BAD PARENT THEN SO BE IT MY KIDS HAVE NEVER BOUGHT TROUBLE TO MY DOOR THAT HASN'T BEEN DEALT WITH THROUGH THE PROPER CHANNELS. THEY DON'T TOUCH DRUGS ETC AND GO TO CHURCH EVERY SUNDAY. I THINK THAT MAKES ME A BETTER MOTHER AND I AM VERY PROUD OF HOW MY DAUGHTERS HAVE TURNED OUT.
ok rant over and again if i have offended anyone i apologize from the bottom of my heart i do not like to offend or preach to anyone without first preaching to myself
Hugs to all 
Sharon/Gem